Tiffany08's Posts
Nairaland Forum › Tiffany08's Profile › Tiffany08's Posts
1 (of 1 pages)
Things You’ll Need: * iTunes * TunePat Audio Converter * License to the music you want to convert SanDisk Sansa e200 Series plays MP3 and WMA music. For iTunes music subscribers, TunePat Audio Converter provides a perfect solution for converting iTunes music to MP3 and unprotected WMA for SanDisk Sansa e200 Series. TunePat Audio Converter uses the Virtual CD burning technology which emulates the whole workflow of burning music to normal CD-R/RW disc: CD ripping, CD burning, MP3 encoding are automatic and with the fastest speed. Its ability to convert DRM protected music files into regular MP3 files makes it a perfect solution for people who purchase their music online but have compatibility issues with their SanDisk Sansa e200 Series, 3GP phone, Zune, PSP, and more. Step1 Set mp3 or wma as output format in TunePat Audio Converter: * Run TunePat Audio Converter * Click Settings button on the top right window * Browse to choose a file folder for storing the converted songs * Choose mp3 as output format * Check the ID3Tag options Step2 Burn iTunes music files using TunePat Virtual_CD_RW in iTunes: * Run iTunes * Create a new playlist * Add music files which you would like to burn to the playlist * Click Burn Disc button at the bottom right * Choose TunePat Virtual_CD_RW as the CD burner * Select Audio CD as Disc Format * Check the "Include CD Text" option * Click Burn button to start burning Step3 Transferring converted music files to Sansa e200: * Connect Sansa e200 to the computer * Drag and drop files from your computer to Sansa e200 by using a variety of music software programs to transfer/synchronize your files * In MTP mode as long as the files are WMA or MP3, they can be dragged into the Media folder. Otherwise, they can be dragged into the Data folder (these files will not appear on the player) * In MSC mode, files/folders can be dragged/copied to the device |
Recently, Dell has become a major player in the PocketPC arena thanks to its Axim line and attractive price. As we all know, Dell PDA Axims can handle WMA and MP3 music, but they cannot support protected audio files such as M4P, AAC, M4B, WMA, AA, OMA, etc. If you want to use iTunes DRM protected audio files on your Axims, you have to convert them to WMA or MP3 first. [B]At present, there are three methods for removing DRM from the protected audio files:[/B] 1. Burn the protected music files to CD-R or CD-RW disc to make an audio CD within iTunes or other media player. 2. Use recording software such as NoteCable. It can record any copy-protected music and audio book files (M4P, WMA, AA and M4B) as they are being played and save the recordings as unprotected audio files (MP3, WMA or WAV). 3. If you don't have a physical burner, you may use a virtual burner software such as TunePat, which works as a CD burner emulator. Since the virtual CD emulates your computer RAM and hard disk as erasable CD-RW drive (Virtual CD-RW), the converting speed is 10 times faster than burning music to physical CD or using recording tricks. [B]To convert the DRM music to WMA or MP3 using TunePat with iTunes, you can follow the steps below:[/B] 1. Run TunePat, and set wma or mp3 as the output format. 2. Run iTunes, and choose TunePat Virtual_CD_RW as the CD burner. https://www.wikihow.com/images/9/95/Set_as_default_burner_843.jpg 3. Click the Burn button, and the protected music files will be automatically burned to the selected format (WMA or MP3). After the DRM protected audio files are being converted to WMA or MP3 format, you can either connect your Dell PDA Axims to the computer using a cradle or a sync cable to import the WMA or MP3 files to your Axims. |
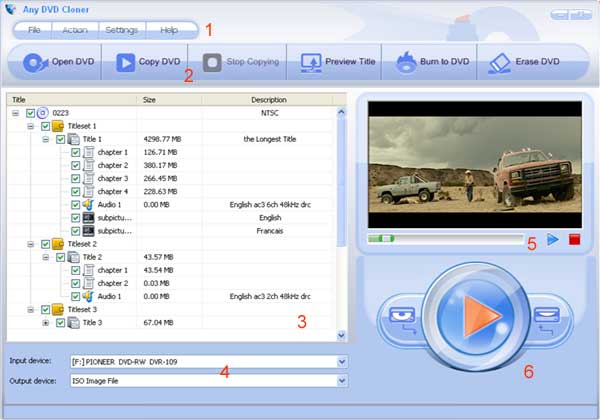
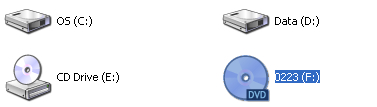
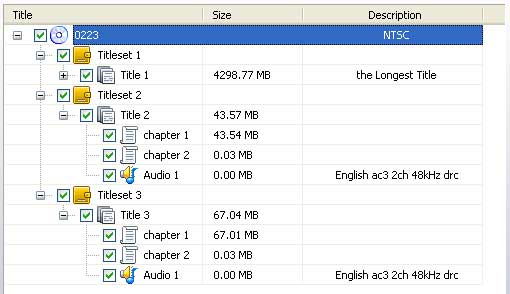
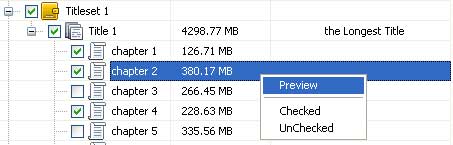
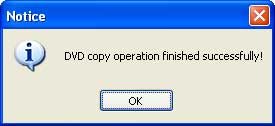
Most DVDs are designed to prevent you from making copies. The first preventative measure is encryption. Commercial DVD titles are often encrypted, which prevents you from either copying them to your hard drive, or if you manage to do so, being able to play the resulting files. There are three most common forms of DVD copy protection namely Macrovision, Content Scrambling System (CSS), and more recently Sony ARccOS. Most DVD burning software does not work on a copy protected DVD. For example; Nero users are forced to find a third party DVD ripper if they want to burn a copy protected DVD. To remove the protection from the purchased movie DVD, DVDSmith Movie Backup will help you to remove protection and make clones of your DVD movies to the hard drive either completely with all extras or just the main movie only. The backup speed is super (only about 15 minutes for DVD-5 or 25 minutes for DVD-9). DVDSmith Movie Backup is a freeware. If you need to burn a copy protected DVD to DVD disc, Any DVD Cloner is your best choice! With Any DVD Cloner, you can easily back up any movie DVD to DVD+R/RW, DVD-R/RW disc, make clones of your favorite DVD movies on DVD in just a few clicks. These working copies allow you to play your DVDs on home and computer DVD players every day without the inevitable risk of getting your originals scratched or damaged. You get disc protection with no loss of playback quality. https://www.any-dvd-cloner.com/images/work-space.jpg System Requirements • Windows Vista/XP • Pentium II 500 MHz or above • 512 MB or above of RAM • 10 GB of Free Hard Disk Space • A DVD-R(W) or DVD+R(W) Drive The operation of Any DVD Cloner is very simple. After only several steps, you can copy protected or unprotected DVDs to ISO file, hard disk or DVD discs. [B]1. Insert a DVD disc into the DVD drive[/B] The logo of your DVD drive will be changed into a disc shape with disc name as below: https://www.any-dvd-cloner.com/images/insert-dvd.jpg And in Any DVD Cloner, Input Device section will show the current DVD drive where the disc is loaded: https://www.any-dvd-cloner.com/images/input-device.jpg (Note: This disc named 0223 is for illustration only, since that the disc name will be loaded automatically according to your disc. And if you have virtual drive installed, and load a DVD ISO in it, the effect will be alike.) [B]2. Load Source DVD[/B] Press the Open DVD button, then the file tree of this DVD will be loaded in the DVD explorer section: https://www.any-dvd-cloner.com/images/button-open-dvd.jpg https://www.any-dvd-cloner.com/images/dvd-explorer.jpg [B]3. Select clips to be cloned[/B] In the DVD explorer, you are able to select the clips to be cloned. Below example skips some chapters and subtitles, and omit titleset 1 and 2. You can also select any clip and press Preview Title button, or right click on the title and select Preview, to watch it in th preview window before cloning: https://www.any-dvd-cloner.com/images/preview-title.jpg [B]4. Choose output device[/B] In the drop down list of Output Device, there are many options. They can make different kinds of clone from the source DVD: https://www.any-dvd-cloner.com/images/output-device.jpg ISO Image File: this option will create ISO image file on hard disk; DVD Folder: this option will backup DVD to local hard disk as folder; Source DVD drive*: in this illustration, F: drive is the source DVD drive; remember not to select this one; Output DVD drive*: no other DVD burner, or many other DVD burners; this depends on your computer hardware configuration. [B]5. Start cloning [/B] Different clone types come with different output device options: 1). If choose ISO Image File, Any DVD Cloner will ask you where to put the ISO file; 2). If choose DVD Folder, it will popup Browse For Folder window to let you set the output backup folder; 3). If choose another DVD burner, it will burn selected clips on another DVD. After selecting clone type, click the red triangle Start Copy button on the right panel, then Any DVD Cloner will start cloning operation: https://www.any-dvd-cloner.com/images/start-cloning.jpg When below message prompts, your DVD is cloned successfully: https://www.any-dvd-cloner.com/images/operation-finished.jpg |


1 (of 1 pages)