Dudude's Posts
Nairaland Forum › Dudude's Profile › Dudude's Posts
1 (of 1 pages)
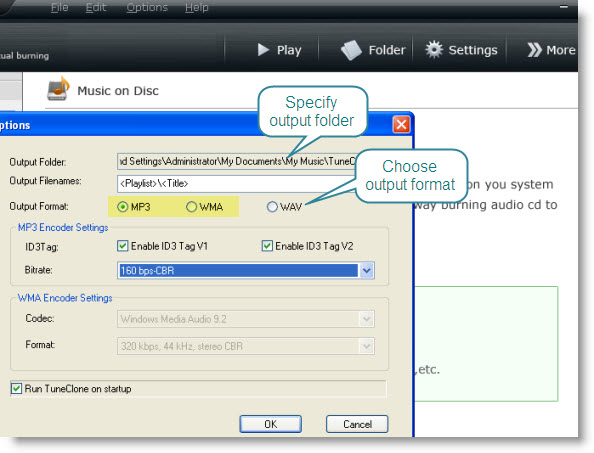
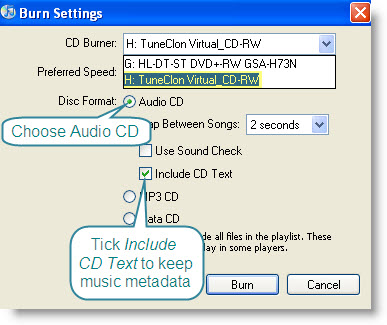
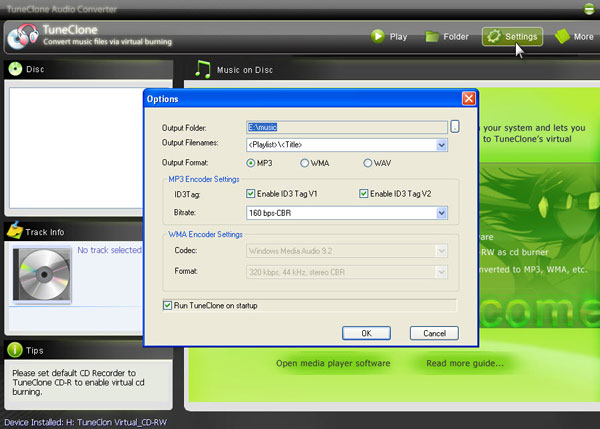
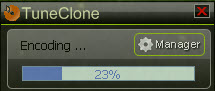
Are you annoyed by iTunes DRM? Do you want to remove it because you want to play the iTunes music on non-Apple MP3 players like PSP, Zune, Creative Zen, BlackBerry, PS3, iriver, Walkman, mobile phone MP3 player, etc, use it as background music in a home video, or anything else that DRM limits it to do? Many people know you can remove the DRM from iTunes music by simply burning the song to a CD, and ripping it back over, losing very little quality (if settings are correct): 1. Insert a CD-R or CD-RW disc into your CD-ROM drive. 2. Burn your playlist to make an audio CD. You cannot select the "MP3 CD" option since it requires the DRM protected iTunes music files be converted to unprotected MP3, WMA or WAV files. 3. After the audio CD is successfully burned, insert the disc into your CD-ROM drive again. Then you can use iTunes to import the music tracks on the burned disc as MP3, WMA or WAV files. And the method I am going to introduce does the same exact thing but you will not need a CD-RW disc, a CD ROM drive, or even need to burn anything! It's that simple. Let's show you how to perform this. We are going to be using a program called TuneClone M4P Converter. TuneClone M4P Converter is basically a program that acts as a virtual CD drive that allows you "burn" MP3 from iTunes and "rip" it. TuneClone "lies" to your computer saying that you have a CD-RW drive that it will burn to (like Alchohol 120%). You can use this to move your library of M4P DRM protected music to the MP3 format that you can use on any player out there worth its salt. This is a useful tool for anyone looking to break their relationship with the iPod. The best part is that it maintains all of the music file's metadata. Below is the step by step tutorial that shows how it works: 1. Create a new playlist in iTunes. 2. Add the protected songs to your playlist. 3. Launch TuneClone M4P Converter. Click the "Settings" tab. In the pop-up window, you can specify output folder, output file name format, output format (MP3, WMA or WAV), etc for the output files. Note: You can check whether TuneClone virtual CD drive is successfully installed and where it is installed in the bottom left corner of the interface. https://farm4.static.flickr.com/3259/3172966730_bcb8cf430d_o.jpg 4. In iTunes, click the "Burn Disc" button. 5. In the pop-up window of "Burn Settings", select "TuneClon Virtual_CD-RW" from the "CD Burner" drop-down list, click the radio button next to "Audio CD" and tick "Include CD Text" option. Click "Burn" to start burning. https://farm4.static.flickr.com/3326/3172966736_419a16f6c7_o.jpg 6. Upon the completion of burning the disc and encoding the music, you can open the TuneClone manager screen to show all the converted music files. To locate the output folder, simply click the "Folder" tab on the interface. |
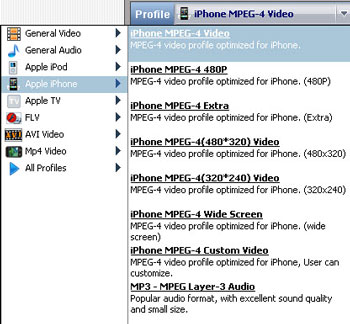
This is for all those iPhone 3G owners still in fix and searching for ways to watch videos on your new gadget. Today I'll let you know how to watch DVD movies and videos from other sources on your iPhone. To begin with you need to know the formats your iPhone can play. The Video Formats Supported by iPhone Include H.264 video, up to 1.5 Mbps, 640 by 480 pixels, 30 frames per second, Low-Complexity version of the H.264 Baseline Profile with AAC-LC audio up to 160 Kbps, 48kHz, stereo audio in .m4v, .mp4, and .mov file formats; H.264 video, up to 2.5 Mbps, 640 by 480 pixels, 30 frames per second, Baseline Profile up to Level 3.0 with AAC-LC audio up to 160 Kbps, 48kHz, stereo audio in .m4v, .mp4, and .mov file formats; MPEG-4 video, up to 2.5 Mbps, 640 by 480 pixels, 30 frames per second, Simple Profile with AAC-LC audio up to 160 Kbps, 48kHz, stereo audio in .m4v, .mp4, .mov file formats The Audio Formats Supported by iPhone Include MP3, MP3 VBR, WAV, AAC, Protected AAC, Audible (formats 2, 3, and 4), Apple Lossless, AIFF Now to watch the DVD movies and videos what you need to do is simply rip the DVD movies or convert the video files into a video/audio format supported by iPhone 3G. After you have the files in a compatible format upload them into your iPhone through the sync of iTunes Library. To convert the video files you need to download the Clone2Go DVD to iPhone Converter. So are you all set? Let's start the process now. Step 1 First open the iPhone converter. Add DVD video or audio files. If the DVD movie you need to convert is on your disc drive, click on the DVD button. In case you have saved it in a hard drive, click the Add video button and locate the folder. Locate the path of the folders VIDEO_TS and AUDIO_TS. the .vob files appear. Select the .vob files and click OK. By clicking on the Add video button you can also import video from various other sources. https://farm4.static.flickr.com/3514/3265307581_8e13074b8c_o.jpg The formats that are supported include Audio Files (*.mp2,*.mp3,*.wav) Windows Media Player(*.avi,*.wmv,*.asf,*.dvr-ms,*.ms-dvr) MOV/MP4 Files(*.mov,*.mp4,*3gp,*.mp4,*.qt) Real Media Player(*.flv) Flash Video Player(*.mkv) MKV Video Player(*.avs) AviSYnth Scripts(*.mpg,*.vob,*.dv,*.m1v,*.m2v,*.dat,*.amv) Once the DVD or video has been been imported you can watch it on the main interface. Here's your chance to pick the DVD or video you wish to play on your iPhone. Select the portion you want to play. Drag from the Start to trim and Stop to trim button to select the segment. Step 2 To choose the proper profile look for the drop-down list of Profile option on the right. Choose the profile that suits you best. Like for instance if you want to play the video in MPEG-4 choose the iPhone MPEG-4 Video from the list of profiles. https://farm4.static.flickr.com/3349/3265307589_6019b08779_o.jpg The Clone2Go DVD to iPhone Converter also allows you to convert the online YouTube Videos for your iPhone 3G. Step 3 Click on the Start Encode button to start converting videos or ripping DVD's for iPhone 3G. Step 4 After the ripping or conversion is complete, go to the Folder button on the main menu to get the converted video/audio files. You are done. Now upload them into your iPhone through the sync of iTunes Library and start playing. |
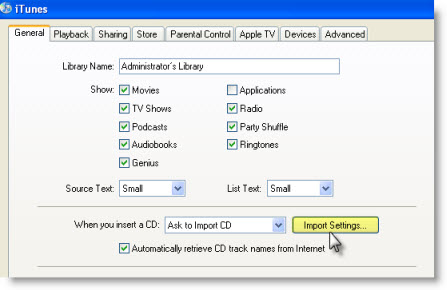
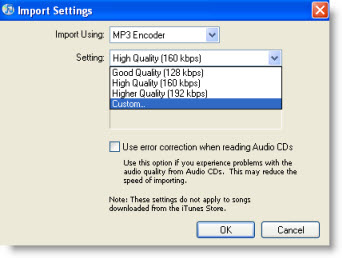
The other day Apple announced that it was making about 80% of the iTunes store DRM free, with the remaining 20% to follow shortly. DRM-free iTunes means that in theory you should be able move your music to other computers and devices easily, But, iTunes Plus DRM-free music comes in .m4a format which is based on the MPEG-4 part 14 standard. Problem is, far more devices don't recognize what to do with .m4a than do (and its video sibling, .m4v). MP3 is a far more popular format. So, can you convert .m4a files into.mp3 files? Yes you can, and you can do it all from within iTunes (iTunes 8 )! Here's how: 1. Click on Edit -> Preferences, . From the General tab click on Import Settings, button. https://farm4.static.flickr.com/3313/3181549348_64239efa83_o.jpg 2. Change the Import Using drop down box to MP3 Encoder. 3. From the Settings drop down box select Custom, and choose a Stereo Bit Rate of 256Kbps. https://farm4.static.flickr.com/3334/3180713931_1ee5ca06ab_o.jpg 4. Click OK, OK and OK. 5. Now find a file that you want to convert, right-click on it and select Create MP3 Version and an MP3 copy will be created. Note that you'll have now both versions of the song in your library, so you’ll have to do a little housekeeping. Note that if you want to upgrade your previously purchased iTunes tracks to DRM free, you need to pay 30 cents per song. You can't pick and choose which tracks to upgrade. Start by going to the iTunes Store home page, and clicking on "Upgrade My Library" under the "Quick Links" heading. Once there, you'll see a list of all the songs and albums that are available for upgrading, with a price next to each. But the important number to look at is the price next to the buy button, since that's how much it'll cost to upgrade your library. So if have an extensive music collection with many songs (i.e. 500 songs) purchased from iTunes and wanted to get them freed from DRM protection, you will have to pay USD150 for the upgrade. And in order to listen to them with your MP3 player or mobile phone music player, you still need a further step - convert the AAC music to MP3 one by one (as the steps show above). It not only messes your iTunes library up but also costs you a great deal of time and money. Therefore, if you really want to play the previously purchased music tracks from iTunes Store with MP3 players or mobile phone music players, you just need to get TuneClone Audio Converter to help to remove the iTunes DRM protection and convert the iTunes music to the popular MP3 format. Also, if you get iTunes Plus DRM-free music files and want to play them with the MP3 players or mobile phone music players incompatible with Apple AAC format, you can still use TuneClone to turn them into MP3 format, saving the time to create MP3 version for the songs one by one. |
TuneClone can also be used to remove DRM from protected WMA music files and convert protected WMA to MP3, WAV and unprotected WMA. Here is a step by step tutorial showing how to convert DRM protected WMA to MP3 for Apple iPod: http://www.tuneclone.com/how-to-convert-wma-to-mp3-for-ipod.php |
Are you annoyed by iTunes DRM? Do you want to remove it because you want to play the iTunes music on non-Apple MP3 players like PSP, Zune, Creative Zen, BlackBerry, PS3, iriver, Walkman, mobile phone MP3 player, etc., use it as background music in a home video, or anything else that DRM limits it to do? Many people know you can remove the DRM from iTunes music by simply burning the song to a CD, and ripping it back over, losing very little quality(if settings are correct): 1. Insert a CD-R or CD-RW disc into your CD-ROM drive. You'd better use CD-RW disc as it can be used for more than once. 2. Burn your playlist to make an audio CD. You cannot select the MP3 CD option since it requires the encrypted iTunes music files be converted to unprotected MP3 files. 3. After the audio CD is successfully burned, insert the disc into your CD-ROM drive again. Then you can use iTunes to import the music tracks on the burned disc to MP3 files. And the method I am going to introduce does the same exact thing but you will not need a CD-RW disc, a CD ROM drive, or even need to burn anything! It's that simple. Let's show you how to perform this. We are going to be using a program called TuneClone. TuneClone is basically a program that acts as a virtual CD drive that allows you "burn" MP3 from iTunes and "rip" it. TuneClone "lies" to your computer saying that you have a CD-RW drive that it will burn to (like Alchohol 120%). You can use this to move your library of M4P DRM protected music to the MP3 format that you can use on any player out there worth its salt. This is a useful tool for anyone looking to break their relationship with the iPod. The best part is that it maintains all of the music file's metadata. Below is the step by step tutorial that shows how it works: 1. Download TuneClone from http://www.tuneclone.com/index.php and install it. TuneClone is fully compatible with Windows XP and Windows Vista. A virtual CD Burner will be installed. This virtual CD-RW will be used to convert music files. 2. Make settings at TuneClone https://farm4.static.flickr.com/3260/2894528182_098dee4dd3_o.jpg Click the Settings button at TuneClone. In the pop-up window, you can specify the output folder, output filenames, output format, etc. for the output files. Note: Apart from MP3, TuneClone also allows you to convert iTunes M4P to WAV and unprotected WMA. Tip: You can get the output protection removed music folder by clicking the Folder button after the whole process. 3. Make settings at iTunes(iTunes 8 ) Create a playlist, and then add the files you want to convert into the playlist. https://farm4.static.flickr.com/3050/2893683885_a8de298a12_o.jpg After you have created the playlist ready to be burnt, click the Burn Disc in the bottom right of iTunes. In the pop up window of Burn Settings, make the settings as highlighted below: https://farm4.static.flickr.com/3174/2894525846_3e89f5735b_o.jpg 4. Start to burn Click the Burn button to start burning. After the burning gets started, TuneClone will automatically convert the music file to MP3, WMA or WAV. You can open the manager screen to show all the converted music files. https://farm4.static.flickr.com/3110/2894528178_9783fd5c45_o.jpg The most important step is to choose the CD burner. Then the software can convert the music files automatically. It is exceedingly easy when you want to batch convert lots of files. |
Basically, when you buy music from iTunes, it comes with a copyright protection called DRM. These DRM-protected songs are locked so that they only work with Apple MP3 players. That means that if you bought a Microsoft Zune, you cannot use iTunes music. So, what is the solution? You have to burn a CD. When you do this, the DRM is removed (because the music is converted to a non-DRM-compatible media). After you burn the CD, you can rip it to your PC as an MP3 file which no longer has DRM. Alternatively, you can use TuneClone (http://www.tuneclone.com/index.php). https://farm4.static.flickr.com/3291/2998637558_d1c1a05c1c_o.jpg TuneClone makes a virtual CD-ROM drive, tricking your PC into believing that you are burning a CD. Therefore, the DRM is removed without wasting a CD. Here is a link to a tutorial using TuneClone and iTunes 8: http://itunesm4ptomp3./2008/09/16/convert-itunes8-music-to-mp3/ |


1 (of 1 pages)