Tutorial On Git And Github - Programming - Nairaland
Nairaland Forum › Science/Technology › Programming › Tutorial On Git And Github (2761 Views)
| Tutorial On Git And Github by kachbytes(op): 10:15am On Apr 07, 2019*. Modified: 8:07am On Apr 13, 2019 |
Hi guys, I'm writing a tutorial on Git and GitHub, for those who may find it confusing. The aim is to get you started with Git and Github, so you can contribute to software projects and applications. I do not enjoy the nairaland UI, but will post the contents here too for those who know how to 'manage'. For those who do not, a Markdown version of the tutorial is hosted on my GitHub. I'd advise you use the links to access the tutorial. Feel free to clone, fork, and leave feedback. I really appreciate those. Git-Hub repo Lessons (to be updated) An introduction to Git and GitHub Installing and setting up Git Git Bash and the Command line Repositories and Version Control Commiting your work Working with remote repositories Working with remote repositories 2 I usually update the notes on weekends. Hope you enjoy them. 3 Likes |
| Re: Tutorial On Git And Github by kachbytes(op): 12:00pm On Apr 07, 2019 |
PART 1: An Introduction to Git and GitHub The software we use on our various computer devices all run on code; without code, your phone, and most modern electronics, would just be boring, lifeless, metallic boxes. Code is what software is made of, and it is written by people we call programmers. The web sites and applications you use today are rarely written by a single programmer. Programmers usually work in teams, building and crafting software by writing multiple lines of codes across various files. The code they write adds new features, fixes issues, or improves old features. The software on your device goes through a lot of refining to make it work better, faster, and nicer. As a project grows (especially for large programs or software), it becomes important to record or monitor the changes that occur over time. There are various ways to watch, or track, these changes. These methods are collectively called version control systems -- systems designed to track various versions of a project. This is where Git comes in. Git is a version control tool, a program that helps monitor changes in your project. It can be an incredibly difficult tool to understand, but once one grasps it, it becomes an indispensable tool, very useful in multiple ways. And the great thing is you don't have to be a programmer to find Git useful - designers, writers, and others from various fields have found it useful. GitHub is an online, social website that runs on Git - think Git on steriods. Programmers can save their projects on GitHub and easily share it with other colleagues. GitHub also adds some extra features to Git, mostly aimed at improving collaboration among coders. This tutorial will teach you the basics of Git and GitHub. At the end of this tutorial, you would learn how to work and collaborate with programmers worldwide. PREREQUISITES - You should be comfortable using a computer and the Internet. - Little knowledge of the command line is required. Don't worry if you have never heard of it - the tutorial also contains a guide to the command line. - Basic knowledge of HTML and CSS. - A recent version of Windows. This guide was written for Windows users. Linux users might find it useful too. 1 Like |
| Re: Tutorial On Git And Github by kachbytes(op): 12:07pm On Apr 07, 2019 |
PART 2: Creating a project directory and installing Git In this section, we will be working on a fictional web project called Git-It... get it? Let's begin. On your system, create a folder in any location of your choice. I'd prefer you save it in your "Documents" folder for this tutorial. Name the folder "Git-It". This is the folder that will contain all the files for our project. https://github.com/Kachi-Awaji/GIT-intro/raw/master/images/1-NewFolder.png Screenshot of my Git-It folder in Documents Our folder will contain the following files: https://github.com/Kachi-Awaji/GIT-intro/raw/master/images/2-FolderStructure.png git.png (an image file containing the Git logo). index.html (the homepage of our Git-It project). main.css (a css file to style our homepage, make it look nice). Create the html and css file in your folder. Both files should be empty. You can search for and download the Git Logo. We will create a simple webpage, containing a header, an image, and a short paragraph. https://github.com/Kachi-Awaji/GIT-intro/raw/master/images/3-GitItHomepage.png Screenshot of the final version of Git-it homepage. And that's it, our project folder is set up - we can begin coding our project, adding lines of text to the empty files that currently sit in the folder. To implement version control in our project, let's download and install Git. Installing Git First, go to https://git-scm.com/downloads, and click on the download link on the right. https://github.com/Kachi-Awaji/GIT-intro/raw/master/images/4-DownloadGit.png The download should begin once you click the Download button. After it is done, double-click the file you downloaded to begin the installation. This will start a series of dialog boxes, where you will make some settings before Git is installed. https://github.com/Kachi-Awaji/GIT-intro/raw/master/images/5-GITinstallation.png Installing Git Click Next to begin. The next dialog box lets you select a folder on your system where you would like to install Git. You don't need to change anything here so click Next to move forward. https://github.com/Kachi-Awaji/GIT-intro/raw/master/images/6-DestinationLocation.png Select installation location On the next screen, you can select some components you want installed with Git. The default options are fine and don't need further tweaking. Click Next to continue. https://github.com/Kachi-Awaji/GIT-intro/raw/master/images/7-ComponentsSetup.png Components Setup https://github.com/Kachi-Awaji/GIT-intro/raw/master/images/8-CodeEditor.png Code Editor This dialog box lets you pick your preffered text editor. Git is a command-line tool (more on that later), and works mostly by typing text or commands on screen. Click the drop-down to pick your text editor, or click Next to leave it as default. The next few dialog boxes contain features for advanced users. Click Next to go through them, until the installation begins. https://github.com/Kachi-Awaji/GIT-intro/raw/master/images/9-InstallationFinally.png And that's it... well done!!! You have installed Git on your system. High-five. https://github.com/Kachi-Awaji/GIT-intro/raw/master/images/10-InstallationComplete.png Click Finish to close the installation dialog box. Well done. In the next class, we will talk about the command-line, and how it works with Git. You will create your first Git repository, and will be introduced to Git commands. 1 Like |
| Re: Tutorial On Git And Github by kachbytes(op): 8:08pm On Apr 07, 2019 |
Part 3: Git Bash and the Command Line In our last lesson, we created a folder for our project files and installed Git. We also talked about the importance of version control and collaboration when building large projects. This section is an introduction to the command line (also known as the terminal). At the end of this section, you should be comfortable using Git Bash, a special terminal for working with Git on Windows. What's the Command Line? Modern operating systems have what we call a Graphical User Interface (GUI)... nice pretty icons and fonts that convey meaning and can respond when we 'click' or 'tap' on them. Years back (more like decades), computer programs weren't that fanciful. Running computer programs was mostly a text-based activity - you had to type a bunch of commands into a program called a shell/terminal/command line. This required a lot of memorization, and people who learnt these programs were considered 'professionals'. Graphical User Interface made computers more user-friendly, much easier to use. Needless to say, most programs and software written today have a graphical interface. You use these programs by clicking on icons and buttons, and they usually come with menus and windows for writing documents, editing photos, or drawing illustrations. Microsoft Word, Photoshop and the Chrome browser are good examples. Programs designed to run in a terminal are called command-line programs. They have no icons or buttons. You interact with these programs using commands. Git is a command-line program, although some programs now offer GUI interfaces for performing Git functions. This tutorial won't be teaching you how to use those - learning the command line will require a more intensive effort, but is ultimately more rewarding. Opening the Git Bash Terminal To start Git Bash, perform the following actions Click the Windows or Start icon In the Programs list, open the Git folder Click the option for Git Bash. You can also type 'git bash' in the Start menu, and click Git Bash to start the program. https://github.com/Kachi-Awaji/GIT-intro/raw/master/images/11-GitBash.png If you see the screen below, we good... you've successfully launched the Git Bash Terminal https://github.com/Kachi-Awaji/GIT-intro/raw/master/images/12-GitBashPrompt.png Working With The Terminal A terminal (also called a shell) is a program that lets you work with command-line programs. Think of it as a robot waiting for you to give it a command to execute. You give it programs to execute by typing in commands. The Git Bash shell is a special terminal designed to work with Windows. Below is a short tutorial to get you started using it. Finding your way around the terminal If you have Git Bash opened, you should see a dark, blank screen with a few characters at the top. https://github.com/Kachi-Awaji/GIT-intro/raw/master/images/12-GitBashPrompt.png On the first line, there is some text written. awaji@harmattanhunter MINIGW64 This would be different on your system. The first part (before the @) is my username on my PC. The part after the @ is the name of my computer. It's not important you know what MINIGW64 means, so we can ignore that. So, the first line follows this format user@computerName MINIGW64 Hopefully, yours follows this format too. Let's move on. On the second line, we have a single character. $ This is called a prompt. It's where you will enter/type commands into the shell. We are now ready to learn a few shell commands. Basic Shell Commands The PWD Command The first command you will learn is pwd. pwd is short for print working directory. The "working directory" is the folder the shell is currently residing it. This command displays the current working directory. When you start a shell, the program takes a folder on your hard disk, and makes it its working directory. It's similar to the 'project folder' in Git, a point where all work takes place. To view your working directory, type pwd at the prompt and press Enter. https://github.com/Kachi-Awaji/GIT-intro/raw/master/images/13-PWD.png When you press Enter, the command runs and prints a result on the next line. In my case, the shell printed /c/Users/awaji The output of this command might look confusing, but it's really easy to understand. When you save files on your hard disk, they are not stored randomly. Rather, they are are organized in various categories using folders(directories). Think of a folder as a container for a group of related files. The Windows OS creates a few folders by default for organization (Documents, Music, Pictures, Scans). Windows also creates a folder on the hard disk for each user. These folders and files all reside on the hard disk. Using this information, let's interprete the output of the pwd command. The output of the 'pwd' program says (reading from right to left) I'm in a folder called 'awaji', which is in a folder called 'Users', which is stored on my hard disk, the C drive. This means any program or command I run will use this location as a sort of reference. Let's learn a few more commands to throw some light on this. The LS command The LS command (or list) shows the content of the current working directory. Enter ls at the command prompt to try it. https://github.com/Kachi-Awaji/GIT-intro/raw/master/images/14-List.png The ls command lists all the files and folders in our working directory. In my screenshot, it displays the contents of the 'awaji' folder. What if we would like to change our working directory, sort of move around or navigate through the folders on our disk? Well, there is a command for that too. The CD command This command is also known as the 'change directory' command. You use it to navigate through your filesystem (hard disk). Let's try it. In our last example, we ran the LS command and it printed a list of all the files and folders in our working directory. Type cd Documents to navigate to the Documents folder. https://github.com/Kachi-Awaji/GIT-intro/raw/master/images/15-Cd.png Type ls to view the contents of Documents. See if you can find the Git-It folder in the list. Exercise: Using the commands you have learnt so far, can you navigate to the __Git__-It folder? *Confirm you are in the __Git__-It folder by running the pwd command.* Other info: To go to a parent folder, use the 'cd ..' command. The ".." refers to parent folder. We now know enough about the command line to begin working with Git. In the next lesson, we will initialize our Git repo and begin to build our homepage. 2 Likes |
| Re: Tutorial On Git And Github by kachbytes(op): 8:33pm On Apr 07, 2019 |
[b]Repositories and Version Control[\b] Last lesson, we learnt how to use Git Bash. We also learnt a few commands to navigate, view, and list the contents of our directories. In this lesson, we will create our first Git repo, and begin working on our project files. I define a software as a way of thinking, a way of doing a particular task. Understanding how Git thinks is very important if you want to use it properly and efficiently. Version Control With Git For this lesson, we will be working in our project directory. Open Git bash and navigate to your project folder to begin. Configuring Git Before we create our first repository, we should make some changes on our git configuration. Remember that Git is meant for collaboration, right? How do programmers know who has made changes to the project? IDENTITIES Git comes along with a configuration tool that lets you set and update various information. Updating your identity is the first thing you should do after installing Git. This will be useful in the future, when you upload your repositories to GitHub. To add your name to Git config, type the following command git config --global user.name "Your name" To update your email, you type something similar git config --global user.email "youremail@yourdomain.com" To view your configuration setting, type git config user.name or git config user.email This will display the current name or email. Creating a repository Git uses what we call "repositories" to store information about your project's changes. This "repository" is a special folder Git creates in your project folder, when Git is initialized. Repositories are sometimes called 'repos'. To create a Git repository, in the terminal, type git init The terminal prints a message saying that a Git repository has been initialized in your project folder. To see the Git repo, type ls Wait... that didn't show anything. Where is the Git repo? Command line arguments Some of the commands you use in the command line will let you add options. Options are like special effects on commands; they make them do something special. The regular 'ls' command only lists files that are not hidden. Windows allows you to hide files, so they do not show up by default. To view files that are hidden, you will type ls with an option '-a'. This will allow ls list all files in a folder, hidden files inclusive. The git folder has a '.' in front of it. The '.' indicates that the folder is hidden. This folder is for Git-only. Not for you. It's where Git stores and monitors the changes you make as your project grows. In the next tutorial, we will learn how to make Git work for us. 4 Likes |
| Re: Tutorial On Git And Github by OpenYourEyes1: 6:54am On Apr 09, 2019 |
kachbytes:I use github too. I have a blockchain repo which I develop only on github unfortunately. I tried working locally but the current version of Git software works only 64bit OS (am not sure though). Do you have any link to 32bit version? You tutorial are good. Good job  |
| Re: Tutorial On Git And Github by kachbytes(op): 9:08am On Apr 09, 2019 |
OpenYourEyes1:Hi, I only just noticed this after you mentioned it. Here you go. OpenYourEyes1:Thank you very much. |
| Re: Tutorial On Git And Github by OpenYourEyes1: 9:12am On Apr 09, 2019 |
kachbytes:Wow. Thanks alot 1 Like |
| Re: Tutorial On Git And Github by kachbytes(op): 12:38pm On Apr 11, 2019 |
Commiting your work Last lesson, we created our first repository by initializing Git in our project folder. In this lesson, we will explore Git some more, learning a few new commands along the way. We will start working on our project files, and learn how to save (or commit) our changes in Git. We will talk about the index (staging area), and end the lesson by making our first commit. Checking the status of your repository The git init command creates a repository in your working directory (project folder). git init creates a hidden folder - a Git repository. This is Git's home in your working folder. From here, it will monitor the files in the directory, and store information about changes they go through as the project progresses. Let's begin by getting some information about our repository. In the command line, type git status. You should get an output similar to the one below. https://github.com/Kachi-Awaji/GIT-intro/raw/master/images/26-GitStatus.png The git status command prints a message that will be very confusing at first; it will feel like reading Chinese. Let's go through the important lines. On branch master We will talk about branches in more detail in a future lesson. All git projects begin on a branch called master. no commits yet Saving changes to your project on Git is called 'commiting' the changes. This messages shows we haven't made any commits to our repository yet. When we do make our commit, this will be updated. Untracked files: Notice the three files highlighted in red? Recognize them? When you intialize Git, you also have to tell Git what files to monitor in your project folder. Files that you ask Git to watch in your project folder are called TRACKED FILES. We haven't begun tracking any files in our project. To begin tracking files in our project, we use the git add command. Let's talk about this command a bit more... it is one of the most important Git commands to learn. Imagine Git has a list. On this list, it has the names of files in your project that you have asked it to 'track'. This list is empty when the repository is initialized. You will use the 'git add' command to include files on this list. Alright, less talking. Let's do an example. In our project folder, let's tell Git to track changes to our index.html and main.css files. https://github.com/Kachi-Awaji/GIT-intro/raw/master/images/27-GitAddCommand.png Check the status again. https://github.com/Kachi-Awaji/GIT-intro/raw/master/images/28-StatusAfterAdd.png Notice the status has been updated. No commits on the repository yet. There are two lines of green text below the "Changes to be committed" heading. These are the files we have 'staged' to be committed. The 'new file:' in front of the filenames indicates this is the first time we will be adding the files to the repository. The 'git.png' file is not being tracked. It won't be added to our commit. We are now ready to make our first commit. Git Commit A commit is like a savepoint in your project. You are essentially saying "My files are this way now. They may go through some changes in the future. I want to be able to return to the way they are now." To commit the files you staged (using the git add command is sometimes known as staging changes), type git commit -m "Commit title" Let's go through our new command. The 'git commit' command saves our changes to the local repository - 'local repository' here meaning the hidden git folder on in your project. For the most part, working with Git_ will be following these steps. Make changes to the files in the working directory. Add the files to the index(stage changes you want to commit) Commit. This is the basic Git workflow. Each git commit you make is a different version of the project... and Git stores these versions so you can go back to them, if you need to. That's the beauty of version control with Git. Every Git commit should have a message attached, that describes what the commit is about -- a short description of the changes you have made. This is important, as you would be working on the project with other programmers. The descriptions you enter will give them a clear picture of your contributions. Using only the 'git command' would open your text editor. This will let you type in your description before the commit is complete. This can be confusing sometimes. The -m option is an easier command to learn. Using the -m option lets us type in our description at the end of the command. One thing is important though - the description must be in quotation marks (""  . .Alright, let's make our first commit. git commit -m "My first commit" The commit command prints a message showing information about itself. Our focus will be on the first line. https://github.com/Kachi-Awaji/GIT-intro/raw/master/images/31-FirstCommitMessage.png The output indicates that we have commited our changes to a branch called master. We will talk about branches in a future lesson, but it's good to remember that every git repository begins on a master branch. (root-commit) signifies that this is our first commit. On its' right, there is what looks like a bunch of random numbers and letters. What you have on your system would probably be different from mine. What do they mean? Every time you make a commit, Git gives that commit a special name to identify. This name is generated using your content, and will uniquely identify the commit in the repository. Technically, it is called a SHA-1 hash. Working on our project files Next, we will begin to add code to our files. Add the code below to your project files. Add this to your index.html <!DOCTYPE html> <html lang="en"> <head> <title>Git-It</title> <link rel="stylesheet" href="main.css"> </head> <body> <h2>Learning Git</h2> <img src="Git.png" alt="Git Logo"> <p>The most popular version control software</p> </body> </html> Add this code to your main.css html, body{ padding: 0; margin:0; } body{ background-color: #29163b; padding-top: 40px; } h2{ color: #e7dcf2; font-size: 48px; text-align: center; letter-spacing: 4px; text-transform: uppercase; } img{ display: block; margin: 0 auto; width: 15%; text-align: center; } p{ text-align: center; color: #bbbb73; letter-spacing: 4px; font-size: 16px; text-shadow: 1px 1px 1px #1d1111; } Our files now have some code. You can double-click the index.html file to view the webpage in your browser. Type 'git status' to see updated information about the repository. https://github.com/Kachi-Awaji/GIT-intro/raw/master/images/32-GitStatusBefore2ndCommit.png Our status now indicates we have made changes that have not yet been staged. Both files have been marked as modified. It also notes we have one untracked file (our git logo). Let's stage our changes, and make a new commit. git add index.html main.css The git add command also lets you add multiple files at once. Just list them after 'git add' and put a space before each file name. Running git status again will show the files have been staged, and are ready for commit. We are now ready to make our second commit. Let's do that. git commit -m "Added code to index.html and main.css files" Remember, your commit message should be a short description of your changes and work on the project. Now, we have two commits in our repository. The commits are a history of our project, and you can use the git log command to view your repo's history. Type 'git log' in the command line. https://github.com/Kachi-Awaji/GIT-intro/raw/master/images/37-ViewingHistory.png The list shows the most recent commit at the top. Let's take a look at our most recent commit. https://github.com/Kachi-Awaji/GIT-intro/raw/master/images/38-CommitBlock.png At the top, it shows the SHA-1 hash of the commit. The SHA-1 hash usually contains about 40 characters. You don't have to memorize or use the full hash, you can use the first seven characters to identify the commit. We will use the hash when we want to revert our project to the way it was at a particular commit. It also shows the author of the commit, and author's email. The date and time the commit was made is also shown. At the bottom is the description/message you tagged along the commit - in this case, "added code to index.html and main.css files". So far, so good. This lesson was a long one. We started using version control on our project, and made our first commits. In the next lesson, we will continue working our project, making changes and adding new commits. See you soon. 1 Like |
| Re: Tutorial On Git And Github by kachbytes(op): 8:10am On Apr 13, 2019 |
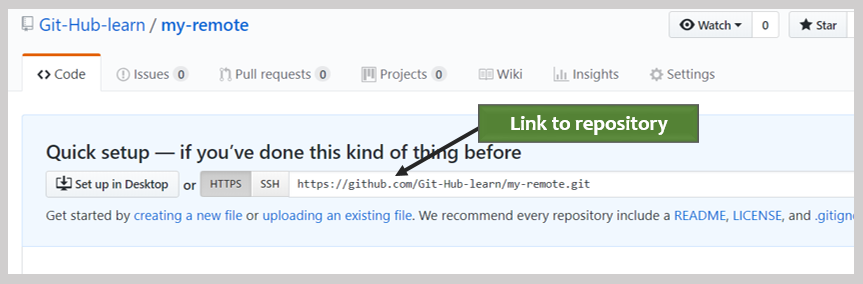
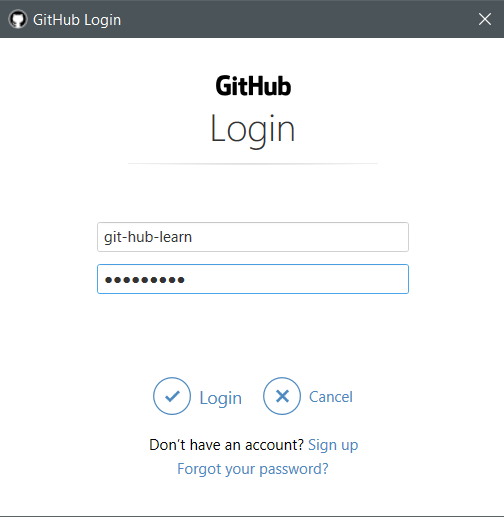
Working with remote repositories In the previous section, we created a local repository and made our first commits. We also learnt to use the git commit command to save changes to the repository, and learnt the git log command for viewing our repo's history. What if you'd like to share your repository with other programmers? You can do that using Git and an online service that lets you host Git repositories. In this lesson, we will learn to create remote repositories using GitHub, an online code-hosting platform. Git is a distributed VCS (version control system). This means the git repository in your project folder can be shared with others, and they can work on your files and make changes as they wish on their own systems. This will let them have not just access to your files, they'd also be able to view the history of the project too(view the commits you have made). You can share your repository with others by hosting them online. Some services that let you host repositories online include GitHub, Bitbucket, GitLab and a few others. GitHub is the most popular and will be our focus in this series. Using GitHub To host repositories on GitHub, create an account by visiting their website. You should verify your account too; click on the link in an email that will be sent to you after you register. For this series, I have created an account on GitHub called Git-Hub-Learn. It will host repositories for the series which you will be working with later. When you create a repository on your system using Git Bash, the repository is stored on your PC. GitHub lets you create repositories that are hosted on its servers... Creating a repository on GitHub To create a repository on GitHub, in the upper-right corner of any page, click the + symbol to get a drop-down. Click New repository to create a repository. https://raw.githubusercontent.com/Kachi-Awaji/GIT-intro/master/images/43-CreateRepoLabel.png You can choose to make your repository either public or private. Public repositories are visible to the public, while private repositories are only accessible to you, and people you share them with. Congratulations! You've successfully created your first repository on GitHub. Next, we will link our local repo with our remote repo so our project will be accessible to others. Linking your local repo to a remote repo So, you have a Git repository sitting on your system. Now you want to share your project to the world, so others can have a copy on their systems. Believe it or not, all you need is two commands to do so. The git remote add command lets you connect one local repository to a remote one. It takes two other values - a repo name(the remote repo is usually called origin), and a link to the remote repository. The link to the remote repository is shown on GitHub. https://raw.githubusercontent.com/Kachi-Awaji/GIT-intro/master/images/41-RepoSettings.png Repo links on GitHub usually follow a pattern the URL to github.com : https://github.com/ your user name : Git-Hub-learn/ the repo name : my-remote.git so, to link our Git-Hub repo, Git bash into your project folder and type git remote add origin https://github.com/Git-Hub-learn/my-remote.git That's all. The command line doesn't print any output so you might not notice any change. To see the changes, type git command --list. At the bottom of the output, you should see remote.origin.url which contains a link to your remote repository. Next, we will 'push' our local repo to our hosted one. A 'push' moves the commits in your local repository, to the remote repository. Use the git push origin master command to push your local save to GitHub. origin indicates we are pushing the changes on our master branch to our remote repository. This will cause Git Bash to show you a GitHub login screen. Enter the username and password of the account you created on GitHub, then click Login. https://raw.githubusercontent.com/Kachi-Awaji/GIT-intro/master/images/47-GitHubLogin.png If all goes well, you should see a similar output. https://raw.githubusercontent.com/Kachi-Awaji/GIT-intro/master/images/48-GitPushSuccess.png Now, go back to your profile on GitHub, and click on the repository. GitHub displays a list of your repositories on the left of the screen. Your repository has been updated, and the files you pushed are available online. Note the git.png is on your GitHub. This was because it wasn't include in the commits. The files in the working directory on the repository are generated from the commits in the .git folder. So far, so good. You've learnt how to host your repositories on GitHub. Next, we will learn how to download repositories from GitHub to our local system. |
| Re: Tutorial On Git And Github by kachbytes(op): 6:34am On Apr 19, 2019 |
My fears for NL were not unfounded. I got banned last time I posted. I sent an email to the moderators and got no reply. What's the point of being a moderator? It's been over a week. |
| Re: Tutorial On Git And Github by kachbytes(op): 6:35am On Apr 19, 2019 |
Working with remote repositories In the previous section, we created a local repository and made our first commits. We also learnt to use the git commit command to save changes to the repository, and learnt the git log command for viewing our repo's history. What if you'd like to share your repository with other programmers? You can do that using Git and an online service that lets you host Git repositories. In this lesson, we will learn to create remote repositories using GitHub, an online code-hosting platform. Git is a distributed VCS (version control system). This means the git repository in your project folder can be shared with others, and they can work on your files and make changes as they wish on their own systems. This will let them have not just access to your files, they'd also be able to view the history of the project too(view the commits you have made). You can share your repository with others by hosting them online. Some services that let you host repositories online include GitHub, Bitbucket, GitLab and a few others. GitHub is the most popular and will be our focus in this series. Using GitHub To host repositories on GitHub, create an account by visiting their website. You should verify your account too; click on the link in an email that will be sent to you after you register. For this series, I have created an account on GitHub called Git-Hub-Learn. It will host repositories for the series which you will be working with later. When you create a repository on your system using Git Bash, the repository is stored on your PC. GitHub lets you create repositories that are hosted on its servers... Creating a repository on GitHub To create a repository on GitHub, in the upper-right corner of any page, click the + symbol to get a drop-down. Click New repository to create a repository. |
| Re: Tutorial On Git And Github by HappyPagan: 8:29pm On Jun 19, 2021 |
.... |
| Re: Tutorial On Git And Github by HappyPagan: 8:49am On Jun 20, 2021 |
How's the class going? |
| Re: Tutorial On Git And Github by Jibreel01(m): 8:05am On Nov 28, 2021 |
So you've posted this tutorial session since year 2019, while I'm just benefiting from it in the year 2021 I pray that God should further increase you in beneficial knowledge Thanks |
| Re: Tutorial On Git And Github by HappyPagan: 5:37am On Dec 16, 2021 |
Jibreel01:Join the class here bitDOTly/3pSnAAf Replace DOT with a . |


Learn Git And Github [*ARCHIVED*] • An Introduction To Git And Github • A Thread For Tutorial On Python Programming • 2 • 3 • 4
Loan Management Software • Who Can Create A Livescore Website • Where To Learn Web Application Development In Onitsha:pls Help