Magezon's Posts
Nairaland Forum / Magezon's Profile / Magezon's Posts
(1) (2) (of 2 pages)
Do you want to insert a contact form in your Magento 2 site's sidebar so that customers can easily find and contact you? In this tutorial, we'll show you how to do that using Blue Form Builder for Magento 2. https://www.magezon.com/magento-2-form-builder.html Supposed that you've already created a contact form using Blue Form Builder. 1. Go to Content > Elements > Widgets[/b]I and click Add New Widget on the top right corner to add a new widget. 2. In [b]Settings section, choose BlueFormBuilder Form type and your Design Theme. Then click Continue button. 3. In Storefront Properties section, enter Widget Title, Assign to Store Views and Sort Order. 4. In Layout Updates section, specify where you want to display your form from Display on drop-down and specify the position from Container drop-down. In this case, you should select Sidebar Main or Sidebar Additional. 5. In Widget Options section, click Select Form button to choose your contact form. You can choose from one of 4 form types: Popup, Inline, Slide-in or Link form and customize settings of each form type.
|
Displaying a sign-up checkbox in your form is one of the great way to get more customers to subscribe to your newsletter. In this post, we'll show you how to add such kind of checkbox in Magento 2 forms with Blue Form Builder. https://www.magezon.com/magento-2-form-builder.html 1. Open the edit page of a form that you've already created with Blue Form Builder. Then open Magezon Blue Form Builder section. 2. Open the window containing all elements by clicking on the plus icon on the top bar of the builder section, the plus icon at the bottom of an element on hover or the plus icon at the bottom of the builder section. 3. After that, find and click Subscribe element to add it the builder section. 4. In the element's settings popup, please pay attention to: - Appearance tab: where you can add label, specify label position, etc. for the element. - Advanced tab: + Required field: set the element to be required or not. + Checked by default: if Yes, the checkbox is automatically checked on page load. + Sub Label: enter additional information that is placed on the right of the checkbox. + Add field value to the Newsletter List: when filling the form, if your customers tick the subscribe checkbox to agree to receive newsletters from your website, then the newsletters will be sent to them through the values filled in the form fields you have chosen. You can add multiple fields but remember that these fields must use Email element. + Send Success Email: send an email to notify customers of successful subscription. + Need to Confirm: send an email to customers for confirmation. Remember to save after you finish all settings.
|
Dropdown is a common field of a form that lets customers select an option from a list. And in this post, we'll show you how to create a dropdown field in Blue Form Builder, a simple and powerful Magento 2 form builder extension. https://www.magezon.com/magento-2-form-builder.html 1. In the edit page of a form, open Magezon Blue Form Builder section. Click the plus icon in the top bar, at the bottom of an element or at the bottom of the builder section to open the popup containing all elements. 2. Find Select element and click to add it to the builder section. After the element is added, a popup containing its settings will appear. - Appearance tab: where you specify label, label position, etc. for the element. - Options tab: where you specify options listed in the dropdown. Tick the Default checkbox of the option that you want to be automatically selected. Click the recycle bin icon to delete the option. - Advanced tab: turn on Shuffle Options to arrange the options randomly. Turn on Show Others Option to add another option to the dropdown that allows customers enter their answer in a text area. You can specify Others Label [/b]and [b]Others Description. Remember to save after you finish all needed settings.
|
Do you want to export a menu from one Magento 2 site and import it into another or simply in the same one? In this tutorial, let's walk through detailed steps on how to do this with Ninja Menus, a drag & drop Magento 2 mega menu extension. https://www.magezon.com/magento-2-mega-menu.html 1. Open the edit page of the menu that you've already created using Ninja Menus, then open Menu Builder section. 2. Click the shortcode icon in the top bar. Then copy the shortcode in the popup appearing. 3. Create a new menu, then similarly open the Menu Builder and shortcode section. After that, paste the shortcode you've just copied in the shortcode section of the new menu. Click Save button and the menu will be imported into the builder section.
|
If your form has a file upload field that allows customers to upload files, you may want to attach these files to email notifications. In this tutorial, we'll show you how to add uploaded files as attachments in email notifications with Blue Form Builder for Magento 2: https://www.magezon.com/magento-2-form-builder.html Supposed that you've already created a form including a file upload field using Blue Form Builder. 1. Open the edit page of the form. Then open Settings > Email Notifications and you'll see 2 tabs: Admin & Customer. 2. Open Admin tab and turn on Attach file uploads to emails button to enable attaching uploaded files to email notifications sent to admins. 3. Open Customer tab and turn on Attach file uploads to emails button to enable attaching uploaded files to email notifications sent to customers. Remember to save after finishing.
|
Sometimes, your customers may accidentally submit multiple copies of the same form. This may make it hard for you to manage your form submissions. In this post, we'll walk you through detailed guide on how to prevent this problem from happening with Blue Form Builder for Magento 2. https://www.magezon.com/magento-2-form-builder.html Supposed that you create a for with Blue Form Builder. 1. Open the edit page of a form, then open Settings > Advanced. 2. Turn on Disable multiple submissions from same device. Then you'll see 2 other fields appearing: - Disable Condition: choose a condition which will determine a customer has already submitted the form. It can be Customer ID, IP Address or Form Fields. If you choose Form Fields, you can choose specific fields in your form. - Message when disabled: enter the message to notify customers that they have already submitted the form. Remember to save after you finish.
|
Sometimes, your customers may accidentally submit multiple copies of the same form. This may make it hard for you to manage your form submissions. In this post, we'll walk you through detailed guide on how to prevent this problem from happening with Blue Form Builder for Magento 2. https://www.magezon.com/magento-2-form-builder.html Supposed that you create a for with Blue Form Builder. 1. Open the edit page of a form, then open Settings > Advanced. 2. Turn on Disable multiple submissions from same device. Then you'll see 2 other fields appearing: - Disable Condition: choose a condition which will determine a customer has already submitted the form. It can be Customer ID, IP Address or Form Fields. If you choose Form Fields, you can choose specific fields in your form. - Message when disabled: enter the message to notify customers that they have already submitted the form. |
Sometimes, you want to style your menus further but the current features of your mega menu builder doesn't give you ability to do this. That's when you need to add custom CSS. In this tutorial, we'll show you how to add custom CSS to your menu in Ninja Menus, an easy and powerful Magento 2 mega menu extension. https://www.magezon.com/magento-2-mega-menu.html Supposed that you have already created a menu using Ninja Menus. Open the edit page of the menu. Then open General > Advanced Settings. Here you'll find CSS Classes and Custom CSS fields where you can add your custom CSS. Remember to save after finishing.
|
Want to add icon to your form fields? In this tutorial, we'll show you how how to insert icon to form fields with Blue Form Builder for Magento 2. https://www.magezon.com/magento-2-form-builder.html 1. Open the edit page of a form, then open Magezon Blue Form Builder tab. 2. Hover over an element, then click Edit in the drop-down list to open the element settings. 3. Open Icon tab where you can customize the icon: - Turn on Show Icon button to allow adding icon to the form field. - Choose Icon from 2 Icon Library: Awesome 5 and Open Iconic. - Customize Icon Color and Icon Position (Left or Right of the form field). Remember to save after you finish. 1 Like
|
A sticky menu is a menu that is fixed at one place and remains visible when users scroll down the page. Using a sticky menu makes it easier to access the menu wherever users are on your page. This post will provide a detailed guide on how to enable sticky menu in Ninja Menus for Magento 2. https://www.magezon.com/magento-2-mega-menu.html Supposed that you've already created a menu using Ninja Menus. In the edit page of the menu, open General > Advanced tab. Then turn on Enable Sticky Menu button. Remember to save after finishing.
|
Normally after a customer submits a form, they will receive a message that notifies that the form has been submitted successfully. In this tutorial, we'll show you how to customize this success message in Blue Form Builder, a powerful Magento 2 form builder extension. https://www.magezon.com/magento-2-form-builder.html Open the edit page of a form. Then open Settings > Success Message where you can customize the success message of the form. - Enter the message content in the WYSIWYG editor. Please note that you can insert variables here so that your message will be dynamic. - Header Content: enter the content in the header. - Footer Content: enter the content of the footer. The footer content only appears when you enable redirecting all customers after submission. https://blog.magezon.com/redirect-customers-blue-form-builder/ - Style: choose style for the message of 2 options available. If you choose Style1, you can customize text color, background color and border color between the header and main content. If you choose Style 2, you can customize the circle color.
|
A menu plays an important role in navigating customers around your website so that they can find the things they want. And it should contains links to category pages, product pages, CMS pages or any page to fulfill this role. In this post, we'll introduce you to 4 types of links you can add to a menu item in Ninja Menus, a drag & drop Magento 2 mega menu extension. https://www.magezon.com/magento-2-mega-menu.html 1. Open the edit page of a menu, then open Menu Builder tab. 2. Hover over the menu item you want to add a link. Then click Edit in the drop-down list to open the menu item's settings. 3. In General tab, you can find Type drop-down where you will see 4 link types to add to the menu item: - Custom Link: if you choose this, you can enter an URL in the Custom Link field. - Category Link: if you choose this, you can search and choose an existing category in Category drop-down. - Product Link: if you choose this, you can search and choose an existing product in Product drop-down. - CMS Page Link: if you choose this, you can search and choose an existing CMS page in Page drop-down. Remember to save after finishing.
|
Adding placeholder text to form fields is one of the ways to explain to customers what should they fill. In this tutorial, we'll walk you through detailed steps on how to add placeholder text to form fields in Blue Form Builder, a simple and powerful Magento 2 form builder extension. https://www.magezon.com/magento-2-form-builder.html 1. Open the edit page of a certain form, then open Magezon Blue Form Builder tab to open the builder interface. 2. Hover over an element then click Edit to open its settings. 3. Open Advanced tab and you'll find Placeholder field where you can enter placeholder text. That's all you need to do. Just follow these easy steps to add placeholder text to your form fields.
|
After customers submit a form, you may want to direct them to a certain page. In this post, we'll show you how to do this with Blue Form Builder, a simple Magento 2 form builder extension. https://www.magezon.com/magento-2-form-builder.html 1. Redirect All Customers After Submission In the edit page of a form, open Settings > Advanced. - Redirect on Submit: enter the page URL to which you want to redirect customers to after submission. - Redirect X seconds after form submit: specify after how many seconds after submission customers will be redirected. 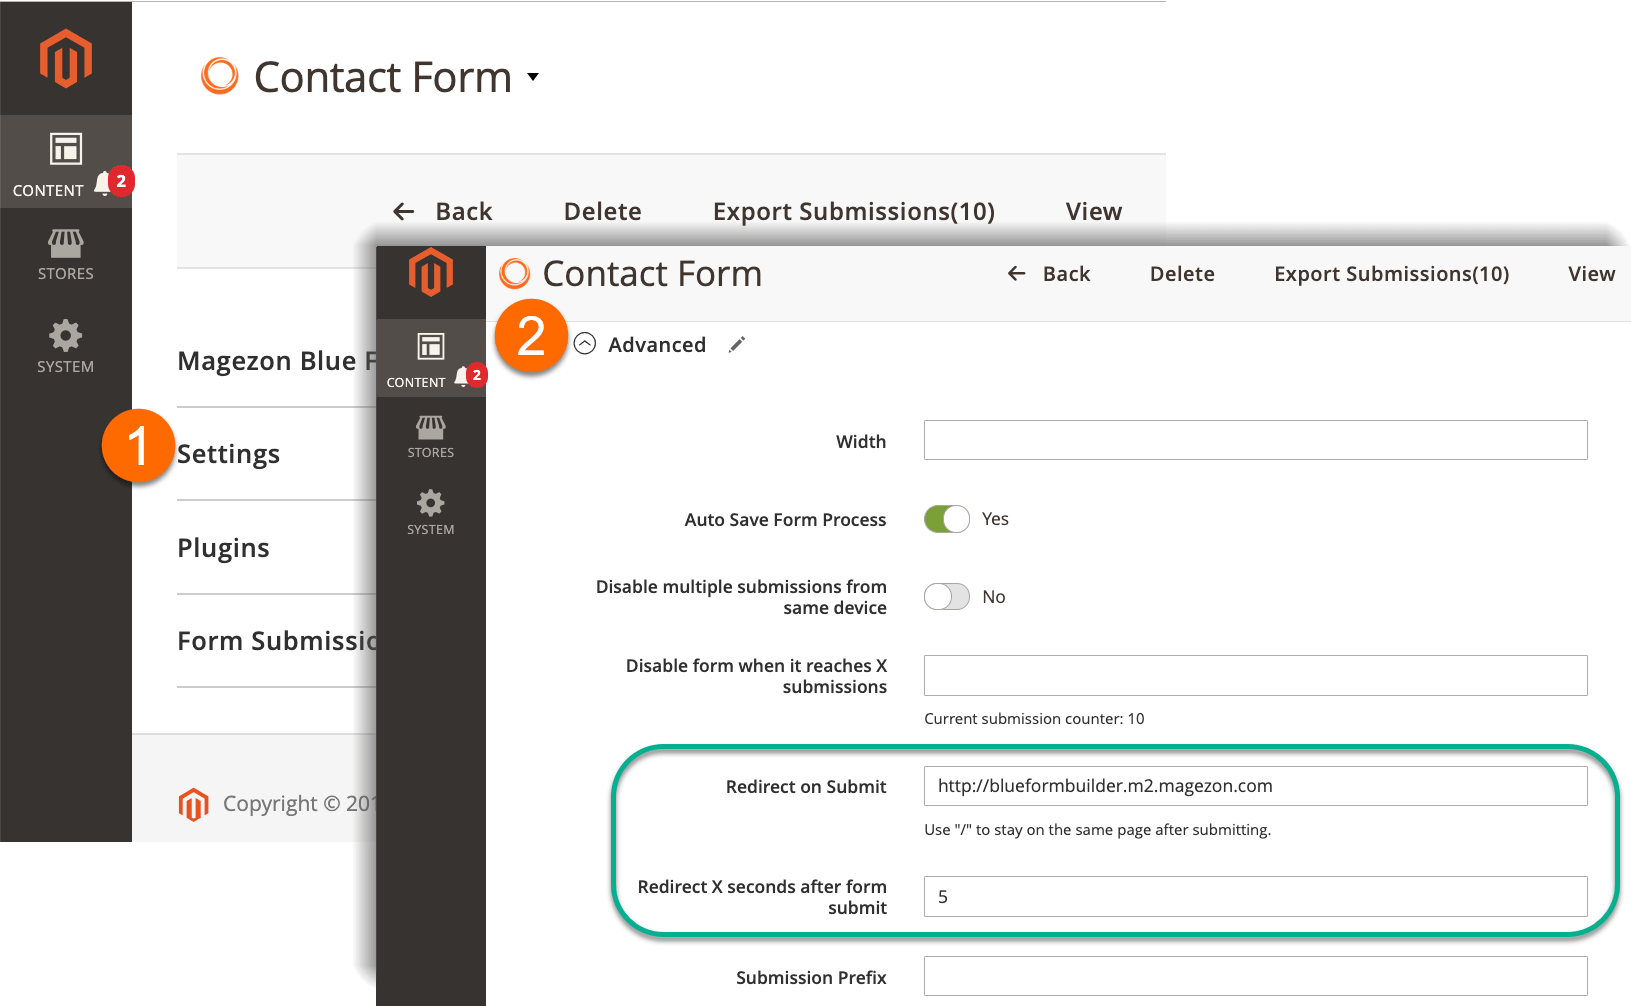 2. Redirect Based On User Input To redirect customers based on their input, you need to install Smart Conditional Logic plugin: https://www.magezon.com/blue-form-builder-smart-conditional-logic.html Let's take an example for clarification: The form contains a field called "What are you having issues with?" that has 4 options. If customers select "Computer", they will go the the page: “http://blueformbuilder.m2.magezon.com/computer-issues” after submitting the form. Now please follow these steps: - Open Plugins > Conditional Form Fields. Then click ADD NEW LOGIC. 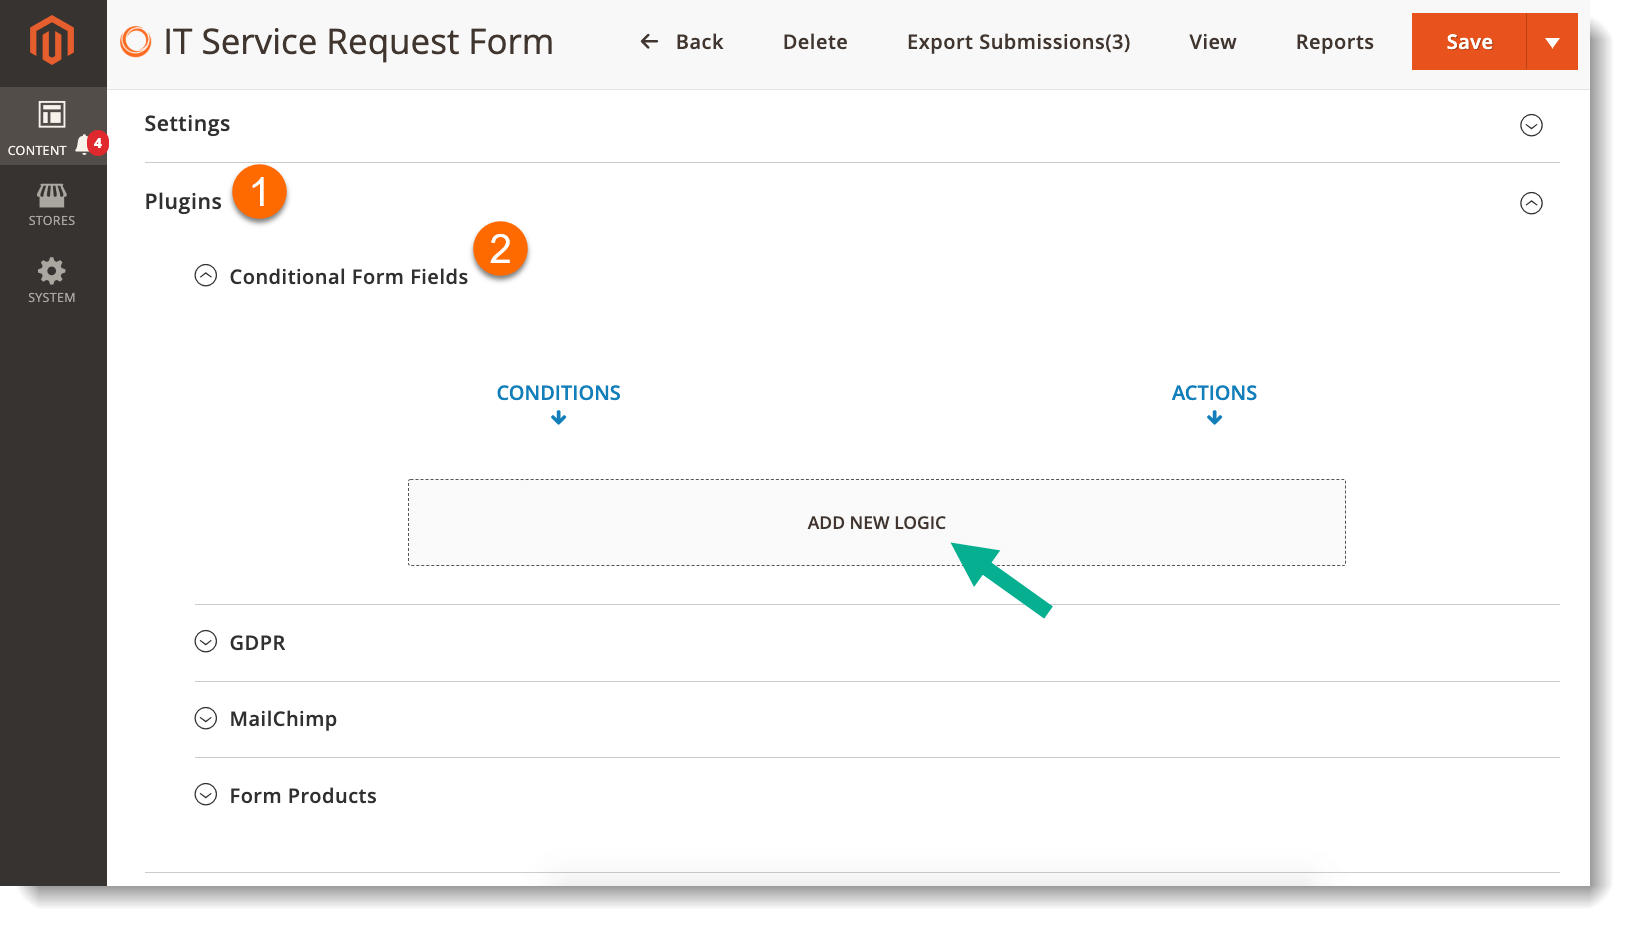 - In Conditions column, click ADD CONDITION ROW. In the first box, choose the "What are you having issues with?" field from the drop-down list. In the second box, choose "is equal to". In the third box, enter the value for the condition. In this case, enter "Computer". 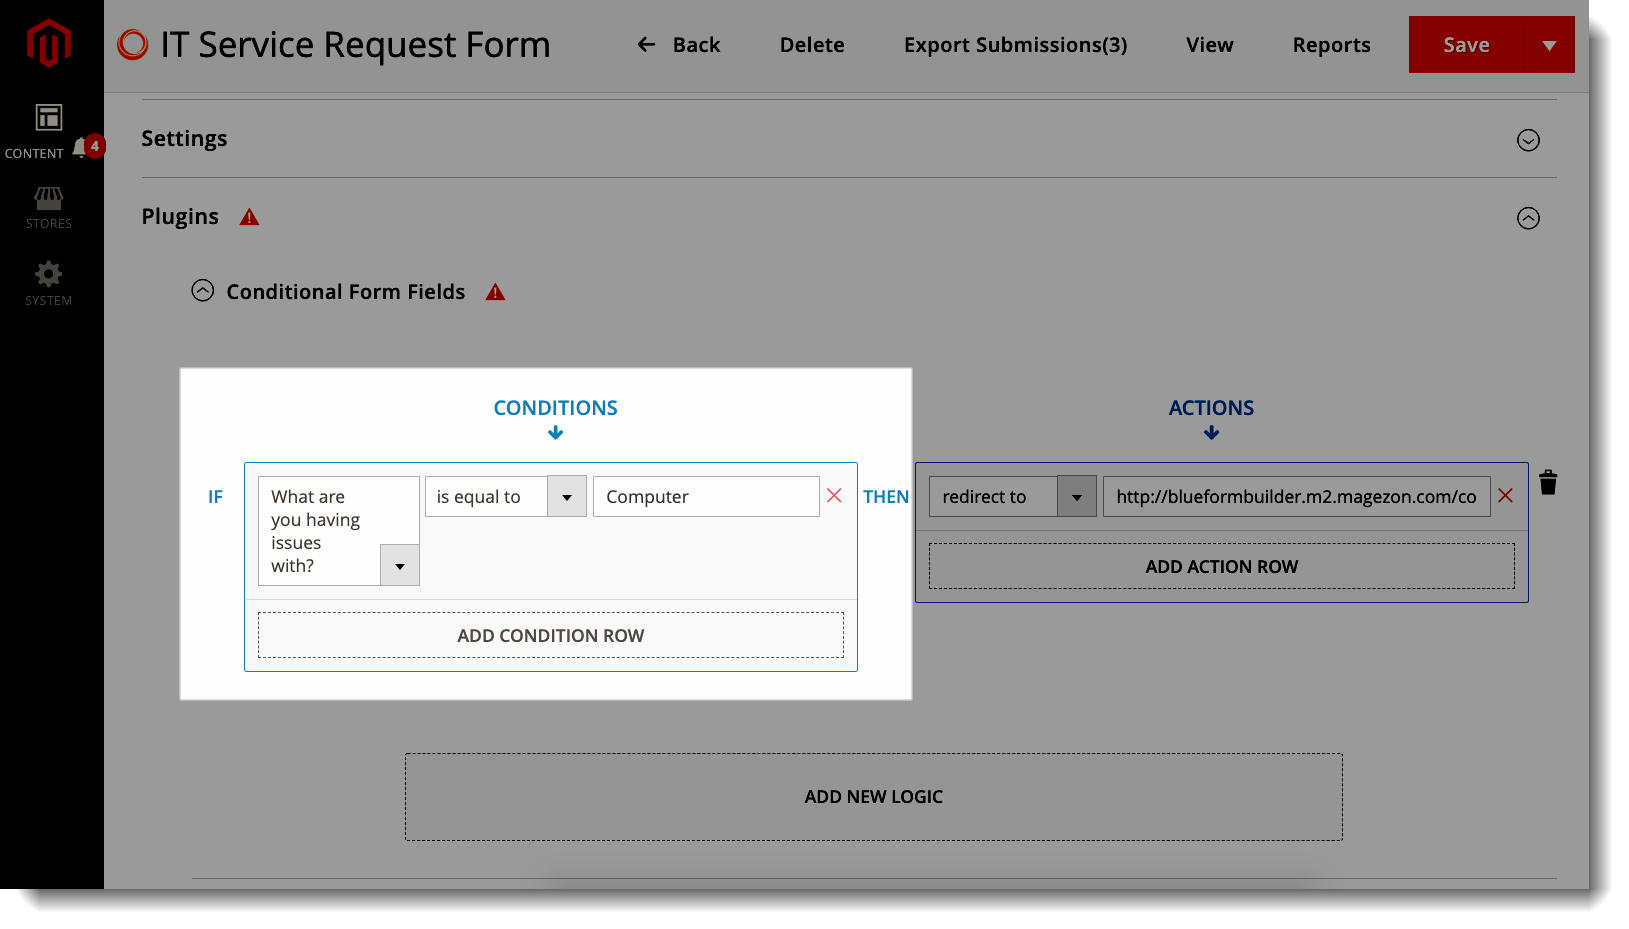 - Next, set action in the Actions column by clicking ADD NEW ACTION. Choose "redirect to" in the first box and enter the redirect page URL in the second box. 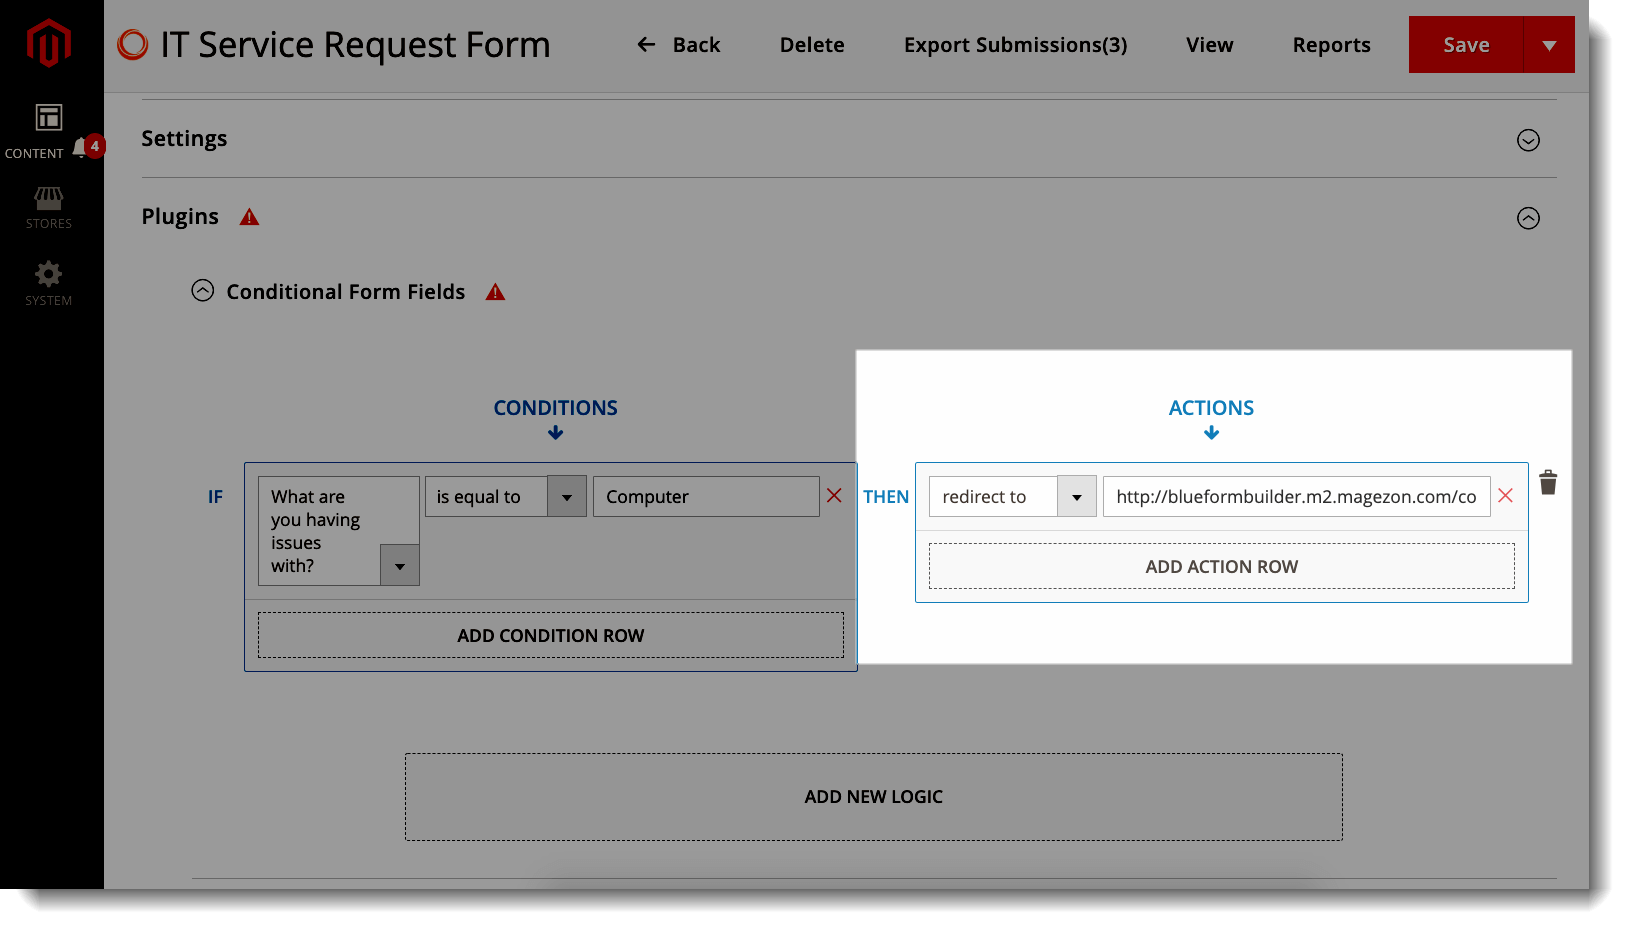 Remember to save after finishing. |
Adding animation effects to your submenus is an effective way to attract customers' attention. In this post, let's walk through quick steps on how to apply animation effects to the submenus in Ninja Menus, an easy and powerful Magento 2 mega menu extension. https://www.magezon.com/magento-2-mega-menu.html Supposed that you've already created a menu using Ninja Menus. 1. Open the edit page of the menu, then open Menu Builder section. 2. Hover over the menu item containing the submenu you want to add animations. Then click Edit in the drop-down list to open settings of this menu item. 3. Open Submenu tab. Then choose the effects when the submenu appears and disappears from Animation In and Animation Out drop-down list. You can also set the Animation Duration (in seconds). Remember to save after finishing.
|
Blue Form Builder for Magento 2 allows building any kind of forms you can imagine with dozens of powerful features. One of these features is pre-built templates that will certainly help you save a great deal of time. In this post, we'll show you how to find and use these templates. https://www.magezon.com/magento-2-form-builder.html 1. Go to Content > Blue Form Builder > Add New Form to create a new form. In the popup appearing, choose Template. In the left panel, you will see a list of templates. Click on one template and you can preview it in the right section. 2. Choose your template and click SAVE FORM. You can change the form name in the field next to SAVE FORM button. After saving, you will navigate to the edit page of the form. 3. Open Magezon Blue Form Builder section to edit the form the way you want. 4. Customize the form further with Settings section. If you install any plugins of Blue Form Builder, you can find it in Plugins tab. Check the form submission in Form Submissions section. Remember to save after finish the customizations.
|
In this post, we'll walk you through quick steps to create hamburger menu on mobile using Ninja Menu, a super simple Magento 2 mega menu. https://www.magezon.com/magento-2-mega-menu.html 1. Supposed that you create a menu using Ninja Menus. Now go to the edit page of the menu. 2. Open General > Advanced Settings tab. Then enable Hamburger on Menu. You can also specify the Hamburger Title. That's all! Easy and quick, isn't it?
|
For those who have coding knowledge, sometimes you may want to add additional custom CSS and Javascript to customize your form further. In today's post, we'll show you how to do this with Blue Form Builder, a simple form builder extension for Magento 2. https://www.magezon.com/magento-2-form-builder.html 1. Open the edit page of a form. Then open Settings tab. 2. Open Custom CSS tab to add custom CSS and Custom Javascript to add custom Javascript. That's it. Super easy, isnt' it?
|
In this post, we'll show you how to add icon to menu item in Ninja Menus, a simple but powerful Magento 2 mega menu extension. https://www.magezon.com/magento-2-mega-menu.html 1. In the menu edit page, open the menu builder section. Then hover over the menu item you want to add icon and click Edit in the drop-down menu to open the settings. 2. Open Icon tab, then turn on Show Icon button. - Position: set the icon's position to be on the Left or Right of the menu item. - Icon / Icon on Hover: choose the main icon and the icon on hover from 2 libraries: Awesome 5 and Open Iconic. - Icon Color: choose color for the icon. - Custom Class: add additional custom class to customize the icon further. Remember to click Save after finishing.
|
By pre-filling certain form fields, it helps reduce the time that customers spend filling your form. Therefore, it's more likely that they complete your form which will increase the form conversion rates. Let's take a look at how to pre-fill forms in Blue Form Builder, a simple yet powerful Magento 2 form builder extension. https://www.magezon.com/magento-2-form-builder.html - Open the builder section in the form edit page. Hover over an element and you'll see a bar. Move the mouse to the element name and click Edit in the drop-down menu to open element settings. - Open Advanced tab and find Default Value option where you can choose the value you want to pre-fill from a drop-down list. There are 3 types of pre-filling values related to Customer, Page and Product For example, if you pre-fill Email form field with [customer.email] value. Then when a logged in customer accesses the form, this field will be automatically filled with their email address.
|
 1. How to export Navigate to the edit page of a form, then open Settings > Advanced tabs. Click EXPORT FORM FILE to export the form. 2. How to import * Note: It's only possible to import forms into other websites that also have Blue Form Builder installed. - Navigate to Content > Blue Form Builder > Add New Form. Then click Import in the popup appearing. - Click Upload Form File button to upload a form file from your computer. You can change the form name. - After finishing, click SAVE FORM button and you'll be redirected to the edit page of the form.
|
Sometimes, you may want to export your form submissions to CSV for further use. In this post, you'll be guided on how to download form submissions as CSV in Blue Form Builder for Magento 2. https://www.magezon.com/magento-2-form-builder.html Why CSV file? CSV is a type of file that you can open in most of spreadsheet programs such as Excel or Google Sheets. By downloading form submissions as CSV, it's easy to view them in these programs. Moreover, a CSV file can be use for other purposes such as importing customers’ contact info into email marketing services. Export form submissions to a CSV Suppose that you install Blue Form Builder and create some forms and have already collected some submissions. Go the edit page of the form. Then click Export Submissions on top to export submissions of this form to CSV.
|
Want to create Magento 2 menus for multiple store views? In this article, we'll guide you how to do this with Magento 2 Mega Menus by Magezon: https://www.magezon.com/magento-2-mega-menu.html Supposed that you installed Ninja Menus and create some menus using this extension. 1. Open the edit page of a menu. 2. Open General tab. In Store View options, choose the store views on which you want to display the menu. Remember that you need to create a different menu for each store view and enter the same Identifier for all menus.
|
 Sometimes, you just want to show your forms to certain customer groups while others can't see it. In today's post, I'll show you how to do this with Blue Form Builder, a drag & drop Magento 2 form builder extension. https://www.magezon.com/magento-2-form-builder.html 1. Open the form edit page. 2. Open Settings > Customer Groups. Then select the groups you want to display the form to. Remember to save after you finish. That's all you need to do. Simple, isn't it?
|
While creating a menu for your Magento 2 website, you may want to import your existing categories to save time. Ninja Menus, a powerful mega menu extension for Magento 2 does support this function. Below is a detailed tutorial on this. https://www.magezon.com/magento-2-mega-menu.html 1. Open the menu edit page. 2. In the Menu Builder section, click the import icon on the top bar. 3. A popup will appear where you can choose the categories you want to import by searching in the Category field. You can also import the subcategories of the selected category instead by slide Import Subcategories button to Yes. Remember to save after finishing. The categories (or subcategories of a category) will displayed on the highest menu level.
|
Spam form submissions is a common problem that web owners have to face. There is no exception to Magento 2 forms. In today's post, let's see how this issue is resolved in Blue Form Builder, a powerful Magento 2 form builder extension. https://www.magezon.com/magento-2-form-builder.html Blue Form Builder 2 types of Captcha to help you protect your forms from spam: 1. Google reCaptcha To add Google reCaptcha to a form, please: Step 1: Sign up for an API key pair including site key and secret key: https://www.google.com/recaptcha/admin/create#list Step 2: Go to Stores > Settings > Configuration. In the left panel, span MAGEZON EXTENSIONS and click Blue Form Builder. Then open reCaptcha or reCapcha3 tab to enter Site key and Secret key. Step 3: Open the edit page of the form you want to add Google reCaptcha. Then add reCaptcha element. In the element settings, open the Advanced tab to customize: reCaptcha Type, reCaptcha Language, reCaptcha theme, reCaptcha Size and show/hide reCaptcha with logged in users. 2. Magento 2 Captcha Enable Magento 2 Captcha is super easy. Just add Magento 2 Captcha element to the form.
|
Besides using a menu on top of every page, sometimes you may want to place in other positions, for example, on the sidebar. And using widget is a smart way to do this. Fortunately, Ninja Menus by Magezon supports widget that gives you the ability to add menu in any position. We'll show you how! https://www.magezon.com/magento-2-mega-menu.html 1. Go to Content > Elements > Widgets and click Add Widget. 2. In Settings section, choose NinjaMenus Menu for Type field and your current theme in Design Theme field. Then click Continue button. 3. In Storefront Properties tab, you can specify where to place your menu in Layout Updates section. 4. In Widget Options tab, enter Title and choose your desired menu by clicking on Select Menu... button. Remember to save after you finish the settings.
|
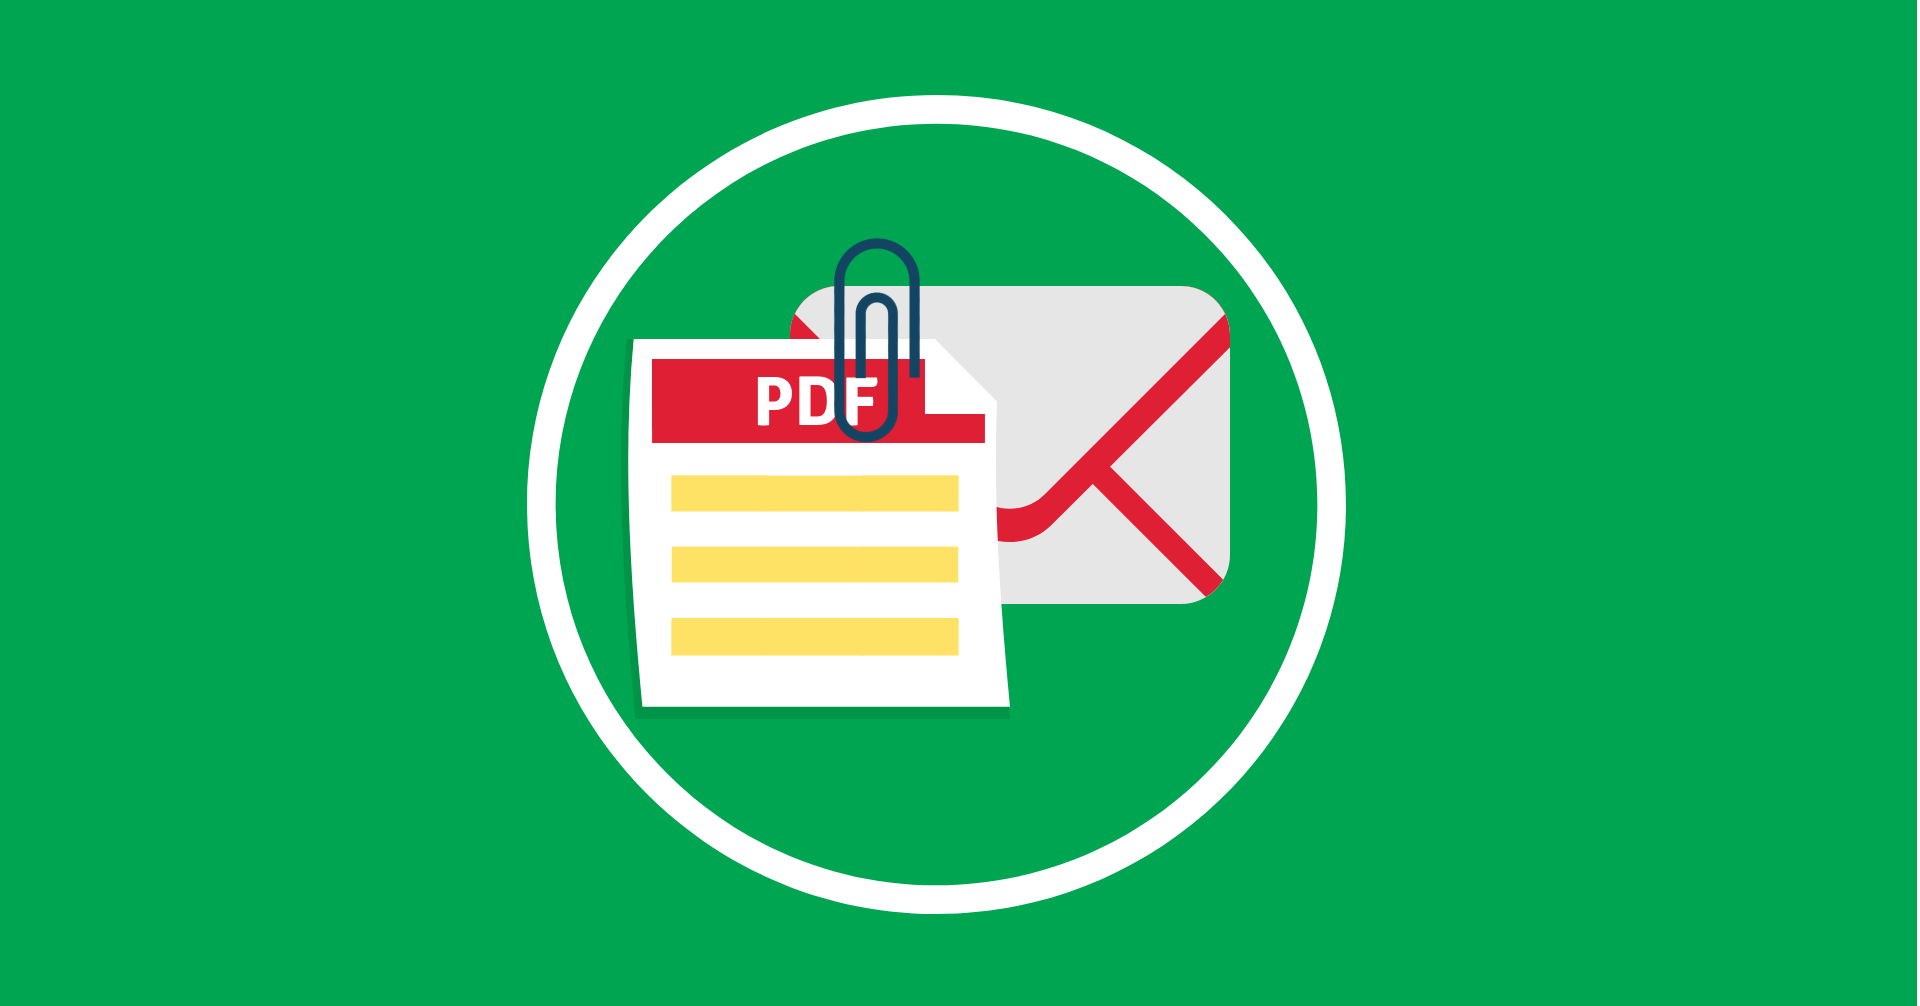 By including form submissions as PDF attachment in email notifications, it will become much easier to share and also help create a professional look & feel for your emails. Blue Form Builder for Magento 2 gives you the ability to do this quickly with just a few steps needed. Let's take a look! https://www.magezon.com/magento-2-form-builder.html First, please make sure that you also install PDF plugin: https://www.magezon.com/blue-form-builder-pdf.html 1. Attach to admin email notification In the form edit page, open Settings > Email Notifications > Admin. Then turn on the button Attach PDF to notification emails. 2. Attach to customer email notification Open Settings > Email Notifications > Customer, then turn on the button Attach PDF to autoresponder emails. 3. Design PDFs Go to Store > Settings > Configuration. In the left panel, span MAGEZON EXTENSIONS and open Blue Form Builder. Click Design Settings tab where you can customize the PDF. Uncheck the checkbox Use system value to make change to any field.
|
For a web owner, it's important to prevent users from mistyping form data, missing to fill some form fields or using wrong formats as you can't collect your desired data. And a form that can make sure all submission data is correct is actually of help. In this post, we'll walk you through detailed steps on how to ensure right submission data with Blue Form Builder for Magento 2. https://www.magezon.com/magento-2-form-builder.html Supposed that you've already created a form using Blue Form Builder. - In the form builder section, hover over an element, then click Edit to open the settings popup. - Open Validation tab and you'll find Validation drop-down where you can choose your desired option. Note: Some elements have been already set validation so you don't need to do this, for example: Email element, Phone Element.
|
(1) (2) (of 2 pages)
(Go Up)
| Sections: politics (1) business autos (1) jobs (1) career education (1) romance computers phones travel sports fashion health religion celebs tv-movies music-radio literature webmasters programming techmarket Links: (1) (2) (3) (4) (5) (6) (7) (8) (9) (10) Nairaland - Copyright © 2005 - 2024 Oluwaseun Osewa. All rights reserved. See How To Advertise. 133 |