Windows 10 Settings You Should Change Right Away - Technology Market - Nairaland
Nairaland Forum / Science/Technology / Technology Market / Windows 10 Settings You Should Change Right Away (536 Views)
Work From Home Right Away Lets Move Your Office Land Line To Cloud PBX Intercom / Top 5 Free Web Development Tools You Can Start Using Right Away / Latest HTTP Injector Settings For MTN 0.0k & MTN Mpulse Data (2) (3) (4)
| Windows 10 Settings You Should Change Right Away by Yinksdavid(m): 7:58am On Sep 08, 2021 |
Microsoft's Windows 10 operating system offers a lot of compelling features, including Cortana and a new Start menu. However, some of its default settings don't provide you with the best performance or usability. From showing file extensions to enabling system protection backups, here are seven things you need to change as soon as you get started with Windows 10 after you've properly set up the operating system. Enable System Protection / Create a Restore Point What happens if you install a bad piece of software or a defective driver and your computer starts acting strangely or you can't even boot. You'll want to revert Windows 10 to the previous system restore point, which will turn back the clock on your drivers, programs and settings to a time when the system worked perfectly. However, Windows 10 comes with system protection disabled. If you want to protect yourself -- and you should -- set up restore points following the instructions below. 1. Search for "restore point" in the Windows search box.  2. Launch "Create a restore point" from the results. You should see a list of available drives. 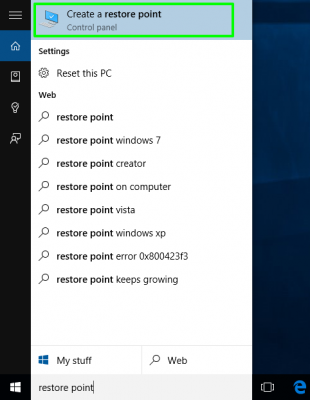 3. Select the system drive and click Configure. The system drive is usually the C: drive and has the word "(System)" written after its volume name.  4. Toggle Restore Settings to "Turn on system protection," set the maximum disk space usage by moving the slider and click Ok. We recommend leaving 2 or 3 percent for restore pints but you may be able to get away with the lowest (1 percent). 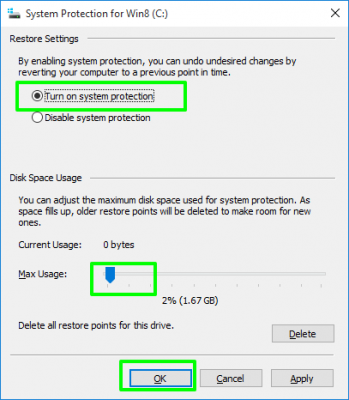 5. Click Create so that you create an initial restore point right away. 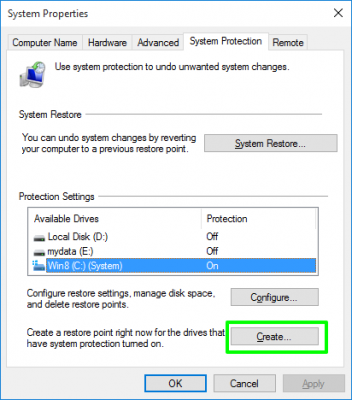 6. Name the initial restore point when prompted. 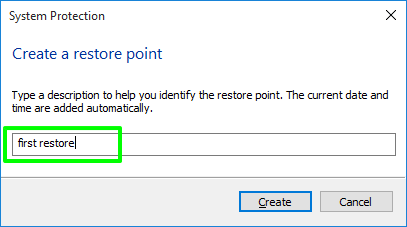 7. Click Close when it is done. 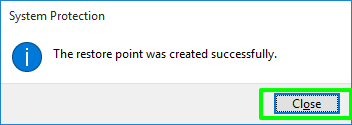 If you need to restore from one of these points, you can click the System Restore button on the System Protection tab. If you can't boot, you can hit F8 or Shift + F8 during boot to get to the emergency menu on some computers. |
| Re: Windows 10 Settings You Should Change Right Away by Yinksdavid(m): 8:09am On Sep 08, 2021 |
Speed Up Your Shutdowns[size=12pt][/size] Though Windows 10 boots very quickly, it can still take a while to shut down or restart. Part of the issue is that the OS waits a long time before exiting any programs you have running. In some cases, Windows 10 even stops and waits indefinitely for you force close open applications. If you decided to reboot your computer, you probably meant to close that Wordpad window with the readme.txt file open in it. You can speed up your shutdowns by setting Windows 10 to kill processes and applications in short order. 1. Open regedit by hitting Windows + R and typing "regedit" into the box. 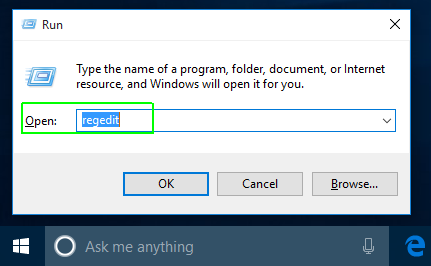 2. Navigate to HKEY_LOCAL_MACHINE\SYSTEM\CurrentControlSet\Control. 3. Open WaitToKillServiceTimeout. 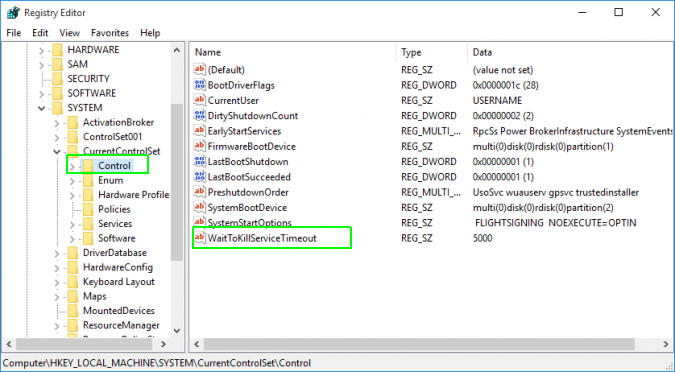 4. Set the value to 2000 and click Ok. This is the amount of time, in milliseconds, that Windows waits to kill an unresponsive service. Most sites recommend you set this no lower than 2000 so that the system has some time to shut these processes without causing a problem. 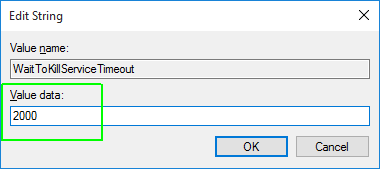 5. Navigate to HKEY_CURRENT_USER\Control Panel\Desktop. 6. Create a String Value and name it WaitToKillAppTimeOut. You can create a string value by right clicking in the right pane and selecting New > String Value. 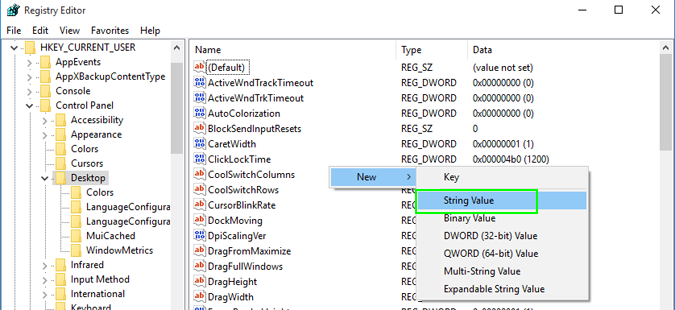 7. Open WaitToKillAppTimeOut and set it to 2000. 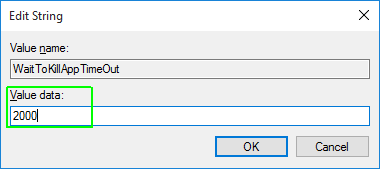 8. Create a String Value called HungAppTimeout and set it to 2000. 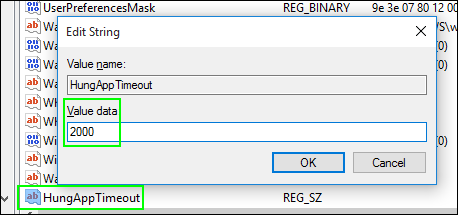 9. Create another Sting Called AutoEndTasks and set it to 1. 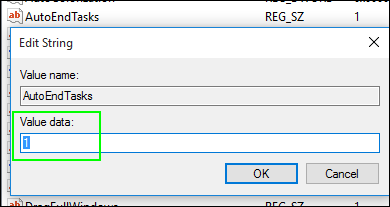 |
| Re: Windows 10 Settings You Should Change Right Away by morikee: 8:22am On Sep 08, 2021 |
Very educative. |
| Re: Windows 10 Settings You Should Change Right Away by Yinksdavid(m): 8:27am On Sep 08, 2021 |
morikee: Thanks Bro. Some more settings to be shared before the end of the day. |
| Re: Windows 10 Settings You Should Change Right Away by Yinksdavid(m): 9:44am On Sep 08, 2021 |
Change Your Default Browser If you upgraded to Windows 10 from Windows 7 or 8, you'll notice that Microsoft Edge is now your default browser, even if Chrome or Firefox was your default before. Edge Browser is a bit faster than Chrome or Firefox, but doesn't provide the level of extensibility that its competitors offer. If you are a Chrome or Firefox user, you'll want to change your default right away. 1. Navigate to settings. 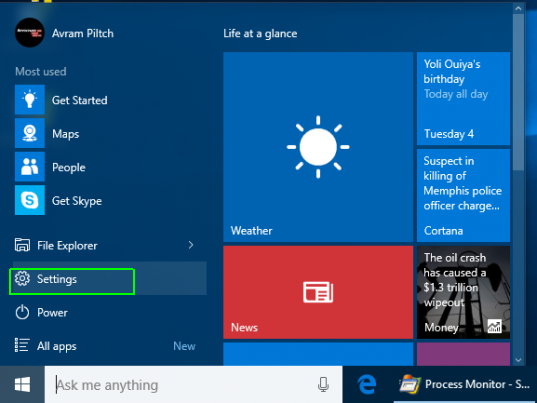 2. Click System. 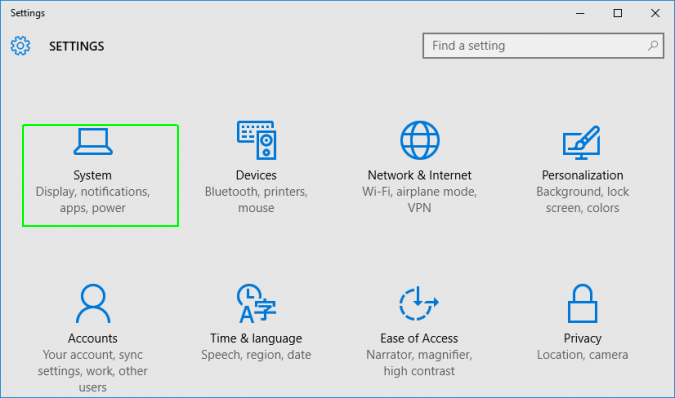 3. Select Default apps from the left pane.  4. Click the Microsoft Edge icon under the "Web browser" header. 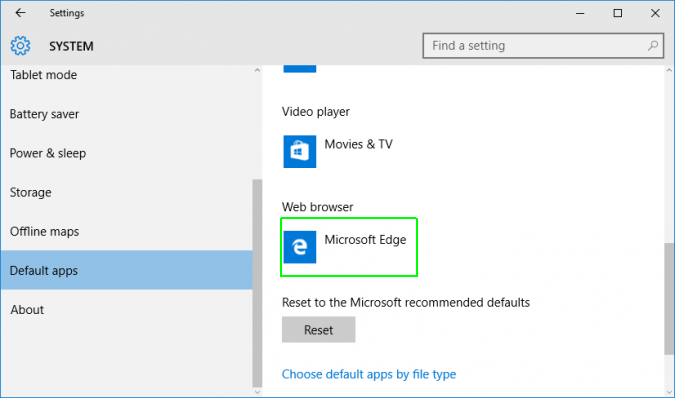 5. Select the browser you want as your new default (ex: Chrome). 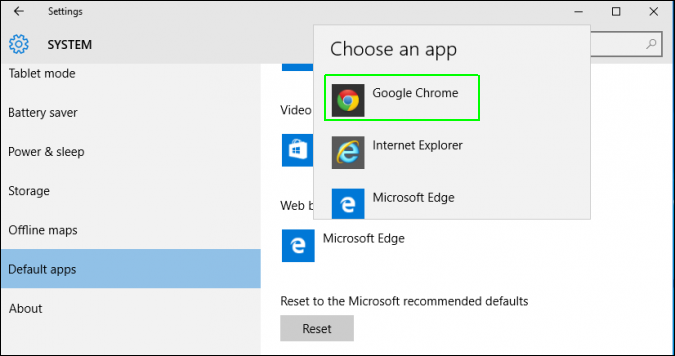 |
| Re: Windows 10 Settings You Should Change Right Away by uchaymart(m): 6:50pm On Sep 08, 2021 |
Yinksdavid:Boss, The PC settings on my system keeps going off each time I click on it for some corrections. Please how do I solve this... Windows 8 to be precise. Thank you in anticipation. |
| Re: Windows 10 Settings You Should Change Right Away by Yinksdavid(m): 6:56pm On Sep 08, 2021 |
uchaymart: Evening Bro, I need to get clearer details of the issue. Can you send a message to me on whatsapp so i can provide probable solution to the issue if i can get the exact problem. |
| Re: Windows 10 Settings You Should Change Right Away by Yinksdavid(m): 6:08am On Sep 09, 2021 |
Good Morning All, If you are having issues with installing or updating your Windows 10 OS, experience any issue after installation, need to know how best to utilize your Windows 10 or you are curious for knowledge purposes about Windows 10 OS, Kindly reach out to me via yinks.azure@gmail.com or the whatsapp number below on my signature and I would be glad to assist. Thanks This also applies to other Microsoft Applications such as Office, Office365, Outlook2019, Sharepoint2019, Dynamics CRM, Exchange Server, Windows Server |
| Re: Windows 10 Settings You Should Change Right Away by Yinksdavid(m): 8:14am On Sep 10, 2021 |
Morning People, Sorry i have to use this already owned topic as I could not create a new topic on the forum due to the error "Please wait for a few minutes before submitting this post. Our server is overwhelmed". Today, I want to share on How to Activate Windows 10's God Mode A legendary folder hidden in Windows 10 gives you quick access to a ton of handy settings in one place. The so-called "God Mode" folder provides links to a range of administration tools and tweaks in Windows. It's been around for a while in older versions of Windows is still alive and well. Here's how to activate the omnipotent "God Mode" in Windows 10. 1. Right-click on the desktop and go to New > Folder to create a new folder. 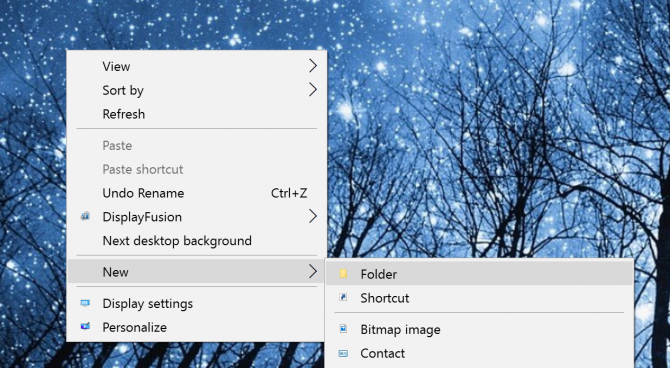 2. Name the folder: GodMode.{ED7BA470-8E54-465E-825C-99712043E01C} (Complete with the period after GodMode and the curly brackets)  Note that you can replace "GodMode" with any text you want, such as "JediMode" or "NinjaMode". 3. Open the GodMode folder to access over 260 commands, from administrative tools to backup tools to internet options and other important settings. 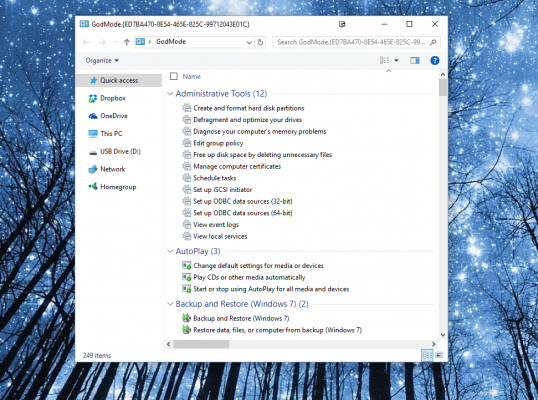 You can also drag and drop any of the commands from your GodMode folder to your desktop for quick access in the future. |
| Re: Windows 10 Settings You Should Change Right Away by Yinksdavid(m): 4:07pm On Sep 10, 2021 |
Here's how to format your hard drive in either OS Want to use one external drive for both your Windows PC and your Mac machine? One hurdle you'll face is that, by default, these platforms use different filesystems. Windows uses NTFS while Mac OS uses HFS, and they're incompatible with each other. However, you can format the drive to work with both Windows and Mac by using the exFAT filesystem. Below are the steps to follow In this guide, we're using exFAT instead of FAT32, another filesystem that both Windows and Mac can read and write to, because FAT32 has a maximum 4GB file size limit whereas exFAT can work with files as large as 16EB (exabytes). exFAT also performs better than FAT32. How to format an external drive in Windows The instructions below are for Windows 10, but other versions of Windows from Windows 7 and up can also format an external drive as exFAT for use with Mac as well. 1. Connect the drive to your Windows PC. 2. Open the Disk Management tool. You can do that by typing "disk format" or "disk management" in Windows search or going to Control Panel > Administrative Tools > Create and format hard disk partitions. 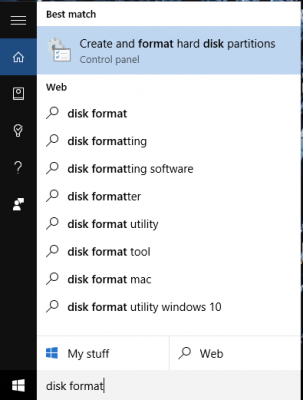 3. Right-click on the external drive's partition or unallocated space you want to format and choose New Simple Volume… 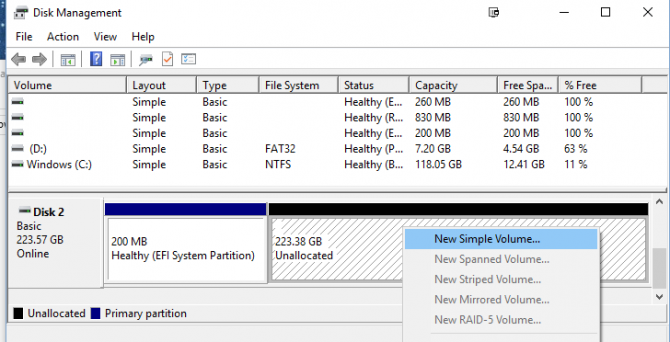 4. Follow the wizard to choose a volume size. 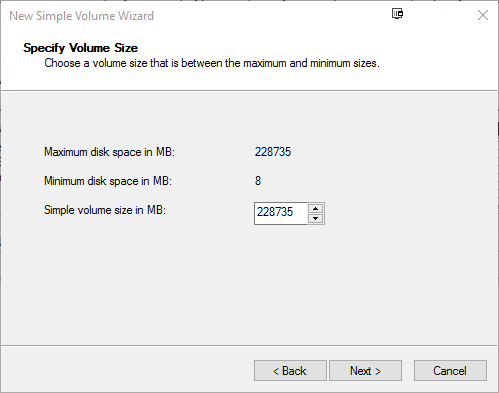 5. Assign a drive letter. 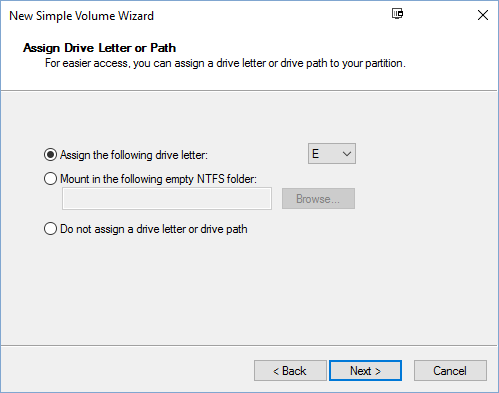 6. Choose exFAT as the file system in the Format Partition screen. 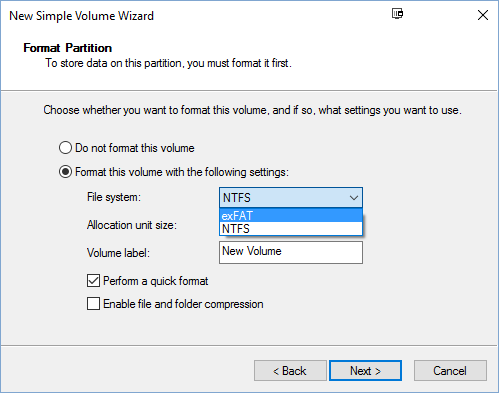 7. Give the volume a new name. 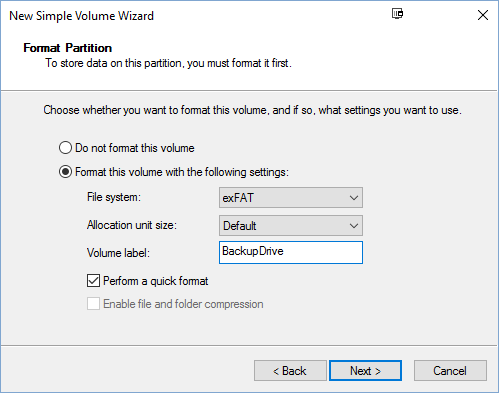 8. Click Next. 9. Click Finish. 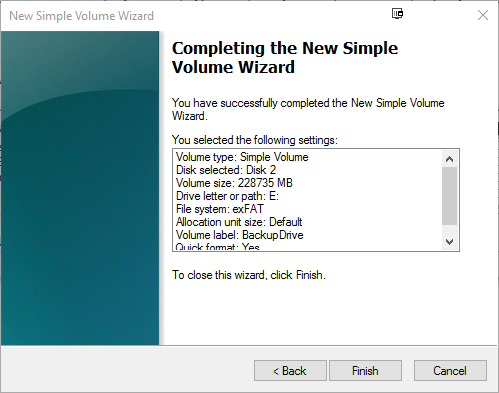 Windows will format the drive as exFAT and you'll be able to use the drive on both Windows and Mac. |
| Re: Windows 10 Settings You Should Change Right Away by Yinksdavid(m): 5:51pm On Sep 10, 2021 |
How to format an external drive in OS X 1. Connect the drive to the Mac. 2. Open Disk Utility. The easiest way to do that is hit CMD and the spacebar at the same time and type in "Disk Utility" to find the program. 3. Select the drive you want to format. 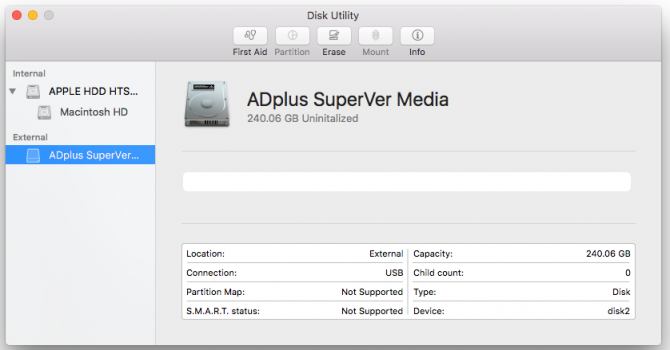 4. Click Erase. 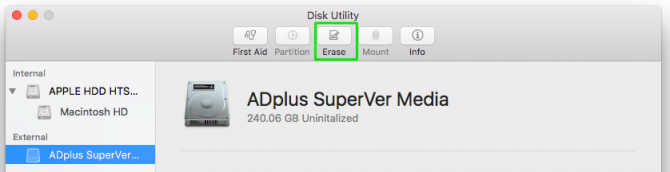 If you don't plan on using the drive for Time Machine, skip steps 5 through 11 below and continue with step 12. 5. Give the drive a descriptive name and leave the default settings: OS X Extended format and GUID partition map. These will format the drive in OS X's HFS+ filetype so it will be compatible with Time Machine. 6. Click Erase and OS X will format the drive. 7. With the drive selected in Disk Utility, click Partition.  8. Enter the amount of space you want to set aside for Time Machine. In this example, we're shrinking the Time Machine partition to 128GB instead of allowing Time Machine to take up the whole drive. 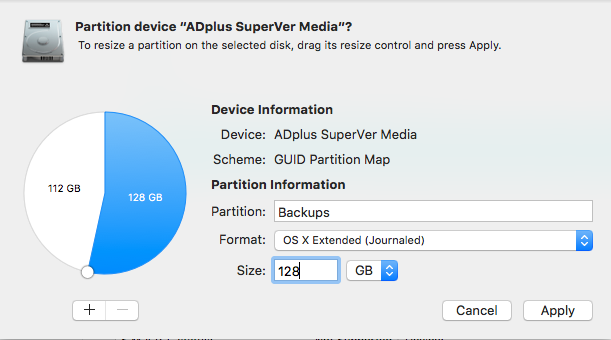 9. Click Apply. 10. Select the new untitled partition so we can format it as exFAT for use with both Mac and Windows.  11. Click Erase. 12. Give the partition a name and select exFAT for the format. 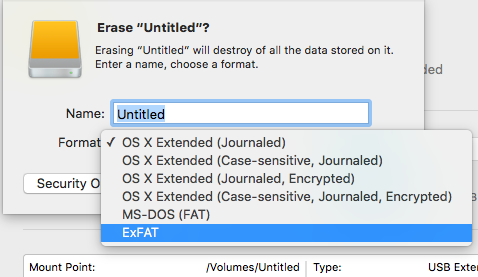 13. Click Erase to finish. Your exFAT-formatted drive or partition can now be used for both Windows and Mac. Note that using a drive frequently between Windows and Mac could increase the chances of file corruption, so make sure you have backups of the files on the shared drive and be extra careful about safely ejecting the drive before disconnecting it from your computer. |
| Re: Windows 10 Settings You Should Change Right Away by Yinksdavid(m): 9:23am On Sep 11, 2021 |
How to Use Maximum CPU Power in Windows 10 For power-hungry applications, Windows 10 has an option to max out your CPU. It’s not the ideal way to run your computer (it produces extra heat), but it should cover your needs for brief periods of high demand usage. 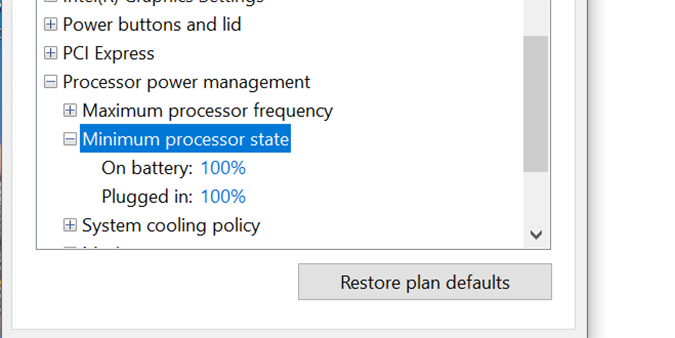 Here’s how it’s done. 1. Right click the Start menu and select Control Panel. 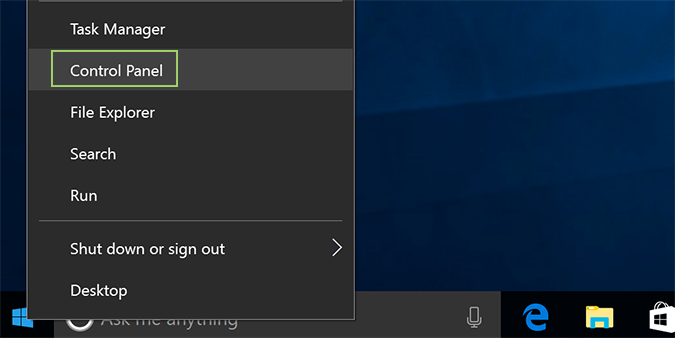 2. Click Hardware and Sound. 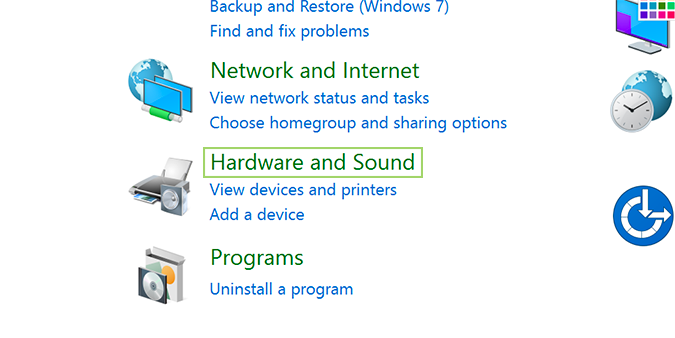 3. Select Power Options. 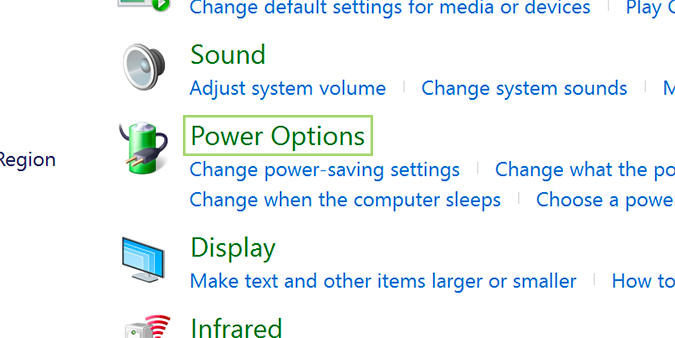 4. Find Processor power management and open the menu for Minimum processor state. 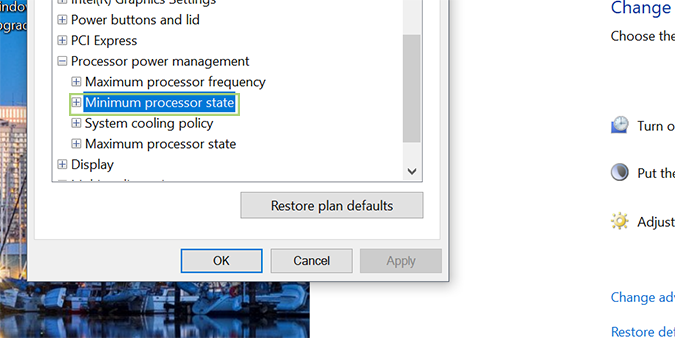 5. Change the setting for on battery to 100%. 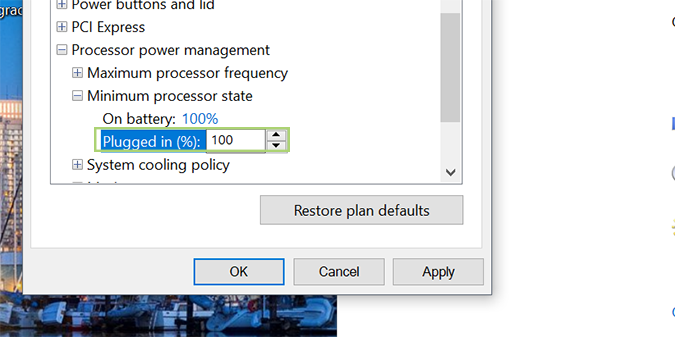 6. Change the setting for plugged in to 100%. [/quote] |
| Re: Windows 10 Settings You Should Change Right Away by Yinksdavid(m): 5:39pm On Sep 16, 2021 |
Genuine License/Activation Keys for the following Microsoft products are available at a very low cost . kindly reach out via my signature for more details. Exchange Server 2016 (Standard and Enterprise Edition) Exchange Server 2019 (Standard and Enterprise Edition) Office 2013 (Professional, Standard and Ultimate version) Office 2016 (Professional, Standard and Ultimate version) Office 2019 (Professional, Standard and Ultimate version) Office 365 - Project Professional 2019 - Office Home and Business 2019 - Visio Professional 2019 - Office Professional Plus 2019 Office Home and Business 2016 for Mac Office Home and Business 2019 for Mac Office Professional Plus 2016 Office Professional Plus 2019 SharePoint Server 2016 (Standard and Enterprise) SharePoint Server 2019 (Standard and Enterprise) Visual Studio Enterprise 2017 Visual Studio Enterprise 2019 Visual Studio 2017 for Mac Visual Studio 2019 for Mac Windows 10 Pro Windows 10 Enterprise Windows 10 Pron N Windows 10 Education Windows Server 2016 (Datacenter, Remote Desktop Services user connection(50) and Standard) Windows Server 2019 (Datacenter, Remote Desktop Services user connection(50) and Standard). |
(1) (Reply)
SOLD!!! Macbook Pro 2017 13-inch 8GB/128SSD @350K / Apple Ipad Mini 4 For Sale / Lenovo T570 Workstation 32gb RAM, 512gb Ssd Core I7
(Go Up)
| Sections: politics (1) business autos (1) jobs (1) career education (1) romance computers phones travel sports fashion health religion celebs tv-movies music-radio literature webmasters programming techmarket Links: (1) (2) (3) (4) (5) (6) (7) (8) (9) (10) Nairaland - Copyright © 2005 - 2024 Oluwaseun Osewa. All rights reserved. See How To Advertise. 50 |