Yinksdavid's Posts
Nairaland Forum › Yinksdavid's Profile › Yinksdavid's Posts
1 2 3 4 5 6 7 8 ... 11 12 13 14 15 16 17 18 19 (of 19 pages)
 Technology Market › Re: Windows 10 Settings You Should Change Right Away by Yinksdavid(op): 5:51pm On Sep 10, 2021 Technology Market › Re: Windows 10 Settings You Should Change Right Away by Yinksdavid(op): 5:51pm On Sep 10, 2021 |
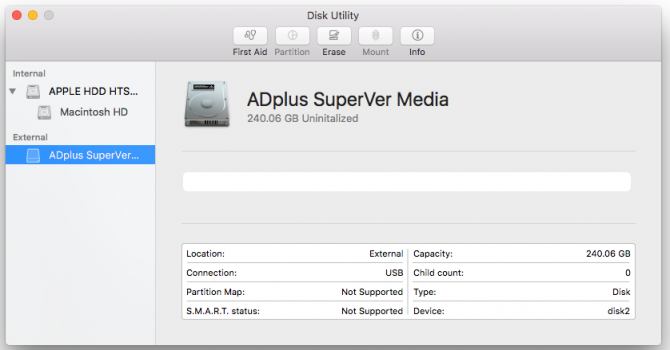
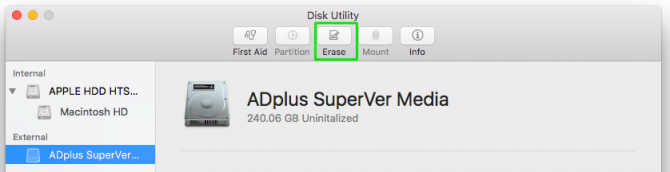
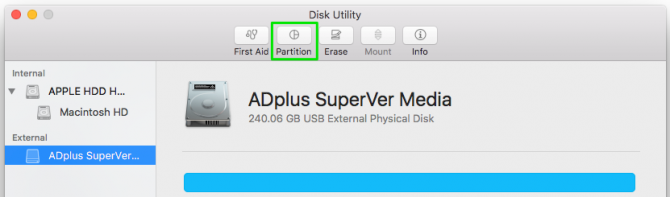
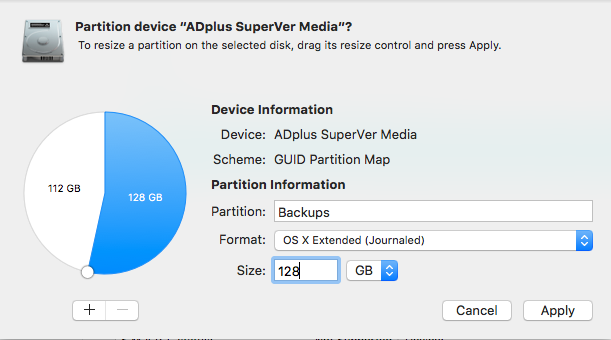
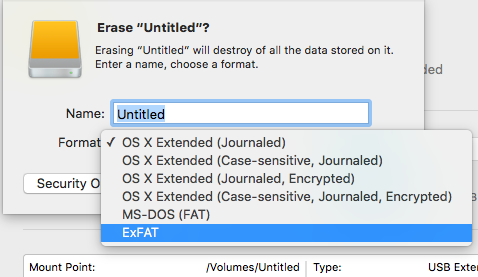
How to format an external drive in OS X 1. Connect the drive to the Mac. 2. Open Disk Utility. The easiest way to do that is hit CMD and the spacebar at the same time and type in "Disk Utility" to find the program. 3. Select the drive you want to format. https://cdn.mos.cms.futurecdn.net/AN5LTboMTcJEfMoHTUjHzL-970-80.png 4. Click Erase. https://cdn.mos.cms.futurecdn.net/torwtNM27wx4byUtqYxcWC-970-80.png If you don't plan on using the drive for Time Machine, skip steps 5 through 11 below and continue with step 12. 5. Give the drive a descriptive name and leave the default settings: OS X Extended format and GUID partition map. These will format the drive in OS X's HFS+ filetype so it will be compatible with Time Machine. 6. Click Erase and OS X will format the drive. 7. With the drive selected in Disk Utility, click Partition. https://cdn.mos.cms.futurecdn.net/o2vrbuLTvSvYJS6oHFvUCU-970-80.png 8. Enter the amount of space you want to set aside for Time Machine. In this example, we're shrinking the Time Machine partition to 128GB instead of allowing Time Machine to take up the whole drive. https://cdn.mos.cms.futurecdn.net/ners4sVsWMSBMzgHLFiYLm-970-80.png 9. Click Apply. 10. Select the new untitled partition so we can format it as exFAT for use with both Mac and Windows. https://cdn.mos.cms.futurecdn.net/GDMsijxTeuqrakfNGbZvhJ-970-80.png 11. Click Erase. 12. Give the partition a name and select exFAT for the format. https://cdn.mos.cms.futurecdn.net/y7aFpVV2mgAqm2chQRkyz6-970-80.png 13. Click Erase to finish. Your exFAT-formatted drive or partition can now be used for both Windows and Mac. Note that using a drive frequently between Windows and Mac could increase the chances of file corruption, so make sure you have backups of the files on the shared drive and be extra careful about safely ejecting the drive before disconnecting it from your computer. |
| Computers › Re: How To Control Windows 10 With Your Voice by Yinksdavid(op): 5:40pm On Sep 10, 2021 |
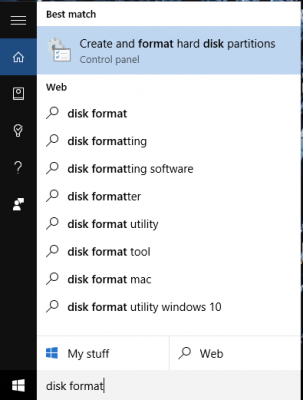
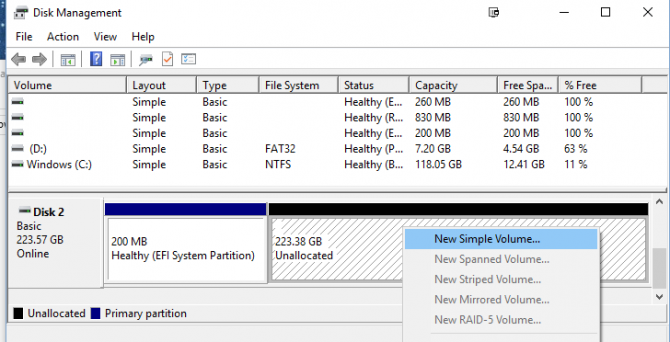
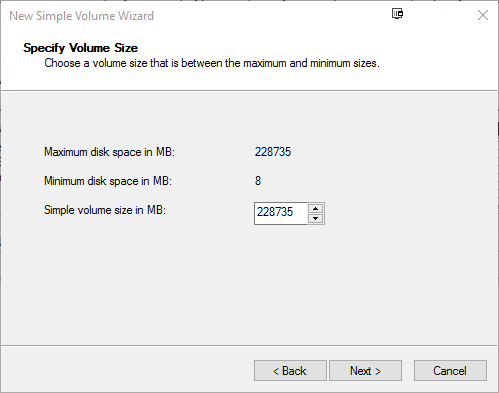
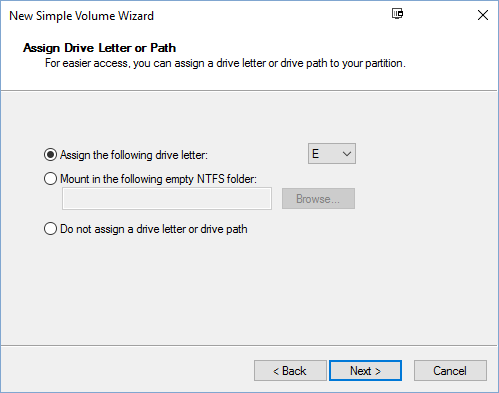
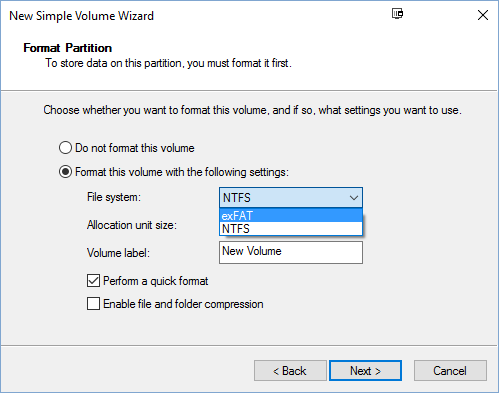
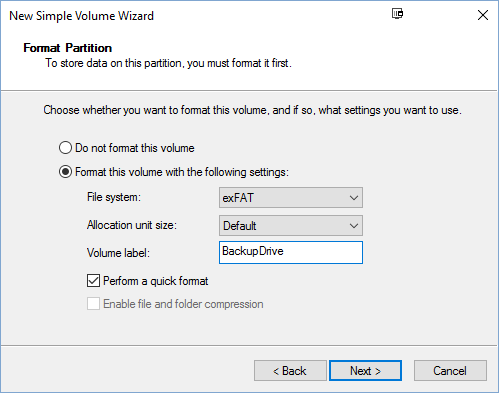
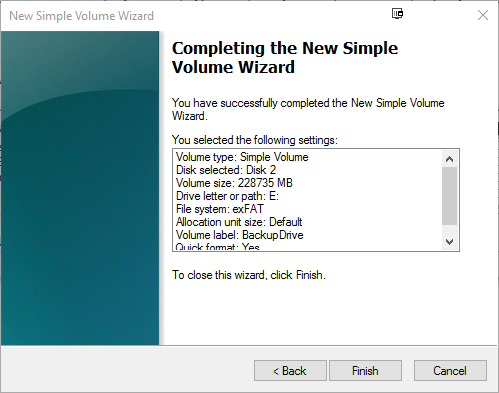
Here's how to format your hard drive in either OS Want to use one external drive for both your Windows PC and your Mac machine? One hurdle you'll face is that, by default, these platforms use different filesystems. Windows uses NTFS while Mac OS uses HFS, and they're incompatible with each other. However, you can format the drive to work with both Windows and Mac by using the exFAT filesystem. Below are the steps to follow In this guide, we're using exFAT instead of FAT32, another filesystem that both Windows and Mac can read and write to, because FAT32 has a maximum 4GB file size limit whereas exFAT can work with files as large as 16EB (exabytes). exFAT also performs better than FAT32. How to format an external drive in Windows The instructions below are for Windows 10, but other versions of Windows from Windows 7 and up can also format an external drive as exFAT for use with Mac as well. 1. Connect the drive to your Windows PC. 2. Open the Disk Management tool. You can do that by typing "disk format" or "disk management" in Windows search or going to Control Panel > Administrative Tools > Create and format hard disk partitions. https://cdn.mos.cms.futurecdn.net/FeLdGhRc9Ff4bVnWzUSbGJ-970-80.png 3. Right-click on the external drive's partition or unallocated space you want to format and choose New Simple Volume… https://cdn.mos.cms.futurecdn.net/vXT3L2Wr2fyg7m3esW92R7-970-80.png 4. Follow the wizard to choose a volume size. https://cdn.mos.cms.futurecdn.net/FK7wuvQpQAPTYWup6ZrMn3-970-80.png 5. Assign a drive letter. https://cdn.mos.cms.futurecdn.net/zbVvPUC7PYZwkdZ6tLesaa-970-80.png 6. Choose exFAT as the file system in the Format Partition screen. https://cdn.mos.cms.futurecdn.net/du6hqFWfYaMwHUDawBSYsZ-970-80.png 7. Give the volume a new name. https://cdn.mos.cms.futurecdn.net/s8jPNVnt5jEhdKUCUiykXW-970-80.png 8. Click Next. 9. Click Finish. https://cdn.mos.cms.futurecdn.net/bxdD7G5wCtcQ8aQdw5poUh-970-80.png Windows will format the drive as exFAT and you'll be able to use the drive on both Windows and Mac. |
| Career › Re: Learn Microsoft Azure by Yinksdavid(op): 5:13pm On Sep 10, 2021 |
How to format an external drive in OS X 1. Connect the drive to the Mac. 2. Open Disk Utility. The easiest way to do that is hit CMD and the spacebar at the same time and type in "Disk Utility" to find the program. 3. Select the drive you want to format. https://cdn.mos.cms.futurecdn.net/AN5LTboMTcJEfMoHTUjHzL-970-80.png 4. Click Erase. https://cdn.mos.cms.futurecdn.net/torwtNM27wx4byUtqYxcWC-970-80.png If you don't plan on using the drive for Time Machine, skip steps 5 through 11 below and continue with step 12. 5. Give the drive a descriptive name and leave the default settings: OS X Extended format and GUID partition map. These will format the drive in OS X's HFS+ filetype so it will be compatible with Time Machine. 6. Click Erase and OS X will format the drive. 7. With the drive selected in Disk Utility, click Partition. https://cdn.mos.cms.futurecdn.net/o2vrbuLTvSvYJS6oHFvUCU-970-80.png 8. Enter the amount of space you want to set aside for Time Machine. In this example, we're shrinking the Time Machine partition to 128GB instead of allowing Time Machine to take up the whole drive. https://cdn.mos.cms.futurecdn.net/ners4sVsWMSBMzgHLFiYLm-970-80.png 9. Click Apply. 10. Select the new untitled partition so we can format it as exFAT for use with both Mac and Windows. https://cdn.mos.cms.futurecdn.net/GDMsijxTeuqrakfNGbZvhJ-970-80.png 11. Click Erase. 12. Give the partition a name and select exFAT for the format. https://cdn.mos.cms.futurecdn.net/y7aFpVV2mgAqm2chQRkyz6-970-80.png 13. Click Erase to finish. Your exFAT-formatted drive or partition can now be used for both Windows and Mac. Note that using a drive frequently between Windows and Mac could increase the chances of file corruption, so make sure you have backups of the files on the shared drive and be extra careful about safely ejecting the drive before disconnecting it from your computer. |
| Technology Market › Re: How To Restart Windows 10 Without Rebooting by Yinksdavid(op): 5:03pm On Sep 10, 2021 |
Here's how to format your hard drive in either OS Want to use one external drive for both your Windows PC and your Mac machine? One hurdle you'll face is that, by default, these platforms use different filesystems. Windows uses NTFS while Mac OS uses HFS, and they're incompatible with each other. However, you can format the drive to work with both Windows and Mac by using the exFAT filesystem. Below are the steps to follow In this guide, we're using exFAT instead of FAT32, another filesystem that both Windows and Mac can read and write to, because FAT32 has a maximum 4GB file size limit whereas exFAT can work with files as large as 16EB (exabytes). exFAT also performs better than FAT32. How to format an external drive in Windows The instructions below are for Windows 10, but other versions of Windows from Windows 7 and up can also format an external drive as exFAT for use with Mac as well. 1. Connect the drive to your Windows PC. 2. Open the Disk Management tool. You can do that by typing "disk format" or "disk management" in Windows search or going to Control Panel > Administrative Tools > Create and format hard disk partitions. https://cdn.mos.cms.futurecdn.net/FeLdGhRc9Ff4bVnWzUSbGJ-970-80.png 3. Right-click on the external drive's partition or unallocated space you want to format and choose New Simple Volume… https://cdn.mos.cms.futurecdn.net/vXT3L2Wr2fyg7m3esW92R7-970-80.png 4. Follow the wizard to choose a volume size. https://cdn.mos.cms.futurecdn.net/FK7wuvQpQAPTYWup6ZrMn3-970-80.png 5. Assign a drive letter. https://cdn.mos.cms.futurecdn.net/zbVvPUC7PYZwkdZ6tLesaa-970-80.png 6. Choose exFAT as the file system in the Format Partition screen. https://cdn.mos.cms.futurecdn.net/du6hqFWfYaMwHUDawBSYsZ-970-80.png 7. Give the volume a new name. https://cdn.mos.cms.futurecdn.net/s8jPNVnt5jEhdKUCUiykXW-970-80.png 8. Click Next. 9. Click Finish. https://cdn.mos.cms.futurecdn.net/bxdD7G5wCtcQ8aQdw5poUh-970-80.png Windows will format the drive as exFAT and you'll be able to use the drive on both Windows and Mac. |
| Science/Technology › Re: How To Move Your Data From An Android Phone To An Iphone by Yinksdavid(op): 5:01pm On Sep 10, 2021 |
Here's how to format your hard drive in either OS Want to use one external drive for both your Windows PC and your Mac machine? One hurdle you'll face is that, by default, these platforms use different filesystems. Windows uses NTFS while Mac OS uses HFS, and they're incompatible with each other. However, you can format the drive to work with both Windows and Mac by using the exFAT filesystem. Below are the steps to follow In this guide, we're using exFAT instead of FAT32, another filesystem that both Windows and Mac can read and write to, because FAT32 has a maximum 4GB file size limit whereas exFAT can work with files as large as 16EB (exabytes). exFAT also performs better than FAT32. How to format an external drive in Windows The instructions below are for Windows 10, but other versions of Windows from Windows 7 and up can also format an external drive as exFAT for use with Mac as well. 1. Connect the drive to your Windows PC. 2. Open the Disk Management tool. You can do that by typing "disk format" or "disk management" in Windows search or going to Control Panel > Administrative Tools > Create and format hard disk partitions. https://cdn.mos.cms.futurecdn.net/FeLdGhRc9Ff4bVnWzUSbGJ-970-80.png 3. Right-click on the external drive's partition or unallocated space you want to format and choose New Simple Volume… https://cdn.mos.cms.futurecdn.net/vXT3L2Wr2fyg7m3esW92R7-970-80.png 4. Follow the wizard to choose a volume size. https://cdn.mos.cms.futurecdn.net/FK7wuvQpQAPTYWup6ZrMn3-970-80.png 5. Assign a drive letter. https://cdn.mos.cms.futurecdn.net/zbVvPUC7PYZwkdZ6tLesaa-970-80.png 6. Choose exFAT as the file system in the Format Partition screen. https://cdn.mos.cms.futurecdn.net/du6hqFWfYaMwHUDawBSYsZ-970-80.png 7. Give the volume a new name. https://cdn.mos.cms.futurecdn.net/s8jPNVnt5jEhdKUCUiykXW-970-80.png 8. Click Next. 9. Click Finish. https://cdn.mos.cms.futurecdn.net/bxdD7G5wCtcQ8aQdw5poUh-970-80.png Windows will format the drive as exFAT and you'll be able to use the drive on both Windows and Mac. Unfortunately, there’s no direct channel that allows you to carry out this switch automatically. You’ll have to manually export and import your Google data and you can easily do that with Google’s Takeout tool. On the Google Takeout website, choose “Google Photos” and “Drive” and hit “Next” to download an archive of your data from them. Visit the iCloud website on your computer and sign in to your account. Enter the “Photos” tab and click the cloud-like button at the top to import your downloaded pictures and videos. For iCloud Drive, the steps are identical. Return to the iCloud homepage and head into “iCloud Drive.” Click the import option to upload all the files you’ve grabbed from your Google Drive storage.[/quote] |
| Technology Market › Re: How To Lock A Folder With A Password In Windows 10 by Yinksdavid(op): 4:20pm On Sep 10, 2021 |
Here's how to format your hard drive in either OS Want to use one external drive for both your Windows PC and your Mac machine? One hurdle you'll face is that, by default, these platforms use different filesystems. Windows uses NTFS while Mac OS uses HFS, and they're incompatible with each other. However, you can format the drive to work with both Windows and Mac by using the exFAT filesystem. Below are the steps to follow In this guide, we're using exFAT instead of FAT32, another filesystem that both Windows and Mac can read and write to, because FAT32 has a maximum 4GB file size limit whereas exFAT can work with files as large as 16EB (exabytes). exFAT also performs better than FAT32. How to format an external drive in Windows The instructions below are for Windows 10, but other versions of Windows from Windows 7 and up can also format an external drive as exFAT for use with Mac as well. 1. Connect the drive to your Windows PC. 2. Open the Disk Management tool. You can do that by typing "disk format" or "disk management" in Windows search or going to Control Panel > Administrative Tools > Create and format hard disk partitions. https://cdn.mos.cms.futurecdn.net/FeLdGhRc9Ff4bVnWzUSbGJ-970-80.png 3. Right-click on the external drive's partition or unallocated space you want to format and choose New Simple Volume… https://cdn.mos.cms.futurecdn.net/vXT3L2Wr2fyg7m3esW92R7-970-80.png 4. Follow the wizard to choose a volume size. https://cdn.mos.cms.futurecdn.net/FK7wuvQpQAPTYWup6ZrMn3-970-80.png 5. Assign a drive letter. https://cdn.mos.cms.futurecdn.net/zbVvPUC7PYZwkdZ6tLesaa-970-80.png 6. Choose exFAT as the file system in the Format Partition screen. https://cdn.mos.cms.futurecdn.net/du6hqFWfYaMwHUDawBSYsZ-970-80.png 7. Give the volume a new name. https://cdn.mos.cms.futurecdn.net/s8jPNVnt5jEhdKUCUiykXW-970-80.png 8. Click Next. 9. Click Finish. https://cdn.mos.cms.futurecdn.net/bxdD7G5wCtcQ8aQdw5poUh-970-80.png Windows will format the drive as exFAT and you'll be able to use the drive on both Windows and Mac. |
| Technology Market › Re: Genuine Microsoft Windows/office/exchange Activation Keys by Yinksdavid(op): 4:17pm On Sep 10, 2021 |
Here's how to format your hard drive in either OS Want to use one external drive for both your Windows PC and your Mac machine? One hurdle you'll face is that, by default, these platforms use different filesystems. Windows uses NTFS while Mac OS uses HFS, and they're incompatible with each other. However, you can format the drive to work with both Windows and Mac by using the exFAT filesystem. Below are the steps to follow In this guide, we're using exFAT instead of FAT32, another filesystem that both Windows and Mac can read and write to, because FAT32 has a maximum 4GB file size limit whereas exFAT can work with files as large as 16EB (exabytes). exFAT also performs better than FAT32. How to format an external drive in Windows The instructions below are for Windows 10, but other versions of Windows from Windows 7 and up can also format an external drive as exFAT for use with Mac as well. 1. Connect the drive to your Windows PC. 2. Open the Disk Management tool. You can do that by typing "disk format" or "disk management" in Windows search or going to Control Panel > Administrative Tools > Create and format hard disk partitions. https://cdn.mos.cms.futurecdn.net/FeLdGhRc9Ff4bVnWzUSbGJ-970-80.png 3. Right-click on the external drive's partition or unallocated space you want to format and choose New Simple Volume… https://cdn.mos.cms.futurecdn.net/vXT3L2Wr2fyg7m3esW92R7-970-80.png 4. Follow the wizard to choose a volume size. https://cdn.mos.cms.futurecdn.net/FK7wuvQpQAPTYWup6ZrMn3-970-80.png 5. Assign a drive letter. https://cdn.mos.cms.futurecdn.net/zbVvPUC7PYZwkdZ6tLesaa-970-80.png 6. Choose exFAT as the file system in the Format Partition screen. https://cdn.mos.cms.futurecdn.net/du6hqFWfYaMwHUDawBSYsZ-970-80.png 7. Give the volume a new name. https://cdn.mos.cms.futurecdn.net/s8jPNVnt5jEhdKUCUiykXW-970-80.png 8. Click Next. 9. Click Finish. https://cdn.mos.cms.futurecdn.net/bxdD7G5wCtcQ8aQdw5poUh-970-80.png Windows will format the drive as exFAT and you'll be able to use the drive on both Windows and Mac. |
| Technology Market › Re: Windows 10 Settings You Should Change Right Away by Yinksdavid(op): 4:07pm On Sep 10, 2021 |
Here's how to format your hard drive in either OS Want to use one external drive for both your Windows PC and your Mac machine? One hurdle you'll face is that, by default, these platforms use different filesystems. Windows uses NTFS while Mac OS uses HFS, and they're incompatible with each other. However, you can format the drive to work with both Windows and Mac by using the exFAT filesystem. Below are the steps to follow In this guide, we're using exFAT instead of FAT32, another filesystem that both Windows and Mac can read and write to, because FAT32 has a maximum 4GB file size limit whereas exFAT can work with files as large as 16EB (exabytes). exFAT also performs better than FAT32. How to format an external drive in Windows The instructions below are for Windows 10, but other versions of Windows from Windows 7 and up can also format an external drive as exFAT for use with Mac as well. 1. Connect the drive to your Windows PC. 2. Open the Disk Management tool. You can do that by typing "disk format" or "disk management" in Windows search or going to Control Panel > Administrative Tools > Create and format hard disk partitions. https://cdn.mos.cms.futurecdn.net/FeLdGhRc9Ff4bVnWzUSbGJ-970-80.png 3. Right-click on the external drive's partition or unallocated space you want to format and choose New Simple Volume… https://cdn.mos.cms.futurecdn.net/vXT3L2Wr2fyg7m3esW92R7-970-80.png 4. Follow the wizard to choose a volume size. https://cdn.mos.cms.futurecdn.net/FK7wuvQpQAPTYWup6ZrMn3-970-80.png 5. Assign a drive letter. https://cdn.mos.cms.futurecdn.net/zbVvPUC7PYZwkdZ6tLesaa-970-80.png 6. Choose exFAT as the file system in the Format Partition screen. https://cdn.mos.cms.futurecdn.net/du6hqFWfYaMwHUDawBSYsZ-970-80.png 7. Give the volume a new name. https://cdn.mos.cms.futurecdn.net/s8jPNVnt5jEhdKUCUiykXW-970-80.png 8. Click Next. 9. Click Finish. https://cdn.mos.cms.futurecdn.net/bxdD7G5wCtcQ8aQdw5poUh-970-80.png Windows will format the drive as exFAT and you'll be able to use the drive on both Windows and Mac. |
| Technology Market › Re: How To Send Disappearing Photos And Videos On Whatsapp by Yinksdavid(op): 4:01pm On Sep 10, 2021 |
Here's how to format your hard drive in either OS Want to use one external drive for both your Windows PC and your Mac machine? One hurdle you'll face is that, by default, these platforms use different filesystems. Windows uses NTFS while Mac OS uses HFS, and they're incompatible with each other. However, you can format the drive to work with both Windows and Mac by using the exFAT filesystem. Below are the steps to follow In this guide, we're using exFAT instead of FAT32, another filesystem that both Windows and Mac can read and write to, because FAT32 has a maximum 4GB file size limit whereas exFAT can work with files as large as 16EB (exabytes). exFAT also performs better than FAT32. How to format an external drive in Windows The instructions below are for Windows 10, but other versions of Windows from Windows 7 and up can also format an external drive as exFAT for use with Mac as well. 1. Connect the drive to your Windows PC. 2. Open the Disk Management tool. You can do that by typing "disk format" or "disk management" in Windows search or going to Control Panel > Administrative Tools > Create and format hard disk partitions. https://cdn.mos.cms.futurecdn.net/FeLdGhRc9Ff4bVnWzUSbGJ-970-80.png 3. Right-click on the external drive's partition or unallocated space you want to format and choose New Simple Volume… https://cdn.mos.cms.futurecdn.net/vXT3L2Wr2fyg7m3esW92R7-970-80.png 4. Follow the wizard to choose a volume size. https://cdn.mos.cms.futurecdn.net/FK7wuvQpQAPTYWup6ZrMn3-970-80.png 5. Assign a drive letter. https://cdn.mos.cms.futurecdn.net/zbVvPUC7PYZwkdZ6tLesaa-970-80.png 6. Choose exFAT as the file system in the Format Partition screen. https://cdn.mos.cms.futurecdn.net/du6hqFWfYaMwHUDawBSYsZ-970-80.png 7. Give the volume a new name. https://cdn.mos.cms.futurecdn.net/s8jPNVnt5jEhdKUCUiykXW-970-80.png 8. Click Next. 9. Click Finish. https://cdn.mos.cms.futurecdn.net/bxdD7G5wCtcQ8aQdw5poUh-970-80.png Windows will format the drive as exFAT and you'll be able to use the drive on both Windows and Mac. |
| Career › Re: Learn Microsoft Azure by Yinksdavid(op): 3:34pm On Sep 10, 2021 |
Here's how to format your hard drive in either OS Want to use one external drive for both your Windows PC and your Mac machine? One hurdle you'll face is that, by default, these platforms use different filesystems. Windows uses NTFS while Mac OS uses HFS, and they're incompatible with each other. However, you can format the drive to work with both Windows and Mac by using the exFAT filesystem. Below are the steps to follow In this guide, we're using exFAT instead of FAT32, another filesystem that both Windows and Mac can read and write to, because FAT32 has a maximum 4GB file size limit whereas exFAT can work with files as large as 16EB (exabytes). exFAT also performs better than FAT32. How to format an external drive in Windows The instructions below are for Windows 10, but other versions of Windows from Windows 7 and up can also format an external drive as exFAT for use with Mac as well. 1. Connect the drive to your Windows PC. 2. Open the Disk Management tool. You can do that by typing "disk format" or "disk management" in Windows search or going to Control Panel > Administrative Tools > Create and format hard disk partitions. https://cdn.mos.cms.futurecdn.net/FeLdGhRc9Ff4bVnWzUSbGJ-970-80.png 3. Right-click on the external drive's partition or unallocated space you want to format and choose New Simple Volume… https://cdn.mos.cms.futurecdn.net/vXT3L2Wr2fyg7m3esW92R7-970-80.png 4. Follow the wizard to choose a volume size. https://cdn.mos.cms.futurecdn.net/FK7wuvQpQAPTYWup6ZrMn3-970-80.png 5. Assign a drive letter. https://cdn.mos.cms.futurecdn.net/zbVvPUC7PYZwkdZ6tLesaa-970-80.png 6. Choose exFAT as the file system in the Format Partition screen. https://cdn.mos.cms.futurecdn.net/du6hqFWfYaMwHUDawBSYsZ-970-80.png 7. Give the volume a new name. https://cdn.mos.cms.futurecdn.net/s8jPNVnt5jEhdKUCUiykXW-970-80.png 8. Click Next. 9. Click Finish. https://cdn.mos.cms.futurecdn.net/bxdD7G5wCtcQ8aQdw5poUh-970-80.png Windows will format the drive as exFAT and you'll be able to use the drive on both Windows and Mac. |
| Technology Market › Re: Windows 10 Settings You Should Change Right Away by Yinksdavid(op): 8:14am On Sep 10, 2021 |
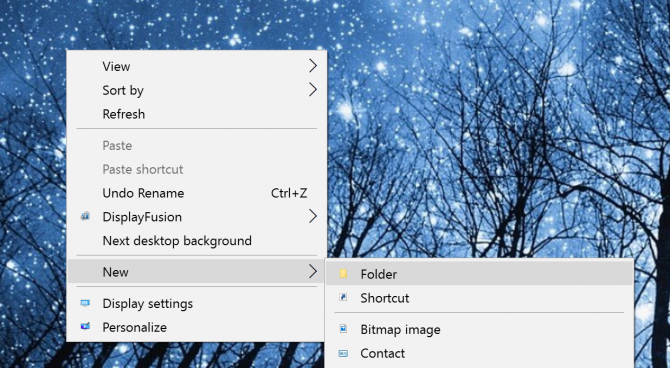
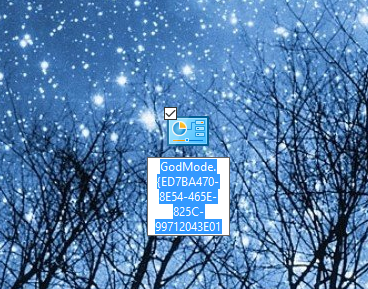
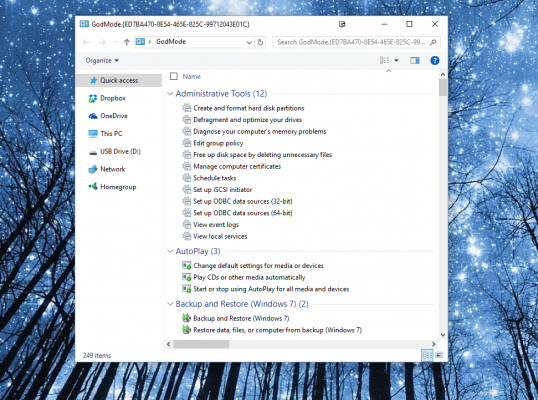
Morning People, Sorry i have to use this already owned topic as I could not create a new topic on the forum due to the error "Please wait for a few minutes before submitting this post. Our server is overwhelmed". Today, I want to share on How to Activate Windows 10's God Mode A legendary folder hidden in Windows 10 gives you quick access to a ton of handy settings in one place. The so-called "God Mode" folder provides links to a range of administration tools and tweaks in Windows. It's been around for a while in older versions of Windows is still alive and well. Here's how to activate the omnipotent "God Mode" in Windows 10. 1. Right-click on the desktop and go to New > Folder to create a new folder. https://cdn.mos.cms.futurecdn.net/vgmXMyZdWCoKvPUUWGNdWA-970-80.png 2. Name the folder: GodMode.{ED7BA470-8E54-465E-825C-99712043E01C} (Complete with the period after GodMode and the curly brackets) https://cdn.mos.cms.futurecdn.net/xv3jF9dvJ6hynZsMH2c7U8-970-80.png Note that you can replace "GodMode" with any text you want, such as "JediMode" or "NinjaMode". 3. Open the GodMode folder to access over 260 commands, from administrative tools to backup tools to internet options and other important settings. https://cdn.mos.cms.futurecdn.net/7pFmhMzTQuUjiFczNFcDnC-970-80.png You can also drag and drop any of the commands from your GodMode folder to your desktop for quick access in the future. |
| Computers › Re: Windows 10 Problems And Solutions (official Microsoft Windows 10 links added) by Yinksdavid(m): 7:59am On Sep 10, 2021*. Modified: 4:04pm On Sep 10, 2021 |
Here's how to format your hard drive in either OS Want to use one external drive for both your Windows PC and your Mac machine? One hurdle you'll face is that, by default, these platforms use different filesystems. Windows uses NTFS while Mac OS uses HFS, and they're incompatible with each other. However, you can format the drive to work with both Windows and Mac by using the exFAT filesystem. Below are the steps to follow In this guide, we're using exFAT instead of FAT32, another filesystem that both Windows and Mac can read and write to, because FAT32 has a maximum 4GB file size limit whereas exFAT can work with files as large as 16EB (exabytes). exFAT also performs better than FAT32. How to format an external drive in Windows The instructions below are for Windows 10, but other versions of Windows from Windows 7 and up can also format an external drive as exFAT for use with Mac as well. 1. Connect the drive to your Windows PC. 2. Open the Disk Management tool. You can do that by typing "disk format" or "disk management" in Windows search or going to Control Panel > Administrative Tools > Create and format hard disk partitions. https://cdn.mos.cms.futurecdn.net/FeLdGhRc9Ff4bVnWzUSbGJ-970-80.png 3. Right-click on the external drive's partition or unallocated space you want to format and choose New Simple Volume… https://cdn.mos.cms.futurecdn.net/vXT3L2Wr2fyg7m3esW92R7-970-80.png 4. Follow the wizard to choose a volume size. https://cdn.mos.cms.futurecdn.net/FK7wuvQpQAPTYWup6ZrMn3-970-80.png 5. Assign a drive letter. https://cdn.mos.cms.futurecdn.net/zbVvPUC7PYZwkdZ6tLesaa-970-80.png 6. Choose exFAT as the file system in the Format Partition screen. https://cdn.mos.cms.futurecdn.net/du6hqFWfYaMwHUDawBSYsZ-970-80.png 7. Give the volume a new name. https://cdn.mos.cms.futurecdn.net/s8jPNVnt5jEhdKUCUiykXW-970-80.png 8. Click Next. 9. Click Finish. https://cdn.mos.cms.futurecdn.net/bxdD7G5wCtcQ8aQdw5poUh-970-80.png Windows will format the drive as exFAT and you'll be able to use the drive on both Windows and Mac. |
| Nairaland General › Re: Admin@nairaland- Why Is Nairaland Server Overwhelmed Most Of The Time. by Yinksdavid(m): 7:44am On Sep 10, 2021 |
Mediadise:I am experiencing the same problem. Please who might know the reason or solution should kindly reach out |
| Programming › Re: I Want To Learn Programming. Which Language Should I Start With? by Yinksdavid(m): 12:22pm On Sep 09, 2021 |
stanliwise:Even though i concur with the response above, i still feel Think4myself needs guidance hence he reason he asked the question. There are lots of projects online and all you need is to get one, keep checking the source codes to learn and improve but it also seems you are just about stating with programming so the below link will provide simplified details of projects and what you need as a beginner. https://www.freecodecamp.org/news/javascript-projects-for-beginners/ |
| Technology Market › How To Enable Offline Gmail In Chrome by Yinksdavid(op): 11:58am On Sep 09, 2021 |
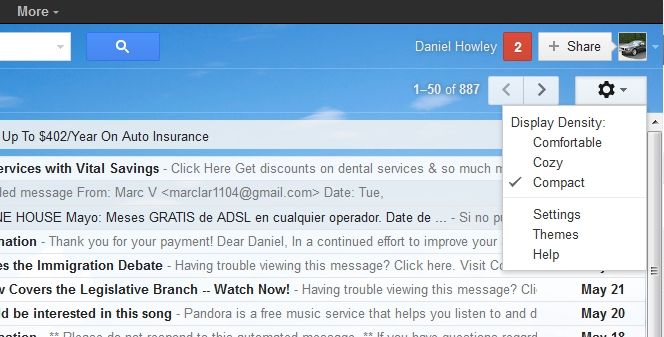
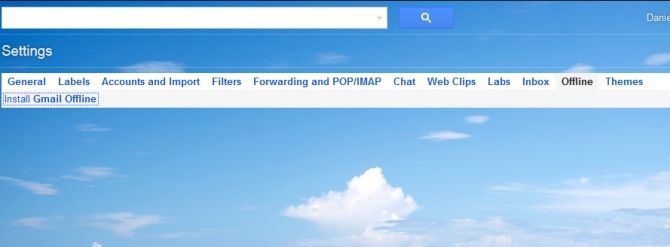
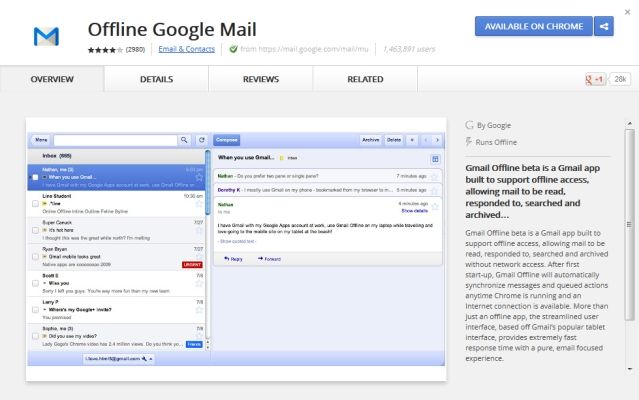
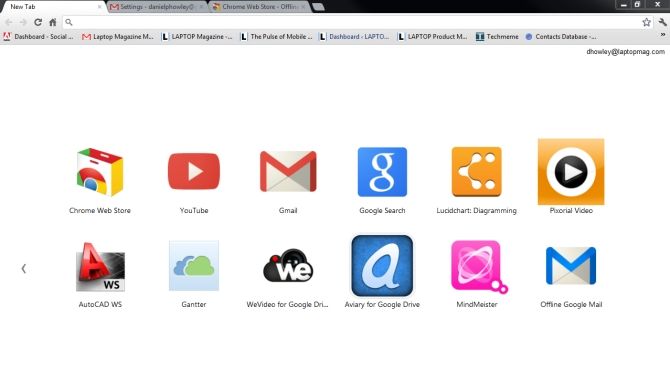
Like Google Docs, Gmail provides users with the ability to access content offline. However, where Docs just lets you view files, Gmail allows you to edit emails without an active Internet connection when signed in through Google Chrome. Viewing and searching messages happens in real-time, while sent messages are stored and fired off when you reconnect to the web. To activate the offline Gmail, follow our quick how-to below. 1. Sign into your Gmail account through Google Chrome. https://cdn.mos.cms.futurecdn.net/dhNcmrwhcisfwj99bPmuwe-970-80.jpg 2. Click the gear icon in the right corner of the screen and select Settings. https://cdn.mos.cms.futurecdn.net/6cvsmFDjijKeJfwxpXQakS-970-80.jpg 3. From the navigation bar, choose Offline and click Install Gmail Offline. https://cdn.mos.cms.futurecdn.net/Z5dwEtCfPmU6oypeM4A2CA-970-80.jpg 4. Click the blue Add To Chrome box and choose Add from the Confirm New App screen. https://cdn.mos.cms.futurecdn.net/QEpRYVCXfpi2pqc8BsDTxM-970-80.jpg 5. After the app is finished installing, an Offline Google Mail icon should automatically appear on your Chrome app page. https://cdn.mos.cms.futurecdn.net/7ePo6riu8Yvrsbpsv2FsPd-970-80.jpg 6. Click the icon, select Allow offline mail and click Continue. https://cdn.mos.cms.futurecdn.net/UToxiBUNR5EzdhKfHe3hYc-970-80.jpg From now on your Gmail account will sync with your computer, allowing you to access your mail while offline. |
| Technology Market › Re: How To Get Superfast Mouse, Touchpad Speeds In Windows by Yinksdavid(op): 11:38am On Sep 09, 2021 |
uchaymart:You are welcome and please feel free to ask anything regarding Cloud computing(Microsoft Azure to precise) or OS related issues on your work stations. Even IT related issues in general(At least i might be able to provide materials/links to help). |
| Technology Market › Re: How To Get Superfast Mouse, Touchpad Speeds In Windows by Yinksdavid(op): 11:19am On Sep 09, 2021 |
Jaydot01:Thanks. Stay blessed |
| Technology Market › Re: How To Get Superfast Mouse, Touchpad Speeds In Windows by Yinksdavid(op): 11:19am On Sep 09, 2021 |
Enddy50ty:Glad to know you are learning from my posts and please stay tuned as I have so many infos to share. You are always welcome 1 Like |
| Webmasters › Re: Learn Web Design LIVE On Nairaland!!! by Yinksdavid(m): 6:13am On Sep 09, 2021 |
Microsoft Visual Studio is an IDE made by Microsoft and used for different types of software development such as computer programs, websites, web apps, web services, and mobile apps. It contains completion tools, compilers, and other features to facilitate the software development process. How does it work? The Visual Studio IDE (integrated development environment) is a software program for developers to write and edit their code. Its user interface is used for software development to edit, debug and build code. Visual Studio includes a code editor supporting IntelliSense (the code completion component) as well as code refactoring. The integrated debugger works both as a source-level debugger and a machine-level debugger. Other built-in tools include a code profiler, designer for building GUI applications, web designer, class designer, and database schema designer. Try it now Visual Studio Dev Essentials Get everything you need to build and deploy your app on any platform. With state-of-the-art tools, the power of the cloud, training, and support, it's our most comprehensive free developer program ever. You can learn more about it from the link below https://docs.microsoft.com/en-us/visualstudio/get-started/visual-studio-ide?view=vs-2019 For your genuine Microsoft activation/license key, kindly reach out to me at yinks.azure@gmail.com |
| Programming › Re: I Want To Learn Programming. Which Language Should I Start With? by Yinksdavid(m): 6:10am On Sep 09, 2021 |
Good Morning All, If you are having issues with installing or updating your Windows 10 OS, experience any issue after installation, need to know how best to utilize your Windows 10 or you are curious for knowledge purposes about Windows 10 OS, Kindly reach out to me via yinks.azure@gmail.com or the whatsapp number below on my signature and I would be glad to assist. Thanks This also applies to other Microsoft Applications such as Office, Office365, Outlook2019, Sharepoint2019, Dynamics CRM, Exchange Server, Windows Server |
| Technology Market › Re: Genuine Microsoft Windows/office/exchange Activation Keys by Yinksdavid(op): 6:08am On Sep 09, 2021 |
Good Morning All, If you are having issues with installing or updating your Windows 10 OS, experience any issue after installation, need to know how best to utilize your Windows 10 or you are curious for knowledge purposes about Windows 10 OS, Kindly reach out to me via yinks.azure@gmail.com or the whatsapp number below on my signature and I would be glad to assist. Thanks This also applies to other Microsoft Applications such as Office, Office365, Outlook2019, Sharepoint2019, Dynamics CRM, Exchange Server, Windows Server |
| Technology Market › Re: Windows 10 Settings You Should Change Right Away by Yinksdavid(op): 6:08am On Sep 09, 2021 |
Good Morning All, If you are having issues with installing or updating your Windows 10 OS, experience any issue after installation, need to know how best to utilize your Windows 10 or you are curious for knowledge purposes about Windows 10 OS, Kindly reach out to me via yinks.azure@gmail.com or the whatsapp number below on my signature and I would be glad to assist. Thanks This also applies to other Microsoft Applications such as Office, Office365, Outlook2019, Sharepoint2019, Dynamics CRM, Exchange Server, Windows Server |
| Technology Market › Re: How To Lock A Folder With A Password In Windows 10 by Yinksdavid(op): 6:07am On Sep 09, 2021 |
Good Morning All, If you are having issues with installing or updating your Windows 10 OS, experience any issue after installation, need to know how best to utilize your Windows 10 or you are curious for knowledge purposes about Windows 10 OS, Kindly reach out to me via yinks.azure@gmail.com or the whatsapp number below on my signature and I would be glad to assist. Thanks This also applies to other Microsoft Applications such as Office, Office365, Outlook2019, Sharepoint2019, Dynamics CRM, Exchange Server, Windows Server. |
| Technology Market › Re: How To Create Desktop Shortcuts For Web Pages Using Chrome by Yinksdavid(op): 6:06am On Sep 09, 2021 |
Good Morning All, If you are having issues with installing or updating your Windows 10 OS, experience any issue after installation, need to know how best to utilize your Windows 10 or you are curious for knowledge purposes about Windows 10 OS, Kindly reach out to me via yinks.azure@gmail.com or the whatsapp number below on my signature and I would be glad to assist. Thanks This also applies to other Microsoft Applications such as Office, Office365, Outlook2019, Sharepoint2019, Dynamics CRM, Exchange Server, Windows Server. 1 Like |
| Technology Market › Re: How To Get Superfast Mouse, Touchpad Speeds In Windows by Yinksdavid(op): 6:05am On Sep 09, 2021 |
Good Morning All, If you are having issues with installing or updating your Windows 10 OS, experience any issue after installation, need to know how best to utilize your Windows 10 or you are curious for knowledge purposes about Windows 10 OS, Kindly reach out to me via yinks.azure@gmail.com or the whatsapp number below on my signature and I would be glad to assist. Thanks This also applies to other Microsoft Applications such as Office, Office365, Outlook2019, Sharepoint2019, Dynamics CRM, Exchange Server, Windows Server. |
| Technology Market › Re: How To Get Superfast Mouse, Touchpad Speeds In Windows by Yinksdavid(op): 6:03am On Sep 09, 2021 |
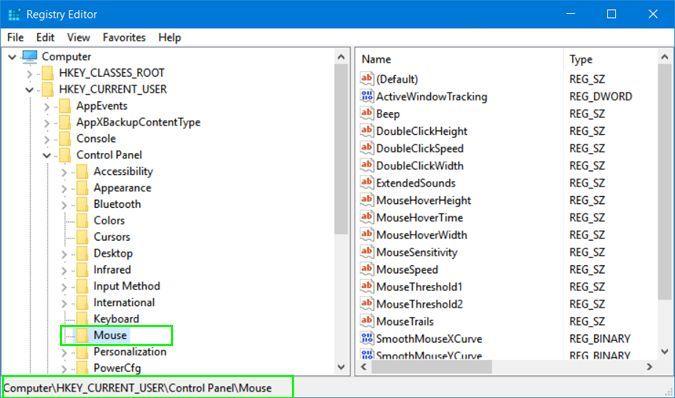
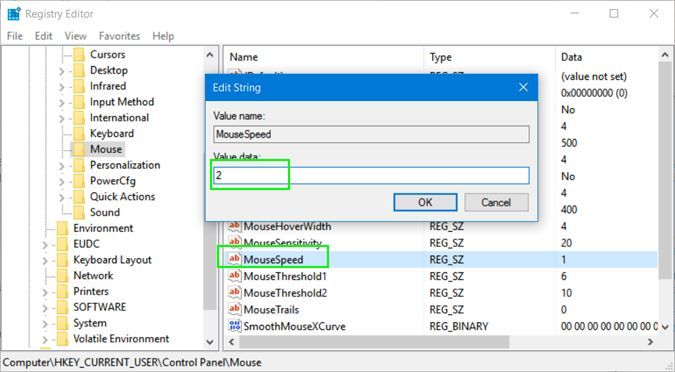
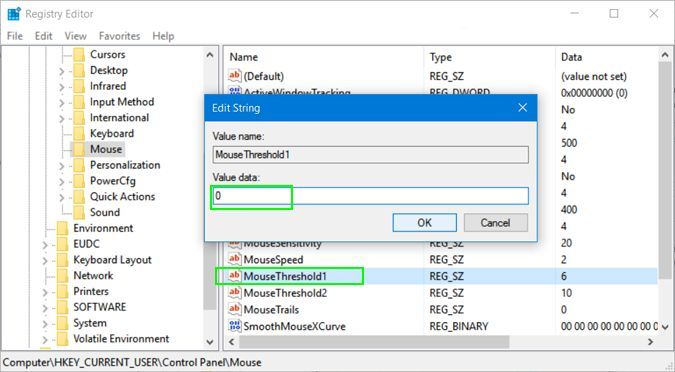
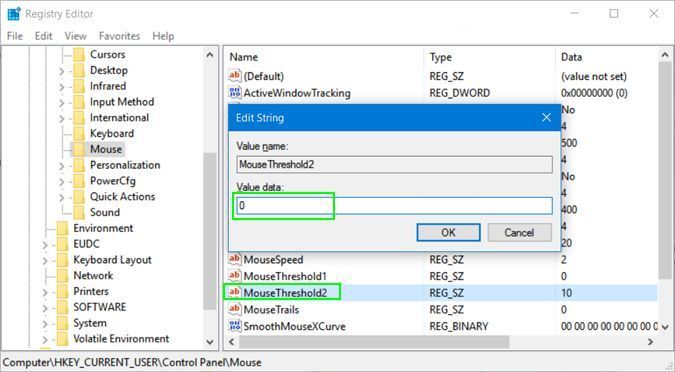
Edit Your Registry for Maximum Pointer Speed 1. Open the Registry Editor. You can get there by hitting Windows + R, entering regedit in the box and hitting Enter. 2. Navigate to HKEY_CURRENT_USER\Control Panel\Mouse by opening the navigation tree in the left window pane. https://cdn.mos.cms.futurecdn.net/qA2TPx2Q4grnxSGKjEC6pE-970-80.jpg 3. Set the MouseSpeed to 2 by double-clicking on MouseSpeed and then entering 2 in the value field. https://cdn.mos.cms.futurecdn.net/4thfn9P37dXs4NSykbp5Am-970-80.jpg 4. Set MouseThreshold1 to 0. https://cdn.mos.cms.futurecdn.net/ES5XJAnhrF7VxeQF4jfWBW-970-80.jpg 5. Set MouseThreshold2 to 0. https://cdn.mos.cms.futurecdn.net/JLwkwonfwCMdeNCVDPEqyG-970-80.jpg 6. Close the registry editor and reboot your PC. |
| Technology Market › How To Get Superfast Mouse, Touchpad Speeds In Windows by Yinksdavid(op): 5:56am On Sep 09, 2021 |
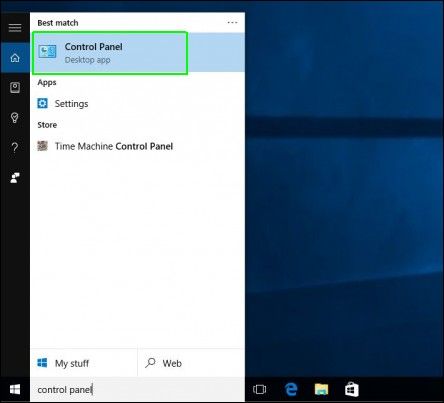
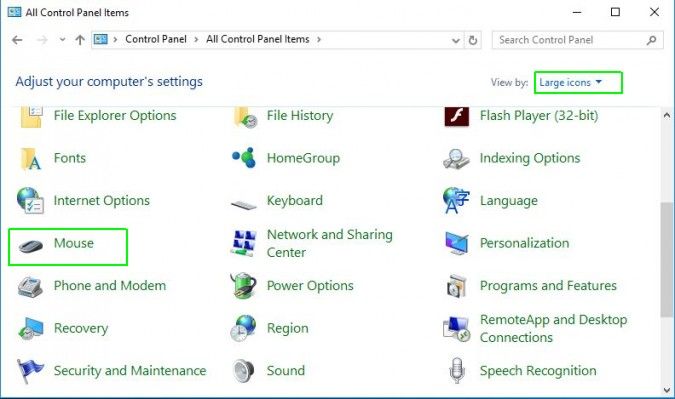
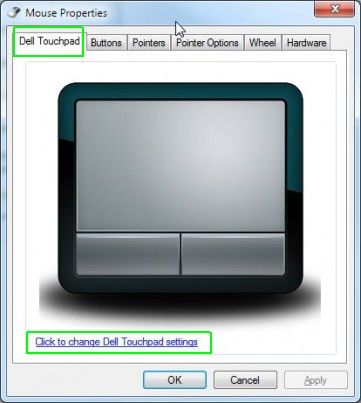
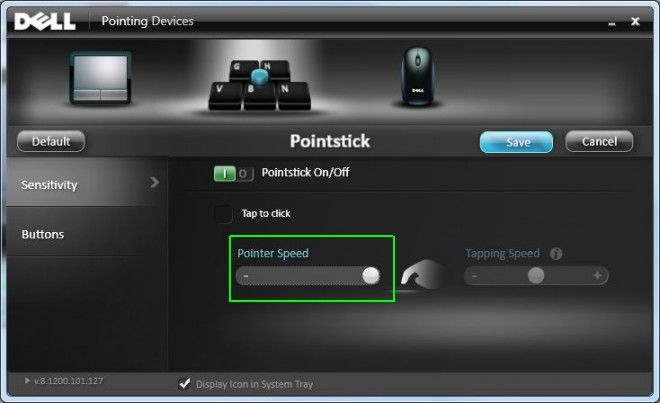
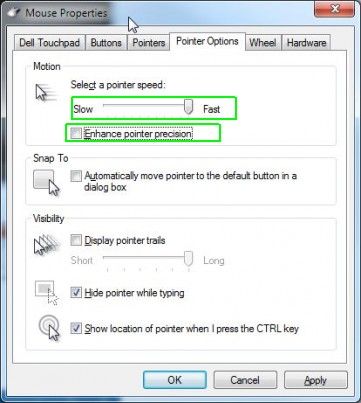
Good Morning All, Sometimes, no matter how much you turn up the settings, your touchpad (or other pointing device) just doesn't cover enough ground in a single stroke. You shouldn't have to lift up your finger, move it back to the other side of the pad and swipe again to make it across your desktop. And, If you have a laptop with a pointing stick such as a Lenovo ThinkPad, you really don't want to have to push the stick really hard just to move around. Fortunately, with a simple registry tweak, Windows 10 and previous versions provide a way to push your pointer speed and sensitivity higher than the control panel allows. Before You Begin Before you edit your registry, make sure your pointer speed is turned up to the maximum in your touchpad / pointing stick software or in the mouse control panel. To get there: 1. Navigate to the Windows Control Panel. You can get there by opening the Start menu and searching for "control panel." https://cdn.mos.cms.futurecdn.net/RDPxSqYgTM6rrpxYCKQ6YC-970-80.jpg 2. Open the mouse menu. If you don't see the Mouse icon, set the "View by" menu to Large icons. https://cdn.mos.cms.futurecdn.net/acTDvewQKpvvVdz4FohioZ-970-80.jpg 3. Open your touchpad driver (if there's a link to it). It may have its own tab (ex: Dell Touchpad) https://cdn.mos.cms.futurecdn.net/fPsnXoRKJEWWo5A7ZnkV67-970-80.jpg 4. Set the pointer speed to max. You may have to set it separately for the touchpad and pointing stick. https://cdn.mos.cms.futurecdn.net/kfA5Dgxcq6h6kMFRZojxV9-970-80.jpg 5. Navigate to the pointer options tab in the Mouse Properties window. https://cdn.mos.cms.futurecdn.net/Kw8Lcb8p4QZzsGVUR8nKr5-970-80.jpg 6. Move the pointer speed slider all the way to the right and uncheck "Enhance pointer precision." https://cdn.mos.cms.futurecdn.net/xeVSco4g2uzurHGWSAEDm6-970-80.jpg 7. Click OK. |
| Technology Market › How To Create Desktop Shortcuts For Web Pages Using Chrome by Yinksdavid(op): 7:44pm On Sep 08, 2021 |
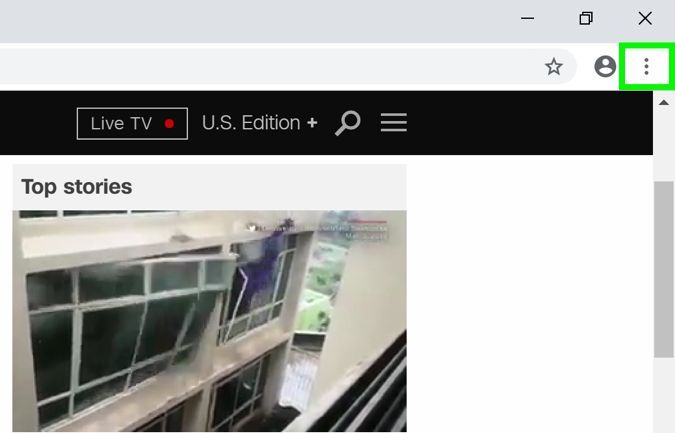
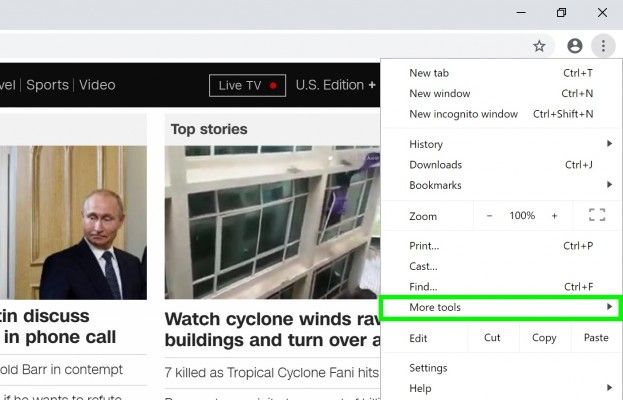
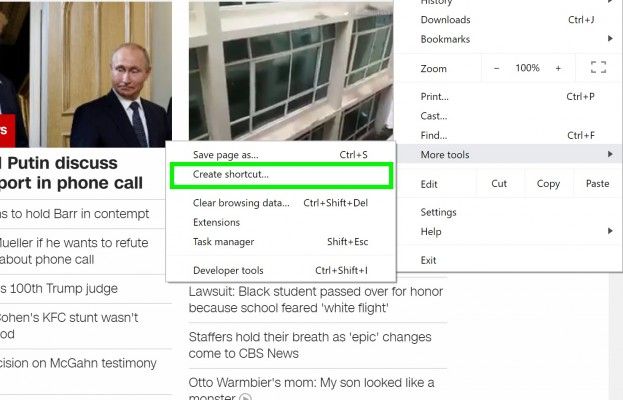
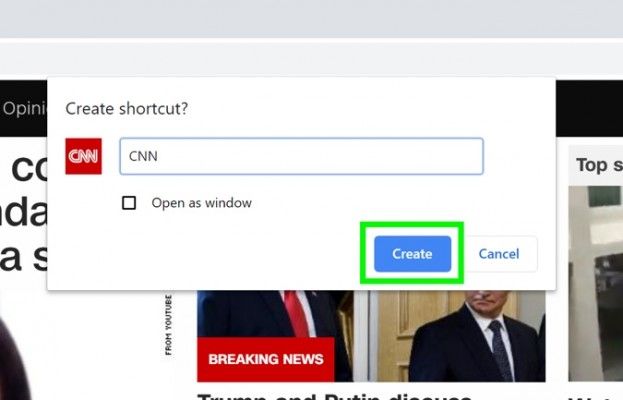
Everyone has a favourite web page that they navigate to as soon as they open their web browser. Whether it's CNN, Gmail or your most beloved sports/entertainment websites(For me, its dailymail.co.uk, footyroom and now nairaland), we all have that one page that we consider more important than the rest. This is why you'll want to know how to create a shortcut to a website on your desktop. You want to known what's happening in the world now, not two seconds from now. Thankfully, Google Chrome makes it easy to drop clickable links onto your desktop, letting you jump to a web page in one click. Here's how to create desktop shortcuts for your favourite web pages using Chrome. How to Create a Shortcut to a Website With Chrome 1. Navigate to your favourite page and click the ••• icon in the right corner of the screen. https://cdn.mos.cms.futurecdn.net/N5wVDZkq4h78gy8PHCCYMk-970-80.jpg 2. Select More tools. https://cdn.mos.cms.futurecdn.net/mk3dLrDRDxVq7gEoZgitFi-970-80.jpg 3. Select Create Shortcut... https://cdn.mos.cms.futurecdn.net/zbfATUGTwtURpqbkocWAfD-970-80.jpg 4. Edit the shortcut name.(Here you can name anything even for disguise e.g if a porn site is your favourite website, you can name it Recycle Trash/Bin) https://cdn.mos.cms.futurecdn.net/k9ENZ73vqhMCxfqhiJqEGo-970-80.jpg 5. Click Create. If you check Open as Window, the next time you open the link, it will open without an editable search bar. https://cdn.mos.cms.futurecdn.net/ZzKK7i999F9LCf3UVsEHri-970-80.jpg Finally you have it just like the below image https://cdn.mos.cms.futurecdn.net/tNH3r2SD3bPnxoqpRvwdTS-970-80.jpg |
| Technology Market › Re: How To Lock A Folder With A Password In Windows 10 by Yinksdavid(op): 7:32pm On Sep 08, 2021 |
Swaylore:Thank you. Many more to come so please stay tuned |
| Technology Market › Re: Windows 10 Settings You Should Change Right Away by Yinksdavid(op): 6:56pm On Sep 08, 2021 |
uchaymart:Evening Bro, I need to get clearer details of the issue. Can you send a message to me on whatsapp so i can provide probable solution to the issue if i can get the exact problem. |
| Technology Market › Re: How To Lock A Folder With A Password In Windows 10 by Yinksdavid(op): 6:53pm On Sep 08, 2021 |
jamiudarex:You are welcome and I appreciate. 1 Like |
| Technology Market › Re: How To Lock A Folder With A Password In Windows 10 by Yinksdavid(op): 5:29pm On Sep 08, 2021 |
StPete:Thank you and I appreciate your time to view the info. I will be sharing about so many things we can do on work stations to help improve productivity and security of our works so kindly stay tuned and regularly check for my updates. Goal is to pass as much info(IT) as possible. 2 Likes |






1 2 3 4 5 6 7 8 ... 11 12 13 14 15 16 17 18 19 (of 19 pages)