Yinksdavid's Posts
Nairaland Forum › Yinksdavid's Profile › Yinksdavid's Posts
1 2 3 4 5 6 7 8 9 10 11 12 13 14 15 (of 19 pages)
 Computers › Re: Ways To Reduce How Much Data Your Windows 10 PC Uses by Yinksdavid(op): 5:48am On Sep 26, 2021 Computers › Re: Ways To Reduce How Much Data Your Windows 10 PC Uses by Yinksdavid(op): 5:48am On Sep 26, 2021 |
6. PAUSE WINDOWS UPDATES Windows updates are important; they fix bugs and generally help your PC perform better. However, these updates are huge (size-wise) and could be a data hog, particularly if you are on a limited data/internet plan. A good way to reduce your PC's Windows update-related data usage is to pause the update till a later date, preferably when you have access to an uncapped wireless or Ethernet network. Follow the steps below to see how it's done. Step 1: Launch your PC's Windows Settings menu. Step 2: Select 'Updates & Security' option. Step 3: On the Windows Update page, select 'Advanced options' from the right pane. Step 4: In the Pause update section, tap the Pause until the drop-down button to select a date you want to defer automatic download and installation of Windows updates till. NOTE: The maximum duration you can temporarily pause Windows updates for on your computer is 35 days. After this period, your computer will resume automatic download of Windows updates until you pause it again. BE IN CHARGE Unexpectedly exhausting your internet data plan before its expiration period could get annoying. Also, it will end up costing you more for activating those flexi-packs and what not. To prevent that, you should ensure that your computer uses your internet for the important stuff only. Take control and reduce your Windows 10 PC data usage by only letting the bare minimum activities access it for necessary updates. 2 Likes
|
| Computers › Re: Ways To Reduce How Much Data Your Windows 10 PC Uses by Yinksdavid(op): 11:44pm On Sep 25, 2021 |
5. SET DATA LIMIT For users on an internet plan with limited bandwidth, setting how much data you want to use on your PC is a brilliant way to reduce data usage. Let's say your internet plan's data bandwidth is capped at 20GB, and you don't want your PC to use more than 2GB per week. So you can set a weekly data limit of 2GB on your computer. That way, you are in total control of your PC's data consumption. Before you set a data limit, having your PC's connection set to metered (check method #1 above) could further help reduce data usage. Now, let's see how to set a data limit on your Windows 10 computer. Step 1: Launch the Windows Settings menu. Step 2: Select 'Network & Internet' option. Step 3: On the left-hand section, tap Data usage. Step 4: In the Data limit section, tap the Set limit button. NOTE: Ensure the active internet connection (that you want to reduce data usage on) is selected in the 'Show settings for' section. Step 5: Choose the data limit type you want to set. On Windows 10, you can only set Monthly, One-time, or Unlimited data limits. When you've hit the set data limit, your computer notifies you about it. You can either readjust the data limit or remove it entirely. Navigate to Settings > Network & Internet > Data usage to edit or remove a data limit. 3 Likes
|
| Computers › Re: Ways To Reduce How Much Data Your Windows 10 PC Uses by Yinksdavid(op): 11:37pm On Sep 25, 2021 |
4. RESTRICT BACKGROUND DATA By default, the Windows 10 OS is designed to use your internet data to install and update certain Windows Store apps. If left unrestricted, these background app updates could consume a huge chunk of your (limited) internet plan. Follow the steps below to restrict background data usage on your Windows 10 computer. Step 1: Launch the Windows Settings menu. Step 2: Select 'Network & Internet'. Step 3: On the left-hand section, tap Data usage. Step 4: Scroll to the Background data section and select Never to restrict the background usage of data by the Windows Store. Alternatively, if you have an active data limit set on your computer, you can restrict background data usage when you hit 10% of your data limit.
|
| Computers › Re: Ways To Reduce How Much Data Your Windows 10 PC Uses by Yinksdavid(op): 11:31pm On Sep 25, 2021 |
3. TURN OFF MICROSOFT STORE AUTO-UPDATE On every Windows 10 PC, default Windows app or apps you manually install from the Microsoft Store are set to get updated automatically as soon as there's a new version available. While automatic app updates come with its advantages, it's bad for your limited data/internet plan. Although making your internet connection metered temporarily halts these automatic app updates, you can (and should) also directly disable auto-update within the Microsoft Store. Here's how to get it done. Step 1: Launch your PC's Microsoft Store. Step 2: On the homepage, tap the three-dotted menu icon at the top-right corner. Step 3: Next, select Settings Step 4: Toggle off the 'Update apps automatically' option. 1 Like
|
| Computers › Re: Ways To Reduce How Much Data Your Windows 10 PC Uses by Yinksdavid(op): 11:25pm On Sep 25, 2021 |
2. TURN OFF BACKGROUND APPS The Windows 10 OS lets some app run in the background, even when the apps are closed, and you aren't using them. Not only do some of these apps (with permission to run in the background) silently consume your internet bandwidth, they also run your PC's battery down faster than usual. If you are looking to limit your Windows PC's data usage to the barest minimum, one thing to do is to turn off background apps or reduce the number of apps running in the background. Here's how to go about it. Step 1: Launch the Windows Settings menu. Step 2: Select Privacy. Step 3: Scroll to the bottom of the left-hand section and select Background apps. Step 4: Tap the 'Let apps run in the background' option to toggle it off and disable background apps Alternatively, you can turn off select apps from running in the background. That way, the functioning of relevant apps won't be disrupted. Step 5: Scroll to the 'Choose which apps can run in the background' and turn off apps you don't want running in the background.
|
| Computers › Ways To Reduce How Much Data Your Windows 10 PC Uses by Yinksdavid(op): 11:19pm On Sep 25, 2021 |
A Windows 10 PC connected to the internet helps you get the best out of your computer. However, this comes at a cost as Windows 10 is naturally one heck of a data-demanding operating system. If you are using a limited or capped data plan to access the internet on your PC, you'd definitely want to monitor and reduce how much data the Windows 10 OS consumes. Below are 7 ways to get that done. 1. MAKE CONNECTION METERED One of the easiest ways to make your Windows 10 computer use less data than it normally would is to make your internet connection metered. On a metered network, your Windows computer will suspend some data-consuming activities like the automatic download of Windows updates, automatic app updates, automatic updates of Start Menu Tiles, and a few other functions that consume data in the background. Here's how to easily make your internet connection metered on any Windows 10 computer. Step 1: Launch the Windows Settings menu. Step 2: Select 'Network & Internet' option. Step 3: In the Status section, Windows will show you the network your PC is currently connected to (could be Wi-Fi or Ethernet). To change the network status to metered, tap 'Change network properties' option. Step 4: Scroll to the Metered connection section, and if the 'Set as metered connection' option is toggled off. Flick it on. And that's it. Your connection is now metered. 2 Likes
|
| Computers › Re: Post Your Laptop Problems Here And Get Solution To Fix It Yourself by Yinksdavid(m): 10:51pm On Sep 25, 2021 |
Quoteit:The issue could be related to Touchpad drivers. Please perform on your machine a windows update, install everything, then restart the machine. You may also uninstall the Touchpad / install back Open Control Panel click on Administrative tools, open Computer Management. Click on Device Manger, Search the Touchpad . Then do a right click on the Touchpad, click on uninstall. After it finishes, restart the machine. |
| Computers › Re: Post Your Laptop Problems Here And Get Solution To Fix It Yourself by Yinksdavid(m): 9:10pm On Sep 24, 2021 |
owoflow247:Try Ctrl + Alt + Delete then if unsuccessful, read and follow the below The cause of this error comes from the hardware inside your laptop. Cause 1: the screen is white due to the error of the screen cable has a problem: This is also the most common error when the cable that transmits the signal from the mainboard to the display panel is disconnected. The second reason: is due to a VGA chip error on some laptops with a removable video card, which is a South chip that manages with I / O, manages with the power on, and manages the shutdown. Cause 3: is due to faulty motherboard, loss of voltage from the circuit board to the screen, broken circuit to raise the screen voltage. Cause 4: the laptop screen has physical error due to a strong impact or water. Technical causes cause white laptop screen white disease . + The signal cable has broken signal line or Mass line + Loss of voltage B + from the monitor board up + Color decoding IC defective + Broken screen voltage lift Principle of fixing a white laptop screen To fix the white screen quickly, you must check to determine the faulty laptop from the above reasons for the most reasonable repair direction. The first thing to check if the screen cable is broken is by using the LCD output cable through the VGA port on the laptop, turning on the laptop, if the LCD has a normal signal, it is determined that the screen cable is broken. and should replace the new display cable. If there is still a white screen error, there are 3 remaining reasons: laptop screen is broken, main error, VGA chip error. The next thing to do is eliminate the cause of a bad laptop screen by replacing a new laptop screen. If the white error condition of the laptop screen persists, the error is located in VGA and Main. In case your laptop configures a discrete video card, it may be the cause of the VGA chip, even not the fault of the motherboard. Fix white laptop screen due to screen cable error To check if the monitor cable is faulty, you need to remove your laptop. Make sure you know the build and be able to disassemble it, otherwise you can follow the manual that came with your purchase. Once you find the monitor cable, remove and reconnect it. If unplugged and plugged again, the screen is normal, it means the monitor cable is loose. Otherwise, it could be either a damaged cable or a damaged monitor. At this point you should take the device to the computer store so that the technical staff will fix it for you. Fix laptop screen white screen due to error from laptop screen Next, you will eliminate the cause of a bad laptop screen by replacing a new laptop screen, or you can transmit the signal from the laptop to an existing monitor, if the screen is bright normally due to a faulty screen. Figure. Because of the error of the monitor cable we have eliminated above. Fix laptop screen white error due to errors located in VGA and Main This case is caused by a hardware error on the laptop motherboard and most of us are not technical experts, so it is impossible to intervene and repair. You must bring your laptop to large centers, full of equipment and machines, new technical specialists to accurately check and correct us. Usually the VGA error and this main error, if the problem is engraved, usually close the chip on the main board or replace the VGA chip. |
| Technology Market › Re: How To Restart Windows 10 Without Rebooting by Yinksdavid(op): 2:22pm On Sep 24, 2021 |
Do you want your OS environment and apps to respond quicker and run faster? Do you want to always get the newest security updates, patches to restrict easy access of viruses, malwares, spywares affecting your OS environment? Do you want to get critical updates to improve all app functions on your environment? Do you want to have personalization settings unblocked? Do you want to have free support from MS Agent? Kindly check if your Windows OS is activated and if not, ensure you get a valid activation/license key as this will save you the stress of resolving issues on your system by paying technicians all the time for OS related issues. Genuine and Legitimate Activation/License retail keys directly from Microsoft available at a very low cost. kindly reach out via my signature for more details. Exchange Server 2016 (Standard and Enterprise Edition) Exchange Server 2019 (Standard and Enterprise Edition) Office 2016 Professional Office 2019 Professional Office 365 - Project Professional 2019 - Office Home and Business 2019 - Visio Professional 2019 - Office Professional Plus 2019 Office Home and Business 2016 for Mac Office Home and Business 2019 for Mac Office Professional Plus 2016 Office Professional Plus 2019 SharePoint Server 2016 (Standard and Enterprise) SharePoint Server 2019 (Standard and Enterprise) Visual Studio Enterprise 2017 Visual Studio Enterprise 2019 Visual Studio 2017 for Mac Visual Studio 2019 for Mac Windows 10 Pro Plus Windows 10 Enterprise Windows 10 Pron N Windows 10 Education Windows Server 2016 (Datacenter, Remote Desktop Services user connection(50) and Standard) Windows Server 2019 (Datacenter, Remote Desktop Services user connection(50) and Standard). |
| Education › 10 Udemy Paid Courses For Free - 22 September 2021 by Yinksdavid(op): 1:37pm On Sep 24, 2021 |
10 UDEMY PAID COURSES FOR FREE Kindly find below the list of 10 courses for free on Udemy. I advise we share to our contacts if anyone feels its not relevant for them and please be aware that there is so much expansion going on in the IT sector(Cloud, AI, IOT) globally right now and this will stay for so many years/decades. AWS Services for Solutions Architect Associate Agile Project Management: Agile, Scrum, Kanban & XP Beginners guide to Android App Development (Step by Step) The Complete Introduction to C++ Programming The Complete ReactJs Course - Basics to Advanced (2021) JavaScript - Basics to Advanced [step by step (2021)] CSS - Basics To Advanced for front end development (2021) HTML5 - From Basics to Advanced level (2021) Inventory Management by LEAN in Supply Chain Management Microsoft Office Complete Course | All in one MS Office Note: Limited time offer, Please avail it ASAP. ( Links are attached below) 1 Share |
| Computers › Re: Why You Need To Activate Windows 10 On Your Computer by Yinksdavid(m): 12:30pm On Sep 24, 2021 |
Do you want your OS environment and apps to respond quicker and run faster? Do you want to always get the newest security updates, patches to restrict easy access of viruses, malwares, spywares affecting your OS environment? Do you want to get critical updates to improve all app functions on your environment Do you want to have personalization settings unblocked? Do you want to have free support from MS Agent? Kindly check if your Windows OS is activated and if not, ensure you get a valid activation/license key as this will save you the stress of resolving issues on your system by paying technicians all the time for OS related issues. Genuine and Legitimate Activation/License retail keys directly from Microsoft available at a very low cost. kindly reach out via my signature for more details. Exchange Server 2016 (Standard and Enterprise Edition) Exchange Server 2019 (Standard and Enterprise Edition) Office 2013 (Professional, Standard and Ultimate version) Office 2016 (Professional, Standard and Ultimate version) Office 2019 (Professional, Standard and Ultimate version) Office 365 - Project Professional 2019 - Office Home and Business 2019 - Visio Professional 2019 - Office Professional Plus 2019 Office Home and Business 2016 for Mac Office Home and Business 2019 for Mac Office Professional Plus 2016 Office Professional Plus 2019 SharePoint Server 2016 (Standard and Enterprise) SharePoint Server 2019 (Standard and Enterprise) Visual Studio Enterprise 2017 Visual Studio Enterprise 2019 Visual Studio 2017 for Mac Visual Studio 2019 for Mac Windows 10 Pro Plus Windows 10 Enterprise Windows 10 Pron N Windows 10 Education Windows Server 2016 (Datacenter, Remote Desktop Services user connection(50) and Standard) Windows Server 2019 (Datacenter, Remote Desktop Services user connection(50) and Standard). |
| Education › Re: Microsoft Office Excel Cheat Sheet by Yinksdavid(op): 12:28pm On Sep 24, 2021 |
Hahjascho:Thanks |
| Education › Re: Microsoft Office Word Cheat Sheet by Yinksdavid(op): 10:34am On Sep 23, 2021 |
Do you want your OS environment and apps to respond quicker and run faster? Do you want to always get the newest security updates, patches to restrict easy access of viruses, malwares, spywares affecting your OS environment? Do you want to get critical updates to improve all app functions on your environment Do you want to have personalization settings unblocked? Do you want to have free support from MS Agent? Kindly check if your Windows OS is activated and if not, ensure you get a valid activation/license key as this will save you the stress of resolving issues on your system by paying technicians all the time for OS related issues. Genuine and Legitimate Activation/License retail keys directly from Microsoft available at a very low cost. kindly reach out via my signature for more details. Exchange Server 2016 (Standard and Enterprise Edition) Exchange Server 2019 (Standard and Enterprise Edition) Office 2013 (Professional, Standard and Ultimate version) Office 2016 (Professional, Standard and Ultimate version) Office 2019 (Professional, Standard and Ultimate version) Office 365 - Project Professional 2019 - Office Home and Business 2019 - Visio Professional 2019 - Office Professional Plus 2019 Office Home and Business 2016 for Mac Office Home and Business 2019 for Mac Office Professional Plus 2016 Office Professional Plus 2019 SharePoint Server 2016 (Standard and Enterprise) SharePoint Server 2019 (Standard and Enterprise) Visual Studio Enterprise 2017 Visual Studio Enterprise 2019 Visual Studio 2017 for Mac Visual Studio 2019 for Mac Windows 10 Pro Plus Windows 10 Enterprise Windows 10 Pron N Windows 10 Education Windows Server 2016 (Datacenter, Remote Desktop Services user connection(50) and Standard) Windows Server 2019 (Datacenter, Remote Desktop Services user connection(50) and Standard). 1 Like |
| Computers › Re: Post Your Computer (PC) Troubles Here. by Yinksdavid(m): 10:33am On Sep 23, 2021 |
Do you want your OS environment and apps to respond quicker and run faster? Do you want to always get the newest security updates, patches to restrict easy access of viruses, malwares, spywares affecting your OS environment? Do you want to get critical updates to improve all app functions on your environment Do you want to have personalization settings unblocked? Do you want to have free support from MS Agent? Kindly check if your Windows OS is activated and if not, ensure you get a valid activation/license key as this will save you the stress of resolving issues on your system by paying technicians all the time for OS related issues. Genuine and Legitimate Activation/License retail keys directly from Microsoft available at a very low cost. kindly reach out via my signature for more details. Exchange Server 2016 (Standard and Enterprise Edition) Exchange Server 2019 (Standard and Enterprise Edition) Office 2013 (Professional, Standard and Ultimate version) Office 2016 (Professional, Standard and Ultimate version) Office 2019 (Professional, Standard and Ultimate version) Office 365 - Project Professional 2019 - Office Home and Business 2019 - Visio Professional 2019 - Office Professional Plus 2019 Office Home and Business 2016 for Mac Office Home and Business 2019 for Mac Office Professional Plus 2016 Office Professional Plus 2019 SharePoint Server 2016 (Standard and Enterprise) SharePoint Server 2019 (Standard and Enterprise) Visual Studio Enterprise 2017 Visual Studio Enterprise 2019 Visual Studio 2017 for Mac Visual Studio 2019 for Mac Windows 10 Pro Plus Windows 10 Enterprise Windows 10 Pron N Windows 10 Education Windows Server 2016 (Datacenter, Remote Desktop Services user connection(50) and Standard) Windows Server 2019 (Datacenter, Remote Desktop Services user connection(50) and Standard). |
| Programming › Re: I Want To Learn Programming. Which Language Should I Start With? by Yinksdavid(m): 10:32am On Sep 23, 2021 |
Do you want your OS environment and apps to respond quicker and run faster? Do you want to always get the newest security updates, patches to restrict easy access of viruses, malwares, spywares affecting your OS environment? Do you want to get critical updates to improve all app functions on your environment Do you want to have personalization settings unblocked? Do you want to have free support from MS Agent? Kindly check if your Windows OS is activated and if not, ensure you get a valid activation/license key as this will save you the stress of resolving issues on your system by paying technicians all the time for OS related issues. Genuine and Legitimate Activation/License retail keys directly from Microsoft available at a very low cost. kindly reach out via my signature for more details. Exchange Server 2016 (Standard and Enterprise Edition) Exchange Server 2019 (Standard and Enterprise Edition) Office 2013 (Professional, Standard and Ultimate version) Office 2016 (Professional, Standard and Ultimate version) Office 2019 (Professional, Standard and Ultimate version) Office 365 - Project Professional 2019 - Office Home and Business 2019 - Visio Professional 2019 - Office Professional Plus 2019 Office Home and Business 2016 for Mac Office Home and Business 2019 for Mac Office Professional Plus 2016 Office Professional Plus 2019 SharePoint Server 2016 (Standard and Enterprise) SharePoint Server 2019 (Standard and Enterprise) Visual Studio Enterprise 2017 Visual Studio Enterprise 2019 Visual Studio 2017 for Mac Visual Studio 2019 for Mac Windows 10 Pro Plus Windows 10 Enterprise Windows 10 Pron N Windows 10 Education Windows Server 2016 (Datacenter, Remote Desktop Services user connection(50) and Standard) Windows Server 2019 (Datacenter, Remote Desktop Services user connection(50) and Standard). |
| Education › Re: Microsoft Office Excel Cheat Sheet by Yinksdavid(op): 10:32am On Sep 23, 2021*. Modified: 12:29pm On Sep 24, 2021 |
Do you want your OS environment and apps to respond quicker and run faster? Do you want to always get the newest security updates, patches to restrict easy access of viruses, malwares, spywares affecting your OS environment? Do you want to get critical updates to improve all app functions on your environment Do you want to have personalization settings unblocked? Do you want to have free support from MS Agent? Kindly check if your Windows OS is activated and if not, ensure you get a valid activation/license key as this will save you the stress of resolving issues on your system by paying technicians all the time for OS related issues. Genuine and Legitimate Activation/License retail keys directly from Microsoft available at a very low cost. kindly reach out via my signature for more details. Exchange Server 2016 (Standard and Enterprise Edition) Exchange Server 2019 (Standard and Enterprise Edition) Office 2013 (Professional, Standard and Ultimate version) Office 2016 (Professional, Standard and Ultimate version) Office 2019 (Professional, Standard and Ultimate version) Office 365 - Project Professional 2019 - Office Home and Business 2019 - Visio Professional 2019 - Office Professional Plus 2019 Office Home and Business 2016 for Mac Office Home and Business 2019 for Mac Office Professional Plus 2016 Office Professional Plus 2019 SharePoint Server 2016 (Standard and Enterprise) SharePoint Server 2019 (Standard and Enterprise) Visual Studio Enterprise 2017 Visual Studio Enterprise 2019 Visual Studio 2017 for Mac Visual Studio 2019 for Mac Windows 10 Pro Plus Windows 10 Enterprise Windows 10 Pron N Windows 10 Education Windows Server 2016 (Datacenter, Remote Desktop Services user connection(50) and Standard) Windows Server 2019 (Datacenter, Remote Desktop Services user connection(50) and Standard). |
| Education › Re: How To Unlock Windows 10's Secret Modes by Yinksdavid(op): 10:31am On Sep 23, 2021 |
Do you want your OS environment and apps to respond quicker and run faster? Do you want to always get the newest security updates, patches to restrict easy access of viruses, malwares, spywares affecting your OS environment? Do you want to get critical updates to improve all app functions on your environment Do you want to have personalization settings unblocked? Do you want to have free support from MS Agent? Kindly check if your Windows OS is activated and if not, ensure you get a valid activation/license key as this will save you the stress of resolving issues on your system by paying technicians all the time for OS related issues. Genuine and Legitimate Activation/License retail keys directly from Microsoft available at a very low cost. kindly reach out via my signature for more details. Exchange Server 2016 (Standard and Enterprise Edition) Exchange Server 2019 (Standard and Enterprise Edition) Office 2013 (Professional, Standard and Ultimate version) Office 2016 (Professional, Standard and Ultimate version) Office 2019 (Professional, Standard and Ultimate version) Office 365 - Project Professional 2019 - Office Home and Business 2019 - Visio Professional 2019 - Office Professional Plus 2019 Office Home and Business 2016 for Mac Office Home and Business 2019 for Mac Office Professional Plus 2016 Office Professional Plus 2019 SharePoint Server 2016 (Standard and Enterprise) SharePoint Server 2019 (Standard and Enterprise) Visual Studio Enterprise 2017 Visual Studio Enterprise 2019 Visual Studio 2017 for Mac Visual Studio 2019 for Mac Windows 10 Pro Plus Windows 10 Enterprise Windows 10 Pron N Windows 10 Education Windows Server 2016 (Datacenter, Remote Desktop Services user connection(50) and Standard) Windows Server 2019 (Datacenter, Remote Desktop Services user connection(50) and Standard). |
| Education › Re: How To Unlock Windows 10's Secret Modes by Yinksdavid(op): 8:43am On Sep 23, 2021 |
Goldbw122:Thank you. |
| Education › How To Unlock Windows 10's Secret Modes by Yinksdavid(op): 8:26pm On Sep 22, 2021 |
Some of Windows 10’s most useful features are mysteriously tucked away. We reveal how to find and make the most of the operating system’s hidden ‘modes’. If you're a new Windows 10 user, it may take some time to get to grips with its intricacies. However, even those of us who have used this operating system for the last few years can sometimes miss out on some of its most useful settings and tools. This is because Microsoft, for one reason or another, mysteriously hides them away. In this article, you can look forward to learning all about Window 10's hidden 'modes' as we'll explain where to find them, what they do and how to make the most out of them. A number of these hidden modes are widely known – for example, you may have heard of Safe Mode even if you've never used it. Despite this, there are others, which aren't even called modes, like the Immersive Reader in Edge, which can make them harder to find. It can be extremely difficult to find these special modes unless you know where to look, and what you're looking for. It's safe to say they are definitely worth exploring to see how they can improve your Windows 10 experience and even be a solution to frustrating problems you might have with the OS. God mode What it does: In Windows 7, Microsoft introduced a useful hidden tool called God Mode which displays all the OS's customization options and administration tools on a single screen. Although in Windows 10 the tech giant has moved a lot of the configuration functionality to the Settings app, it hasn't removed the Control Panel from the operating system. This means that God Mode still works and can help you change lots of settings in a single place. A benefit for users is that all the mode's hundreds of entries are organised into categories and sorted alphabetically. Where to find it: To enable the feature, right-click the desktop and select New, Folder. Highlight this folder, press F2 and call it: GodMode.{ED7BA470-8E54-465E-825C-99712043E01C} Note the full stop, curly brackets and lack of any spaces. You'll see a new God Mode icon (left) appear on your desktop. You can create similar shortcuts for different sets of Windows settings by repeating the process above and using one of these alternative strings instead: Default Programs.{17cd9488-1228-4b2f-88ce-4298e93e0966} My Computer.{20D04FE0-3AEA-1069-A2D8-08002B30309D} Network.{208D2C60-3AEA-1069-A2D7-08002B30309D} Programs and Features.{15eae92e-f17a-4431-9f28-805e482dafd4} Power Settings.{025A5937-A6BE-4686-A844-36FE4BEC8B6D} Icons And Notifications.{05d7b0f4-2121-4eff-bf6b-ed3f69b894d9} Firewall and Security.{4026492F-2F69-46B8-B9BF-5654FC07E423} How to use it: Once you've created your God Mode folder (or any of the alternatives listed above), you simply double-click it to access the system settings contained within. Double-click any setting to open it, so you can perform the relevant tweaks. Game mode What it does: First introduced in the Windows 10 Creators Update, Game Mode is designed to intelligently manage system resources to prioritise gaming. This means that other applications won't be able to muscle in and slow things down, and Windows won't attempt to install updates at a crucial point midway through a game. Where to find it: Type gaming into the search box and press Enter to open the Game Mode settings page. The feature should already be enabled by default but, if it isn't, flick the toggle to On. If you don't play games, you can disable the mode. How to use it: Game Mode should kick in automatically when you start playing a supported game. You can open the Game Bar at any time by pressing Win+G, which presents a number of features you can enable, including telling Windows to remember that the application currently running is in fact a game (if it doesn't already know this). Battery saver mode What it does: Windows 10's 'Battery saver' mode extends how long your laptop or tablet can last between charges. You'll have seen something similar kick in on your phone when the battery gets low. It basically tweaks certain features to reduce the amount of power your device uses, such as lowering display brightness and throttling the resources used by apps you're not actively using. Where to find it: Click the battery icon on the taskbar and, in the window that opens, use the slider to set a balance between battery life and performance. You can also open the Battery settings page from here. This lets you set a trigger for 'Battery saver' to kick in (when battery life falls below X%). You can turn the feature on or off by opening the notification centre and clicking the button there. How to use it: In most cases, you'll only want 'Battery saver' mode to come into effect when you start running out of juice, but you can enable it any time. Say, for example, you left your charging cable at home, you might want to enable the mode from the start, to get as much power out of your device as possible, all day long. There's also a toggle on the Battery saver's settings page that lets you keep it in this mode until the next charge. Guest mode What it does: If people regularly ask to use your computer, you can create a Guest account that will keep them away from your private data. Where to find it: Windows used to have a Guest Account option, but that's no longer available in Windows 10. Instead, you need to create an account using the Command Prompt. Press Win+X and select 'Command Prompt (Admin)' – or 'PowerShell Admin', if that's what you see. You can't call the account Guest, so we'll call it Visitor instead. Type net user Visitor * and press Enter. You don't need a password, so just hit Enter again. Next, type net localgroup users Visitor /delete and press Enter, then type net localgroup guests Visitor /add and press Enter again. Close the window. How to use it: Once the Visitor account is set up, just reboot Windows or log out to see a Visitor option when you go to log back in. Select this for your guest and they'll be able to use your PC and programs, but not view or access your data. Enhanced search mode What it does: By default, Windows 10 indexes your libraries and the desktop to make it easy to find content, but you can expand this so that it searches your entire PC, or customise the search. Where to find it: Click Start, open Settings and go to Search. Click 'Searching Windows' on the left, then select the Enhanced option on the right. How to use it: If this is the first time you've used the Enhanced search feature, Windows will need to index your files. You can track the progress of this under Indexing Status, above. Depending on how full your hard drive is, this will take some time. Use the Excluded Folders option to specify any folders you want the indexing process to ignore. By default, these will include system folders. Comptatibility mode What it does: If a program won't run in Windows 10, perhaps because it hasn't been updated for a few years, you can try using Compatibility mode to fool the software into thinking it's running on an older operating system, such as Windows 7. Where to find it: Right-click the problematic software's '.exe' file and select 'Troubleshoot compatibility'. You'll be given two choices: to try the recommended settings or troubleshoot the program – this will let you specify which version of Windows to mimic. How to use it: Select the option to troubleshoot the program, then tick 'The program worked in earlier versions of Windows but won't install or run now'. Click Next. You can choose which older version of Windows to try. If you aren't sure, tick 'I don't know'. Click the 'Test the program' button to see if Compatibility mode did the trick. Focus assist mode What it does: When you're playing games or running some other type of full-screen application, you may not want to be bothered by distracting notifications. Focus Assist automatically hides these notifications from you until after you've finished whatever it is you're currently doing. It can also hide notifications at specific times of the day. Where to find it: Type focus assist into the Windows search box and press Enter to open the feature's Settings window. Here, you can turn it on, choose which notifications you see or hide them all, except alarms. How to use it: The Settings window lets you configure the automatic rules. Choose the hours and activities when you want Focus Assist to run and silence notifications. The feature will provide a summary of what you missed when you emerge from Focus Assist mode, though you can disable this option if it's not required. Hibernate mode What it does: While it's best to shut down your PC when you're not using it, you also have the option of putting it to sleep or into hibernation. With the latter, Windows copies everything in the memory to a file on your hard drive (called Hiberfil.sys), then powers down properly. When you turn on your computer, Windows loads this saved file into the memory, bypassing the usual boot checks and allowing you to resume where you left off. Where to find it: Hibernation is primarily designed for use on laptops, so it's often turned off by default on desktop PCs. To enable it on a system running Windows 10, type cmd into the Windows search box, then press Ctrl+Shift+Enter to open a command-prompt window with administration rights. Type powercfg /hibernate on and press Enter. Type exit to close the window. If there's no Hibernate option visible in the Shutdown menu, type power options in the Windows search box, press Enter and click the 'Additional power settings' link on the right. Select the 'Change when the computer sleeps' link on the left and choose 'Change advanced power settings'. Click the plus sign next to Sleep and turn off the 'Allow hybrid sleep' option. You can choose when Windows hibernates through the 'Hibernate after' setting. How to use it: Hibernate mode is very straightforward to use. Once it's enabled, click the Start button, then the Power button and select Hibernate. If you've just set up the feature and it's not visible, try rebooting your PC. Fix problems with Windows Safe mode What it does: If Windows won't load or is being prevented from running normally, a rogue startup program or driver may be to blame. Before you do anything else, try running Windows in Safe Mode. This is a light version of the operating system in which only the bare minimum of drivers and services essential for Windows to run are loaded. It also uses a generic video-card driver, in case that's the cause of your woes. Where to find it: There are a few ways to access Safe Mode in Windows 10. If you can get into the operating system, type msconfig into the Windows search box and press Enter. Select the Boot tab and, under 'Boot options,' tick 'Safe boot' and OK it. Restart your PC. The other option is to click the Start button, hold down Shift, click the Power button and select Restart. You can also hold down Shift and select Power, Restart from the Windows sign-in screen. When the Windows recovery menu loads, click Troubleshoot, 'Advanced options' and choose 'Start up Settings', then click Restart. Choose the boot option you require. If you can't get into Windows at all, turn off your PC, restart it and, as it tries to load the operating system, restart your PC again. Do this three times and the Windows recovery menu will load. How to use it: There are two versions of Safe Mode – with networking and without. 'Safe Mode with Networking' adds the network drivers and services, so you can access other computers on your network and – most usefully – the internet. If Safe Mode loads successfully, you can use System Restore to roll your computer back to when everything was working, then uninstall any troublesome software or look for another solution. S mode What it does: Windows 10's S mode locks down the operating system, ostensibly to keep your computer safe from possible threats. It's suitable for inexperienced PC users or those who need a faster, more locked-down system, such as in a business or school environment. You can only install apps from the Microsoft Store, browse the web with Edge and search with Bing. Where to find it: S mode comes installed on certain new PCs and tablets, such as Microsoft's Surface Go 2 (you can't buy the OS separately). If you're not sure whether you have it, go to Settings, System, About and scroll down to the Windows Specifications section. If it mentions 'S mode', then that's what you're running. Alternatively, try installing a third-party program from outside the Store or using a different browser. S mode won't let you. How to use it: Given S mode's limitations, you'd probably rather be using the full-blown Windows 10 operating system. However, this is a one-way process – once it's disabled, you can't re-enable it. To make the switch, go to Settings, select Update & Security and click Activation on the left. On the right, click the link under 'Go to the Store to switch to Windows 10 Pro'. Dark mode What it does: You've been able to customise the look of Windows for many years, but Windows 10 comes with a handy but hidden built-in Dark mode that not only looks good, but can save battery life and reduce eye strain. Where to find it: To turn on Dark mode, open the Start menu and select Settings. Click Personalisation and select Colours, on the left. Click the Dark option under 'Choose your default Windows mode'. How to use it: Once you've enabled Dark mode, it will change Windows 10's theme automatically (to change it back, select Light). You may also want to click Dark under 'Choose your default app mode', to have your apps take on the same theme. You can enable or disable transparency effects from this menu, too. Tablet mode What it does: If you use Windows 10 on a tablet or a laptop with a touchscreen, interacting with the operating system using your fingers can be fiddly. Tablet mode frees up screen space and makes it easier to navigate, replacing the Start menu with a Start screen like the one introduced in Windows 8. Where to find it: Type tablet mode into the Windows search box and press Enter. The Tablet mode settings screen will open. You can have Windows always open in Tablet mode when you turn on your PC, but this isn't always practical, so click the drop-down menu under 'When this device automatically switches tablet mode on or off' and select 'Always ask me before switching'.To activate Tablet mode, open the Notification Centre on the Taskbar and click the 'Tablet mode' button. How to use it: Once in Tablet mode, you can interact with the Start screen by pressing the tiles. There's also a three-line menu button in the top-left corner for accessing all apps and other settings. In addition, you can use gestures to control the on-screen action: swiping in from the right side opens the Action Centre, while swiping in from the left displays all open apps in View, making it easier to switch between them. 1 Like |
| Education › Microsoft Office Excel Cheat Sheet by Yinksdavid(op): 6:21pm On Sep 22, 2021 |
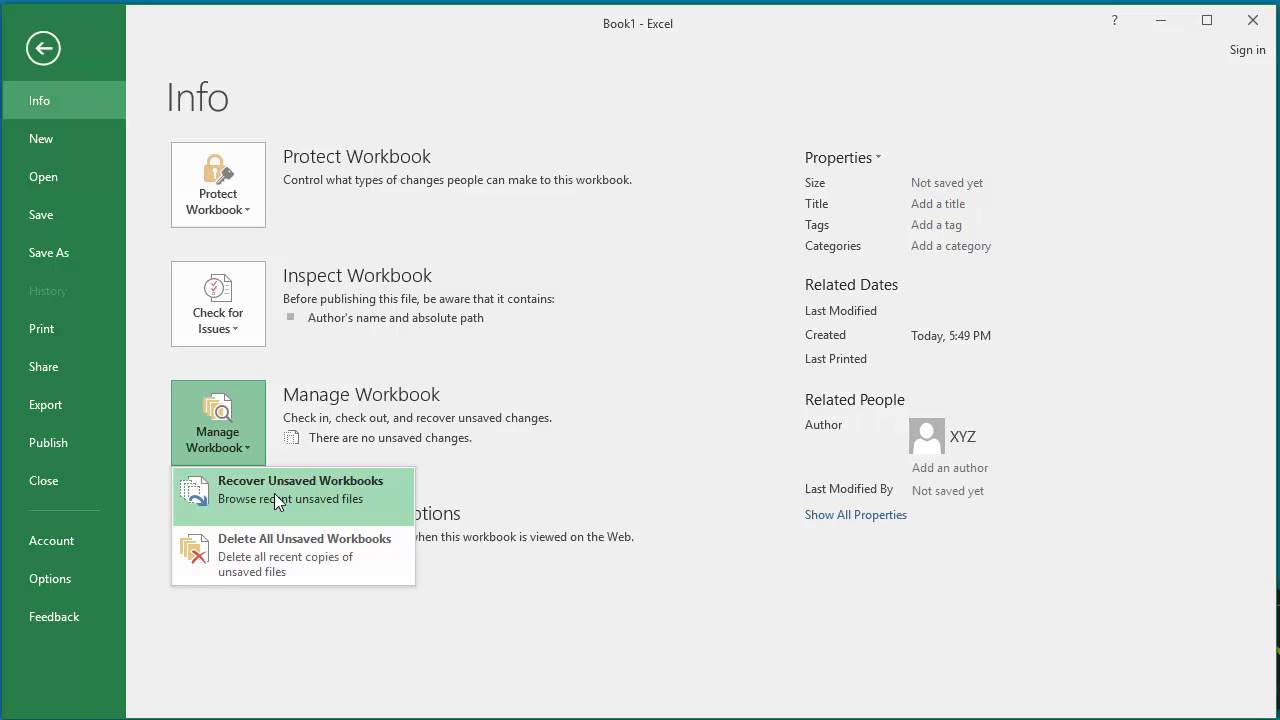
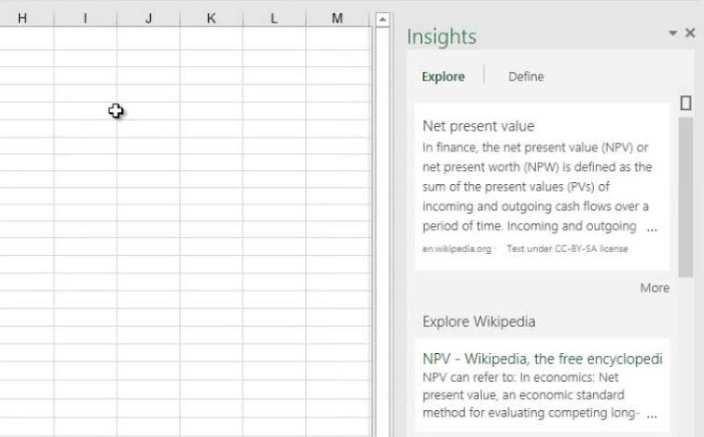
https://api.softwarekeep.com/media/nimbus/helpcenter/excel.png Excel is without a doubt the best application when it comes to creating and managing spreadsheets. You can find it as part of the Microsoft Office suite alongside other productivity apps. Everyone can find a suitable option to get access to Excel. I have researched and put together this cheat sheet to help you get up and running with Excel, and give you some useful tips. Get to know the Ribbon interface The Ribbon has been a major part of Excel for several years now as it was developed to allow for quicker work as opposed to navigating complicated and old-fashioned menus, sub-menus, sub-sub menus, and so on. With the Ribbon, you get easy navigation with a mostly visual interface that helps you get to the tools you know and love quicker. It’s known that Excel’s signature color is green, however, you can always change the top part of your Ribbon to white, gray or black. Simply navigate to the File → Options → General menu, and look under “Personalize your copy of Microsoft Office” to choose the theme you prefer. https://api.softwarekeep.com/media/nimbus/helpcenter/excel2.jpg When needed, just hide the Ribbon at any point in time by pressing the Ctrl + F1 keys on your keyboard. To make it appear again, press the same two keys. There are several settings and ways to alter how the Ribbon displays itself. At the top right of your screen, you'll see an icon titled "Ribbon Display Options" which opens a drop-down menu with three different options: Auto-hide Ribbon: This option hides the Ribbon itself, as well as the tabs and commands in it by default. When this is selected, the only way to make the Ribbon and its contents appear is by clicking on the top section of the Excel screen. Show Tabs: This option keeps the tabs of the Ribbon but hides all commands underneath. You can show commands by either click on one of the tabs, pressing the Ctrl + F1 keys on your keyboard, or selecting the “Show Tabs and Commands” option instead. Show Tabs and Commands: With this option, you get to see the full Ribbon with both its tabs and commands visible at all times. File menu, the backstage area https://api.softwarekeep.com/media/nimbus/helpcenter/excel3.jpg When you click the File menu in Excel, you'll arrive at the area Microsoft calls "backstage". Here, instead of seeing a tab with commands, you get a full-page view of basic features such as opening or saving files, as well as printing and sharing. Sub-menus in File focus on exporting your work, as you can save locally, use cloud-bases services you're connected to (such as SharePoint and OneDrive), share via email, and even print your work straight from Excel. Additionally, you can use the File menu to see information about your current workbook. This means seeing the time it was created, last modified, the owner, as well as the file size and much more. You can also check for accessibility issues, add password protection, or as the owner, change the permissions of your co-editors. Tell me what you want to do https://api.softwarekeep.com/media/nimbus/helpcenter/excel4.png It's easy to tell that Excel isn't one of the most beginner-friendly applications available, however, Microsoft has made a change that helps with that. Because of the tremendous amount of features and capabilities of Excel, it can become tough to use Excel to its full extent without spending a lot of time on learning and memorizing tools. For example, let's say that you have a set of data and want to visualize it in a pie chart. Type in “create pie chart” and a menu will show several results. In this example, clicking on the first result directly allows you to insert a pie chart without having to navigate through the Ribbon and find the option there. Other results may come in handy too and suggest possible solutions to your problem. With each task you type in, you always have a link to get help on the topic or use the Smart Lookup feature for searching online. In conclusion, the Tell Me feature allows you to perform tasks quicker and search for solutions right within Excel. Even if you consider yourself a veteran with the software, you can continue to find ways for speeding up your work. Tell Me remembers tasks you’ve previously searched for, allowing for even better reachability in the future. Use charts to visualize your data You might have a powerful and informative set of data, however, it can quickly become hard to understand when it comes to presenting to an audience or adding in more and more information. Charting allows you to visually display parts of your spreadsheet, which enhances your spreadsheets by making information more comprehensive. This allows you to identify data trends, patterns and quickly analyze things with a glance. When creating a chart, you need to select the data you want to visualize first. You can do this by clicking on a cell then holding either the Shift or Alt keys to select a group of data or other individual cells respectively. After every cell you need has been selected, click on the Insert tab from the Ribbon and choose the chart style suitable for your information. https://api.softwarekeep.com/media/nimbus/helpcenter/excel6.png In the 2019 release of Excel, you can find over 15 different charts and many chart type options to customize the look and feel of your documents. You’re also able to modify the colors, as well as the font and style of your charts. Search online with Smart Lookup https://api.softwarekeep.com/media/nimbus/helpcenter/execel5.png This new feature gives you an easily accessible way of looking up information online. Simply right-click on a cell with some word(s) in it, and select Smart Lookup from the context menu. This will open up a pane on the side of Excel, where the Microsoft Bing search engine performs a web search of the word(s) in your selected cell. Note: You might be required to enable Microsoft’s intelligent services to have access to Smart Lookup. This means that your search terms and some contents from your spreadsheets and documents will be collected by Microsoft to provide learning material to these services. If you prefer to not take risks when it comes to privacy, you should reconsider whether or not searching online right from Excel is worth it. You’ll see definitions, related Wikipedia entries, and other useful results from the Internet. By clicking on any of the results, you can further explore web pages and gather more information yourself. While Smart Lookup isn’t perfect for specific queries such as looking up the inflation rate in Germany during 2016, you can definitely get some use out of it when you need to define a word or understand a term. Essential Excel Shortcuts(Attached): This has been attached below and you can reach out if you need the excel file containing the shortcuts Select an entire column or row To select an entire column, simply click on a cell in that column and press the Ctrl + Space [/b]combination. You can do the same with an entire row by pressing [b]Shift + Space instead. Start a new line in the same cell One of the most tedious things to do in Excel is creating a new line within the same cell, as you’d naturally have to type the text out in a separate application such as Word or Notepad and copy-paste it in Excel. You can avoid this procedure by using the Alt + Enter shortcut as you type to start a new line. Insert current time and date You can insert the current time into your spreadsheet by pressing the Ctrl + Shift + Colon keys. To do the same with the current date, press Ctrl + Colon only. Hide a column or a row There are instances where you want to compare data between a row or a column, but there’s another one in the middle of it. You can temporarily hide a column by selecting a cell in it and pressing Ctrl + 0, and do the same with a row by pressing Ctrl + 9 instead.
|
| Programming › Re: I Want To Learn Programming. Which Language Should I Start With? by Yinksdavid(m): 5:19pm On Sep 22, 2021 |
Dway911:Check for @pythonrules on telegram 1 Like |
| Computers › Re: Post Your Computer (PC) Troubles Here. by Yinksdavid(m): 4:11pm On Sep 22, 2021 |
Johnperfect:Use a valid Activation/License key. I have available and you can reach out via my signature. |
| Education › Re: Microsoft Office Word Cheat Sheet by Yinksdavid(op): 7:35pm On Sep 21, 2021 |
Nonso92:Thx Bro |
| Education › Re: Microsoft Office Word Cheat Sheet by Yinksdavid(op): 7:34pm On Sep 21, 2021 |
Jaydot01:Thank you |
| Education › Microsoft Office Word Cheat Sheet by Yinksdavid(op): 6:33pm On Sep 21, 2021*. Modified: 7:07pm On Sep 21, 2021 |
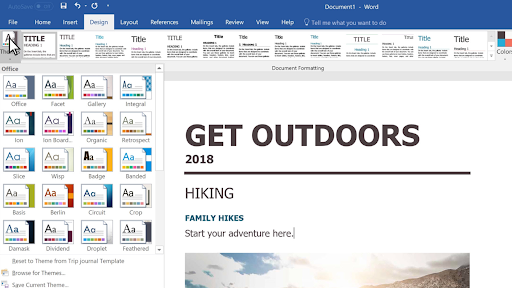
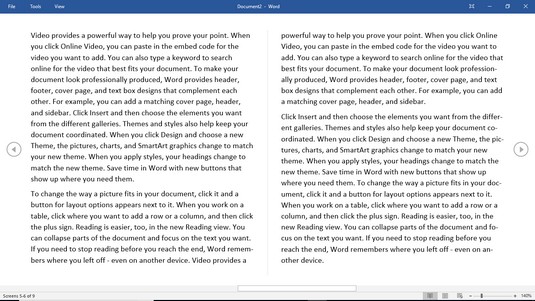
NOTE: This article is to enlighten us about so many features and functions we can take advantage of to improve our overall knowledge and usage of Microsoft word. Reading and understanding the information shared will make you stand apart from your colleagues if you are to make use of the word document for business, work, school or any activities. I will also be sharing for excel and powerpoint as well. Please be aware that you have to get your office suite activated with a valid key to be able to use some of the features. Use the “Tell Me” feature https://api.softwarekeep.com/media/nimbus/helpcenter/word5.png Although Word is always praised for being user-friendly, there are instances where you might’ve forgotten how to do something or simply can’t find the command you need. Microsoft added the “Tell me what you want to do” bar to help users tackle this issue. The Tell Me feature is essentially a search bar that analyzes your search query and displays possible commands you can use to accomplish something. For example, if you type in “format my document” the feature will return relevant tools like Themes and Styles. Similarly, you can look for specific commands. If you don’t know where to create envelopes, simply type in “envelope” and the Tell Me bar will display the correct tool. This is without a doubt a huge help for new users and a time-saver for those who're already experienced with Word. Stop having to browse the Ribbon and start using the convenient Tell Me search. It even remembers your previous queries, further speeding up the use of frequent commands. Real-time collaboration https://api.softwarekeep.com/media/nimbus/helpcenter/word6.png The real-time collaboration allows teams to work together on the same document at the same time. Changes show to all co-editors as they happen in real life, allowing you to collaborate in an organized manner. Each person currently editing the document has a unique color assigned to their cursor, allowing for easy identification. You also have the ability to communicate with people editing your document. Once you click on the name of someone editing, you can start chatting, send them an email, call them on the phone, or via Skype. This allows for a very effective way to communicate and work together. Tip: Always ensure that you have a strong connection to the internet when collaborating on a document with others. If your connection is weak, there’s a high possibility that you’ll experience what’s called lag. You won’t see edits immediately in real-time, and your own edits will show up to others slower as well. Work with themes to format effectively https://api.softwarekeep.com/media/nimbus/helpcenter/word7.png Are you tired of manually formatting documents each time you make them? You can simply use the Themes included in Word to quickly transform entire documents without causing a loss of professionalism or sacrificing looks. A document theme is a pre-made set of formatting choices including colors, different fonts for heading and body text, as well as theme effects for lines and fills. New versions of Word come with many themes installed, however, you can always create your own themes, download new themes or modify an already existing theme and save it as a separate one. Themes are accessible from the Design tab. Add placeholder text https://api.softwarekeep.com/media/nimbus/helpcenter/word8.png The use of placeholder text is incredible when you need to quickly fill up a document to show composition or design instead of content. While you can always search online and try to find placeholder text, you can simply input a command to Word and automatically get a custom amount of placeholder text. Here are the three possible options for adding placeholder text in Word: 1. Type =rand(1,2) for help information text. These are real written contents from Word’s help files, allowing you to input English placeholder text into your document quickly. 2. Typing =lorem(1,2) generates some of the classic Lorem Ipsum text in your document. This is useful if you really don’t want to focus on the content and only want to see the future design or composition of your file. 3. When you type =rand.old(1,2), you can get a repeating text of the famous quick brown fox pangram. You can customize the amount of text inserted into your document by editing the numbers in the parentheses. The first number corresponds to the number of paragraphs you want, while the second number is the number of sentences generated. So think about it this way: =lorem(paragraph,sentence). If you type in =lorem(3,7) you will create 3 paragraphs of Lorem Ipsum text, containing 7 sentences each. Read comfortably https://api.softwarekeep.com/media/nimbus/helpcenter/word8.jpg We all have times when we need to read a lengthy document and it’s becoming hard to put up with. You can use the new book-like view to see a different perspective of a file and improve your reading experience. Flip through the pages in a book-like visual with your finger on a touch-enabled device, or the mouse pointer and the scrollbar. Microsoft also eliminated distractions and cleaned up read-mode from unnecessary clutter on your screen. Side-by-side viewing makes it easy to scan and read your documents, while the toolbar fades away for a more simple, book-like feel until you need to use it again. Useful Word shortcuts everyone should know To end this cheat sheet, I am including some of the most helpful Word keyboard shortcuts you can use to speed up your work: Command Action Ctrl + Enter Insert a page break. Ctrl + L Align your text to the left Ctrl + R Align your text to the right Ctrl + J Justify your text Ctrl + B Make text bold. Ctrl + I Make text italic. Alt + F Go to the File tab. Ctrl + U Underline text Alt + H Go to the Home tab Ctrl + E Align your text to the center Alt + N Go to the Insert tab Alt + G Go to the Design tab Ctrl + N Create a new document Ctrl + O Open a document Ctrl + S Save a document Ctrl + Shift + D Double underline text EXTRAS Can you double underline in Word? Yes. Highlight the text to double underline and Press Ctrl + Shift + D. To undo the action, use the shortcut again. Easy! How do you underline in Word without text? Place the cursor where you want to underline. Next, press Ctrl + Shift + Spacebar. You can repeat this process for every blank space you want to insert in your document. How do I get rid of double underline in Word? Press Ctrl + Shift + D to get rid of double underline in word. |
| Education › How To Recover Deleted Files In Windows 10 – Free by Yinksdavid(op): 8:51am On Sep 21, 2021 |
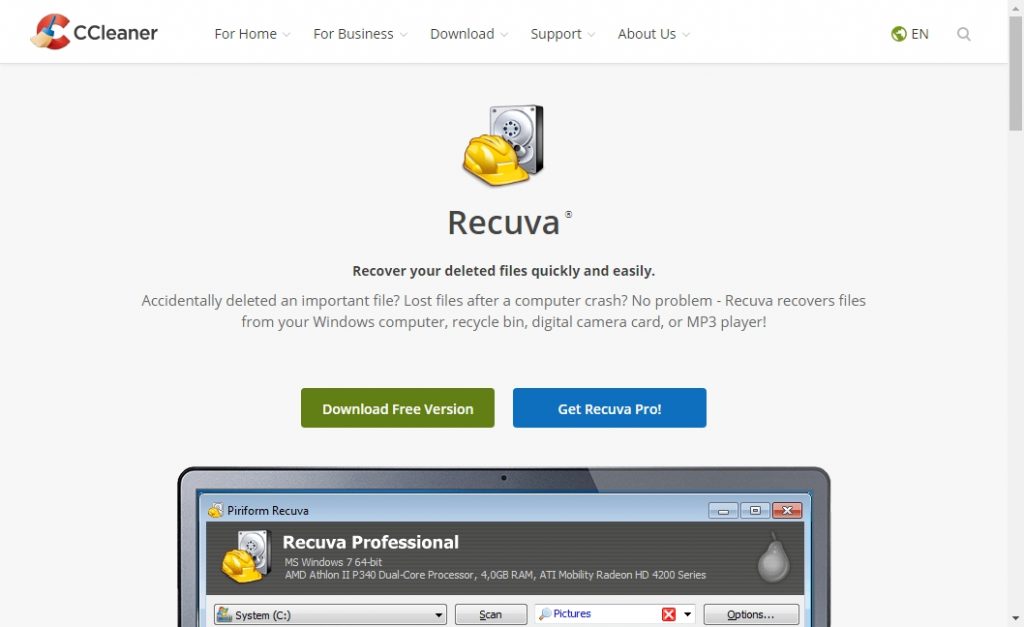
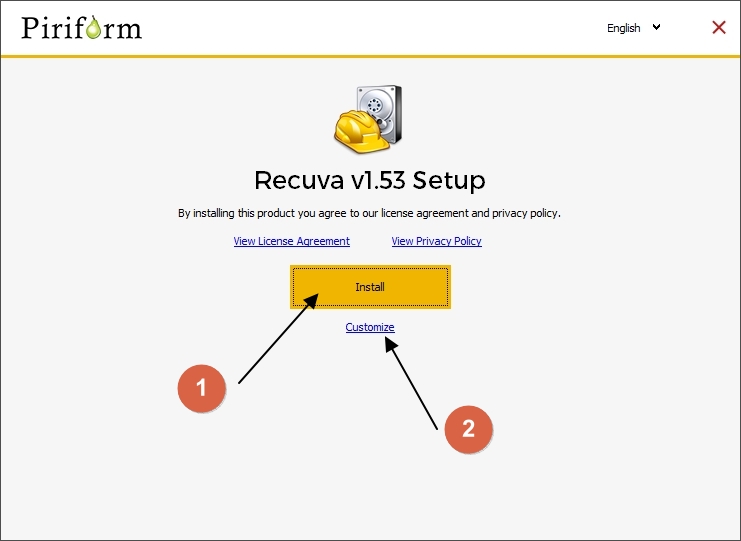
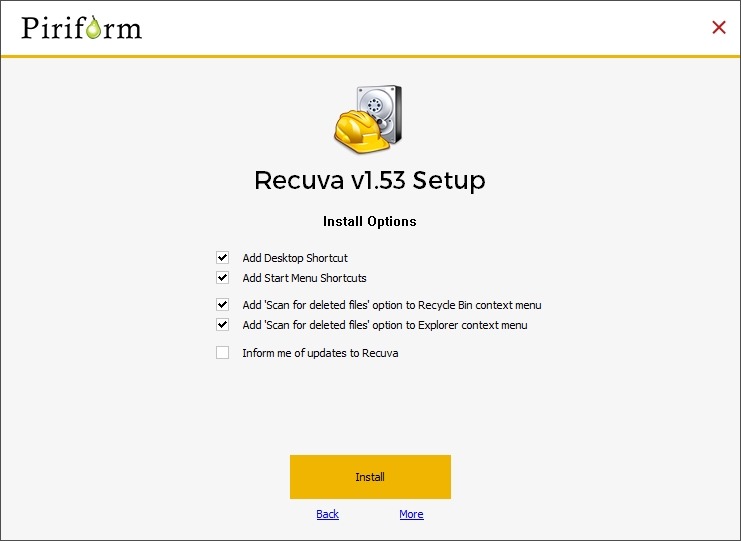
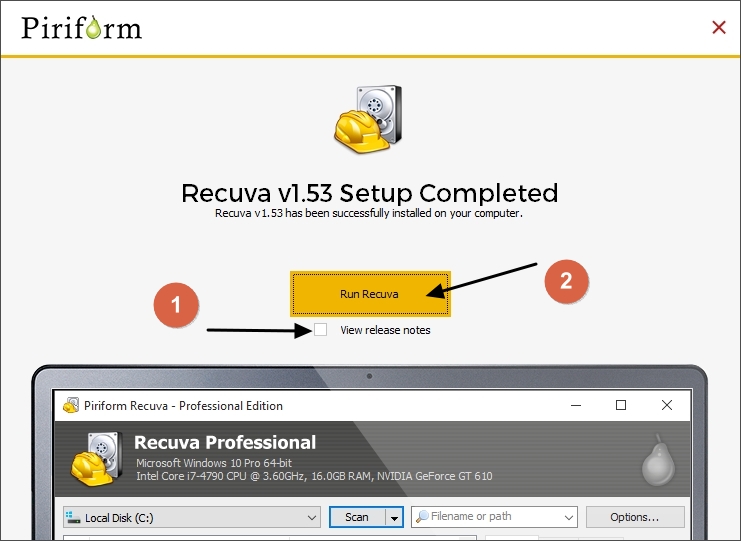
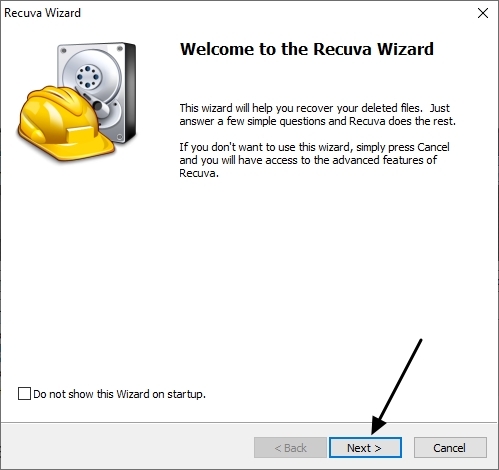
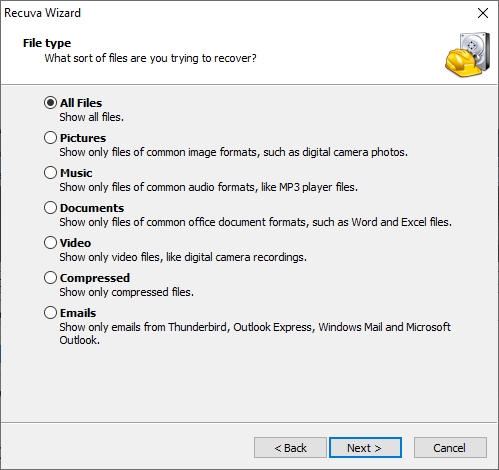
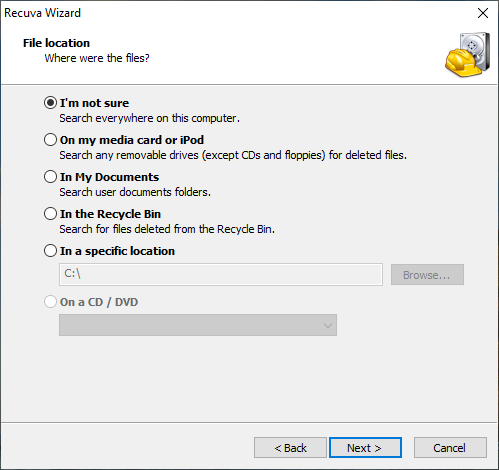
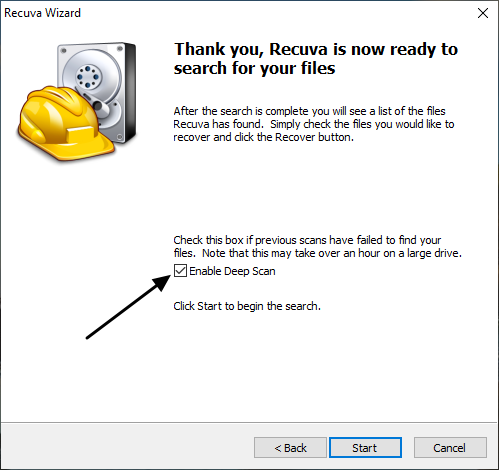
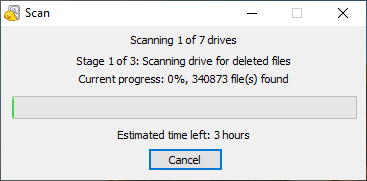
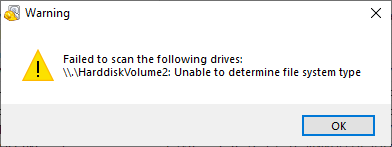
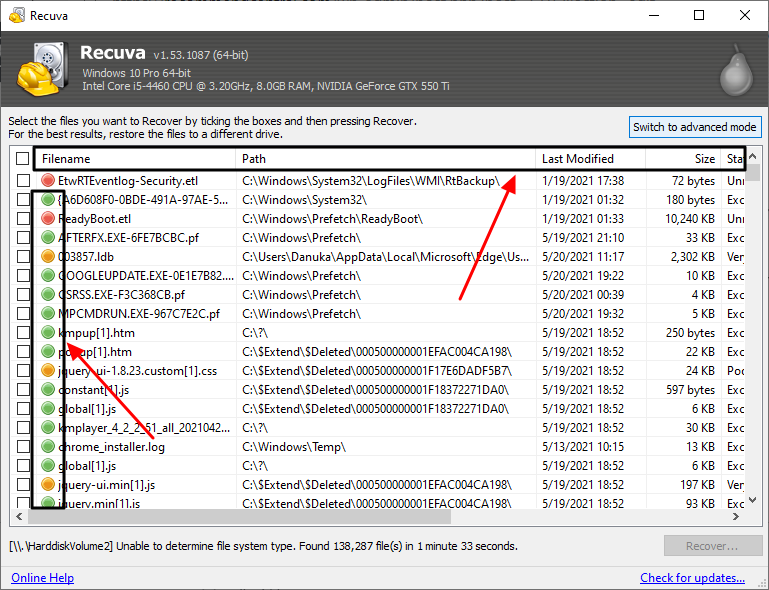
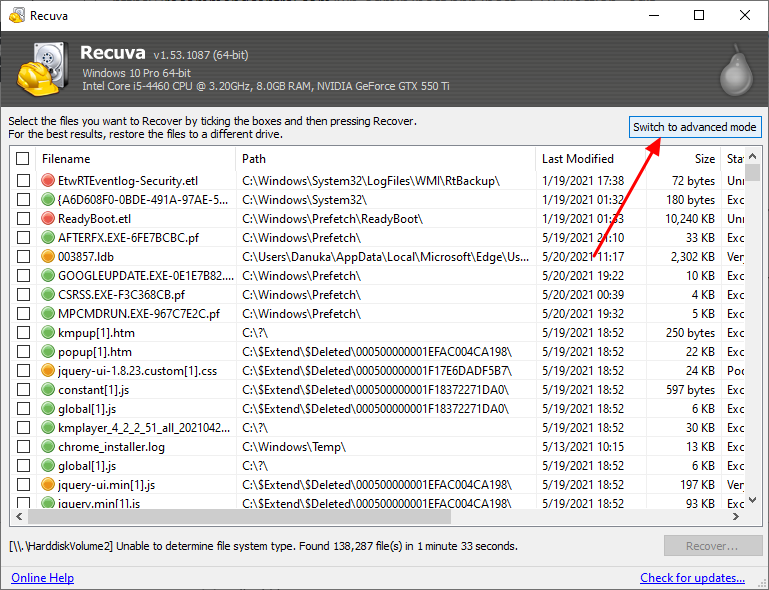
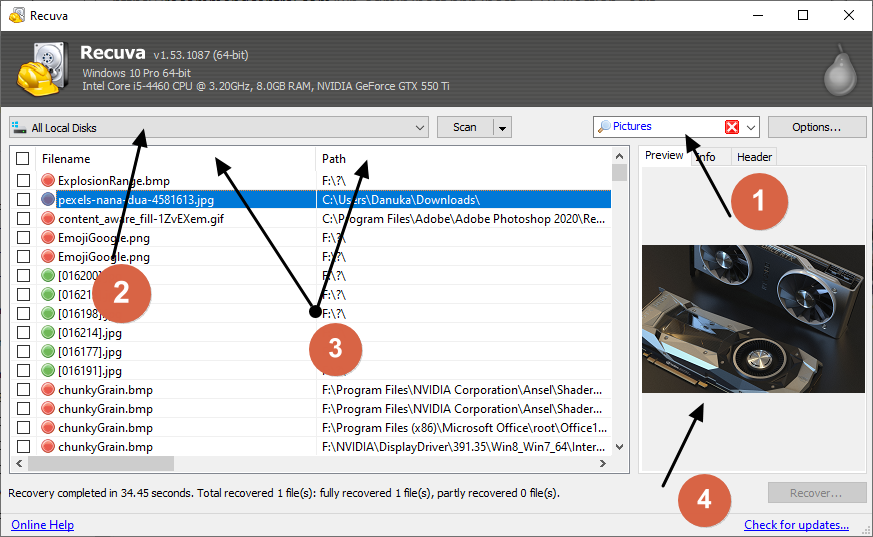
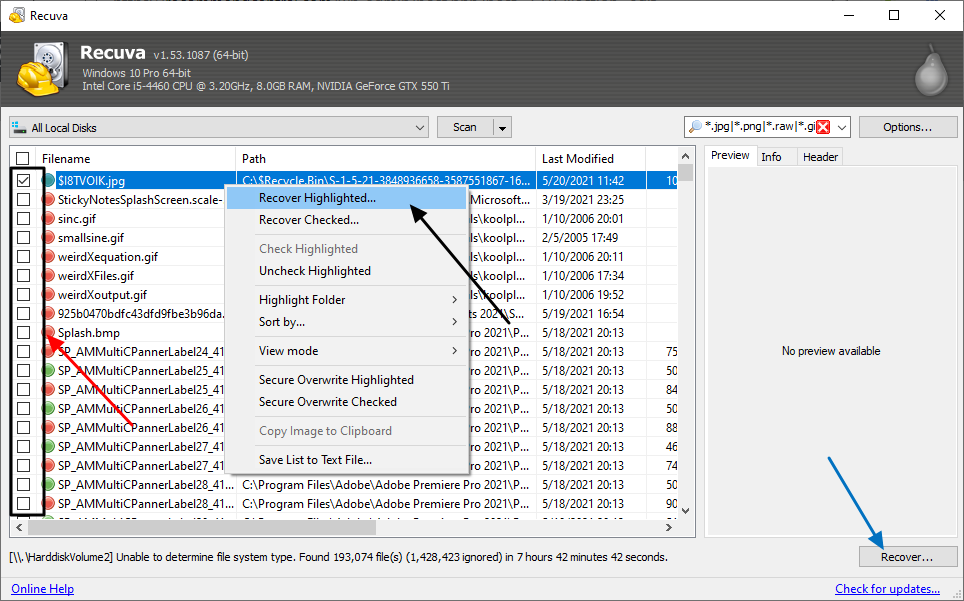
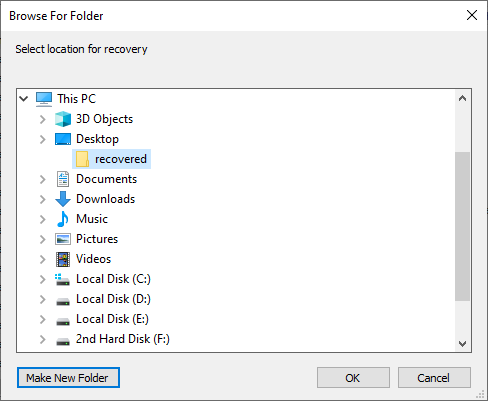
Deleting files by mistake or by some other unintentional ways is something that usually happens to all of us. I, myself, have also dealt with the same unpleasant experience whenever I use computers. Recovering files is not the same as deleting them; and, the thing is, some files may never be recovered at all. Accidentally deleted files cause headache especially if those files are of high importance, need to be submitted urgently, or works that we have spent most of our days and nights. Whatever reason it is, the more that we need not to fail to recover them. Don’t lose hope cause the chance of retrieving a newly deleted file is very high! This article will help you. To recover deleted files in Windows 10 Here, I used a free software. You can go along with me and follow every step given below to recover deleted files in your windows 10 PC. Recover Deleted Files In Windows 10 Using Recuva (Free Version) https://recommendcentral.com/wp-content/uploads/2021/05/Recuva-Restore-Deleted-Files-1024x627.jpg? Recuva is a free software and there is also a pro version of it. But, its free version has everything you need. What you loose when use it for free are Virtual hard drive support, Automatic updates and Premium support. The decision is yours if ever you want to purchase it to get all the features of Recuva Pro. Install Recuva & Open it https://recommendcentral.com/wp-content/uploads/2021/05/Recuva-setup.jpg? To recover deleted files from your Windows 10 PC, first you need to install Recuva. You can install Recuva in two different ways. Quick install Custom install Custom Install You can go with the custom install if you want to stop creating desktop shortcuts, start menu entries etc.. After selecting the options click on “Install“. https://recommendcentral.com/wp-content/uploads/2021/05/Recuva-setup-custom-install-options.jpg? Once installed, uncheck the box “View Release notes” and then click on “Run Recuva“. https://recommendcentral.com/wp-content/uploads/2021/05/recuva-setup-completed.jpg? In the first initiation, Recuva wizard will be opened. Using the wizard, you can choose which file types you want to recover and where to scan. Do not close it and continue with the wizard by clicking the “Next” button. https://recommendcentral.com/wp-content/uploads/2021/05/recuva-wizard.jpg? Choose the file type to search If you want to recover a specific file from your Windows 10 PC, you can select it here. Selecting a file type can reduce the scan time a lot. But, if you want to recover multiple files such as photos, videos, etc., select the “all files” option and click on Next button to go to the next step. https://recommendcentral.com/wp-content/uploads/2021/05/recuva-wizard-choose-file-type-to-recover.jpg? Select file location You can select the location where the file was deleted; you can also save a lot of time if you remember the exact disk or path where the file was. However, you can select the “I am not sure” option so Recuva will scan everywhere in your hard drive to recover the selected file/s in the previous step. Once choose, click on Next button. https://recommendcentral.com/wp-content/uploads/2021/05/Recuva-choose-the-file-location.png? Deep scan Make sure to enable this to get better results. Deep scan will scan every file that has been deleted from your computer. Take note that this will take much longer time than a normal scanning process; hence, the need to prepare yourself to keep your computer turned on until the scan is finish is very vital in this. Since deep scan take longer time (maybe more than an hour), you can go first with the normal scan, and if you did find nothing, you can perform a deep scan. https://recommendcentral.com/wp-content/uploads/2021/05/Recuva-enable-deep-scan.png? Wait until the scan finish If you did the above-mentioned steps correctly, then the scan should perform well and now you only have to wait until it gets completed. As mentioned earlier, keep the computer turned on. Depending on the scan method and options you choose, it will take approximately 1 minute-3 hours to complete the scan. Recuva doesn’t use much computer resources so you can do other works on your computer without encountering any problem. https://recommendcentral.com/wp-content/uploads/2021/05/Recuva-scan-progress-estimated-time.png? After completing the scan Once the scan is completed, search result windows will appear. In case you get any error like below, do not panic. I will be sharing why the error occur in the next section . Until then, just ignore the error for now and let’s focus on the scan results you get. https://recommendcentral.com/wp-content/uploads/2021/05/Recuva-failed-to-scan-the-following-drive.png? Understand Recuva Scan Results https://recommendcentral.com/wp-content/uploads/2021/05/Recuva-Scan-results-1.png? Based on the scan results, you can see that the files with some weird file names are labeled with different colors (status). Let us first identify what each of these colors mean. Green Color : Excellent condition – Recoverable Orange Color : Poor/Very poor condition – Recoverable Red Color : Unrecoverable (you can recover the file but it may not in usable condition) These status are not 100% accurate. But, we can get an idea based on these colors whether a file has the chance to be recovered or none at all. In short, these colors indicate how many times the file has been overwritten by another file. Take a look at the data given below: Green color – No overwrites Orange color – Some overwrites Red color – Too much overwrites Therefore, the higher the overwrites, the less chance it is usable.In addition, you can see more details about the file as: Path : Where was the file when it got deleted Last modified : The date that the file was lastly modified (very useful when finding files) Size : Size of the file (useful to find large files [Zip, Video]) State : Recoverable state of a file Comment : Whether the file is overwritten or not The reason to explain this is that you can sort-out the scan result using these (You just need to click on one of these tabs). It will be very easy for you to recover your deleted files. Let’s get started and recover deleted files in your Windows 10 PC! Recover deleted files in Windows 10 from the scan results You can recover files while you’re on the basic mode, but let’s switch to advanced mode so you can recover specific file types using the search box. https://recommendcentral.com/wp-content/uploads/2021/05/Recuva-Switch-to-advanced-mode.png? How to Sort-Out Search Results to Get Files Quickly Once you are in the advanced mode, you can easily find the file/s you want by sorting the results. Here is how: https://recommendcentral.com/wp-content/uploads/2021/05/Recuva-scan-results-sort-files.png? 01 – A search box will be available on the top-right of the window and from there, you can search your files through their names. However, I recommend you to select the file type of the file that you want to recover from the dropdown list you want to recover it from because the file name might have been changed after the deletion. 02 – If you remember the location of the file before it was deleted, then you can use this drop down list and select the disk. It will narrow down the search results so you can easily find it. 03 – You can use these columns to further sort-out the scan results (by file size, by its status). 04 – You can see a preview of some files(Images) once you click on the file. How to Restore a File From the Search Results https://recommendcentral.com/wp-content/uploads/2021/05/Recuva-recover-highlighted.png? You can select a single file or multiple files to restore. To select multiple files, check the small box on the left portion of the file name (pointed using a red arrow). Once you selected all the files, right click and select “recover checked”. Or click on the “Recover” button on the bottom right corner (pointed using a blue arrow) To restore a single file, just simply select the file, right click, then select “recover highlighted”. Or click on the “Recover” button on the bottom right corner (pointed using a blue arrow). https://recommendcentral.com/wp-content/uploads/2021/05/Recuva-browse-for-folder-to-recover-file.png? Afterwards, a windows will open and will ask where to store the recovered files. In this case, avoid restoring files to the same disk. Then click on the “OK” button. |
| Computers › Re: Post Your Computer (PC) Troubles Here. by Yinksdavid(m): 7:15pm On Sep 18, 2021 |
vivypretty:I have sent you an email notification on here. Kindly respond so i can send the material to help you resolve the issue(100% Confirmed) |
| Computers › Re: Post Your Computer (PC) Troubles Here. by Yinksdavid(m): 7:10pm On Sep 18, 2021 |
vivypretty:You are not asked to google or download. I understand you are unable to even loggin but you can reinstall, repair or restore your system to an earlier date even without logging in. Have you even seen or read the article i asked you to search for? The steps are quite much hence the reason i gave you an alternative to check for the article. If you can't get it then send me an email and can share a material you can use. If you also need to be guided, then let me know. |
| Computers › Re: Post Your Computer (PC) Troubles Here. by Yinksdavid(m): 5:05pm On Sep 18, 2021 |
Jerry59:sent an email so you can respond and will share the troubleshooting steps you can take via email. |
| Computers › Re: How To Speed Up Windows 10 by Yinksdavid(op): 3:28pm On Sep 18, 2021*. Modified: 3:56pm On Sep 18, 2021 |
Does Windows 10 feel a bit sluggish for you? Read on for tips and tricks to speed up the OS Generally, technology is known to slow over time, and this isn’t isolated to Windows devices, but macOS and Linux-powered systems too. While it’s really frustrating to see your machine slow down with time, taking longer to start-up, for example, it’s by no means the end of the road. Rather than binning your machine and purchasing a new one, there are a number of techniques we can deploy in Windows 10 systems to wind things back up. Think of it as a little spring cleaning. Bloatware, for instance, is one of the most common causes of slowdown, preventing your machine from running at peak performance. These programmes aren’t necessarily malicious, rather they’re not necessary to the functionality of your device. They might be systems you once used but no longer have any need for, or add aesthetic alterations to the user interface that you can well do without. Generally, removing bloatware will serve to speed up your device without affecting how it operates on a day-to-day basis. Make logging into Windows 10 quicker We cannot stress the importance of security and, most of the time, a strong password or two-factor authentication are an absolute must. However, when your old laptop is already taking forever to start up, logging in can make the process even lengthier. Although we wouldn’t normally advise it, you might want to consider skipping this process by disabling password authentication on your Windows 10 device. Typing in a password might only take seconds, yet having to reboot your PC every time it falls asleep could cause your unsaved work to be lost, as well as take way more time off your schedule, potentially impacting your productivity. if you find yourself regularly working from public spaces such as cafés, pubs, or workspaces, you might want to reconsider this idea – especially if your laptop tends to tag along. Although you could try to ensure that you never lose sight of your device, an unlocked laptop is heaven-sent for thieves and other threat actors, and it’s always better to be safe than sorry. One way of interpreting this advice is to only apply it to stationary devices which never leave your home, such as a desktop PC. However, when it comes to tablets and laptops, you might want to skip this one. Make shutting down Windows 10 faster If you like to shut down your computer after a hard day's work, then you will realise that the process still requires three clicks. To speed this up you can use a shortcut. Simply right click anywhere on a free part of the desktop then click New > Shortcut. In the Location field, type in the following. %windir%\System32\shutdown.exe /s /t 0 Click on the Next to finish. Now each time you click on that shortcut, your PC will immediately shut down. Be careful though, as this will happen without a confirmation check. Disable startup programmes in Windows 10 Virtually every version of Windows allows you to disable startup items, and Windows 10 is no exception. Stopping some programmes from starting up will speed up the OS. To find this option, right-click the taskbar and choose Task Manager. Tap 'more details' and then click on the Startup tab. Here you can disable the programmes you don't want to start up. Remove bloatware in Windows 10 No one likes bloatware (except PC manufacturers) but it does mean your system is slightly cheaper as a result. But you can ditch this crapware. These are programmes such as disc burning software, backup tools from the manufacturer, or other utilities that you don't necessarily need. Why programmes such as PC Decrapifier and CCleaner do a sterling job of getting rid of bloatware, if you have a brand new (but bloatware laden) computer, then a clean install of Windows 10 could be the best way of clearing out unnecessary software clogging up your system. Disabling services on Windows 10 As with all versions of Windows, working in the background are services. While some of them are vital to smooth running, quite a few aren't for day-to-day use. If you disable these services, you can speed up Windows 10. To turn off services in windows, type: "services.msc" into the search field. Then double-click on the services you want to stop or disable. Many services can be turned off, but which ones depend on what you use Windows 10 for and whether you work in an office or from home. A great guide to the services that can be switch off can be found here. Remember, though, stopping or disabling services can have unforeseen consequences. Many components or applications may stop working properly, so proceed with caution. Make the Windows 10 Start menu and other windows zippier To do this, open up Systems Properties (type in the search field sysdm.cpl and press Enter), then click on the Advanced tabs and settings in the Performance options. By default, the Animate windows when minimising and maximising box will be ticked. Click to deactivate and then click Apply. Not only should this add some speed to the Start menu opening, but also other windows that appear on your desktop. You can also disable all the visual effects throughout Windows 10 to speed up everything. Just click on the tick boxes to turn them off individually or choose the "Adjust for best performance" option to optimise the performance for your machine. Turn on Windows 10 fast-startup With Windows 10 there is a new "hybrid" startup mode that should cut down on bootup times. It does this by putting the PC into hibernation instead of fully shutting down. To enable this, click on the Start button and type in "Control Panel" and press enter. In the control panel click on Hardware and Sound. A new page should appear, here click on Change what the power buttons do. Then click on Change settings that are currently unavailable. Finally, tick the box marked Turn on fast startup. Clean up your Windows 10 disk Thankfully, Windows 10 has a built-in Disk Cleanup tool which is extremely useful when you want to get rid of unnecessary files. To launch the tool, click on the Start button and then select the File Explorer link. Right-click Local Disk C: and choose Properties. Navigate to the General tab and then find the Disk Cleanup button. Once there, click "unnecessary files (temporary internet files, etc.)" then hit OK. For advanced users, you can select the "Clean up system files" button to get rid of even more files. Migrate Windows 10 to an SSD The most effective, but most disruptive way to improve the speed of Windows 10 is to move the operating system or your entire hard drive onto a brand-new SSD. SSDs are much larger and more sophisticated versions of a standard USB stick. Unlike hard drives which use a moving arm to read and write onto a physical disk, SSDs don't contain any moving parts, and as a result, can process data far faster than their older counterparts. It's common for PC users to have both an SSD and hard drive running side by side, with the operating system running on the much faster hardware. However, with falling prices and larger capacities entering the market, it's now relatively cost-effective to migrate the entirety of your data, including software, onto an SSD. Importantly, Windows 10, or any operating system for that matter, performs wonderfully on an SSD, drastically reducing load times and boot times to mere seconds. If you're buying a new laptop or PC, you'll want to cast an eye over the spec sheets to make sure they have an SSD installed. Windows 10 can be migrated over to an SSD on an existing system, although the process is a little fiddly. |